KO
|
EN
gitlite — search
Search
#typescript
#ai-agents
#ai
#dsh-plugin
#deepseek-harness
#open-source
#cli
#claude-code
#codex
#developer-tools
#react
#windows
MAST
★ 46
Open GitHub ↗
ManifoldAlignmentStyleTransfer
Download README (.md)
Explore Similar Repositories
Dipper
:
Dipper is a simple Polygon Paraswap stables arbitrage bot.
A1200_keyb_MPU
:
Amiga 1200 keyboard MPU drop-in replacement pcb
qndxx
:
青年大学习截图生成
Passky-Android
:
Android application for Passky (password manager)
metamask-react-auth
:
React Component for MetaMask Authentication
// repository documentation
Was this content helpful?
★ 0
(0 ratings)
Select Rating:
★
★
★
★
★
Submit Feedback
Recent Feedback
×
Download README
Do you want to download the
README.md
file for
MAST
?
Download (.md)
## Manifold Alignment for Semantically Aligned Style Transfer **[[Paper]](https://arxiv.org/pdf/2005.10777.pdf)** 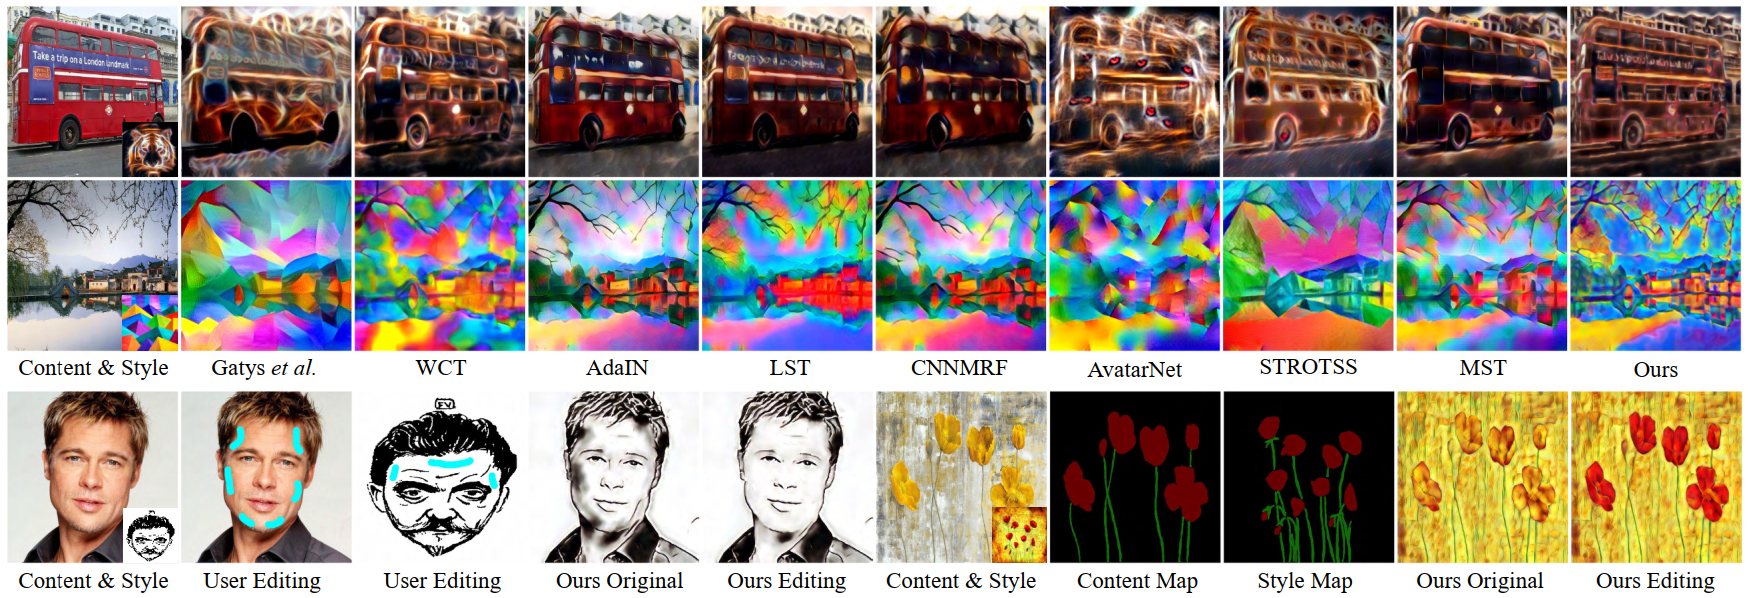 <span id="gui_demo">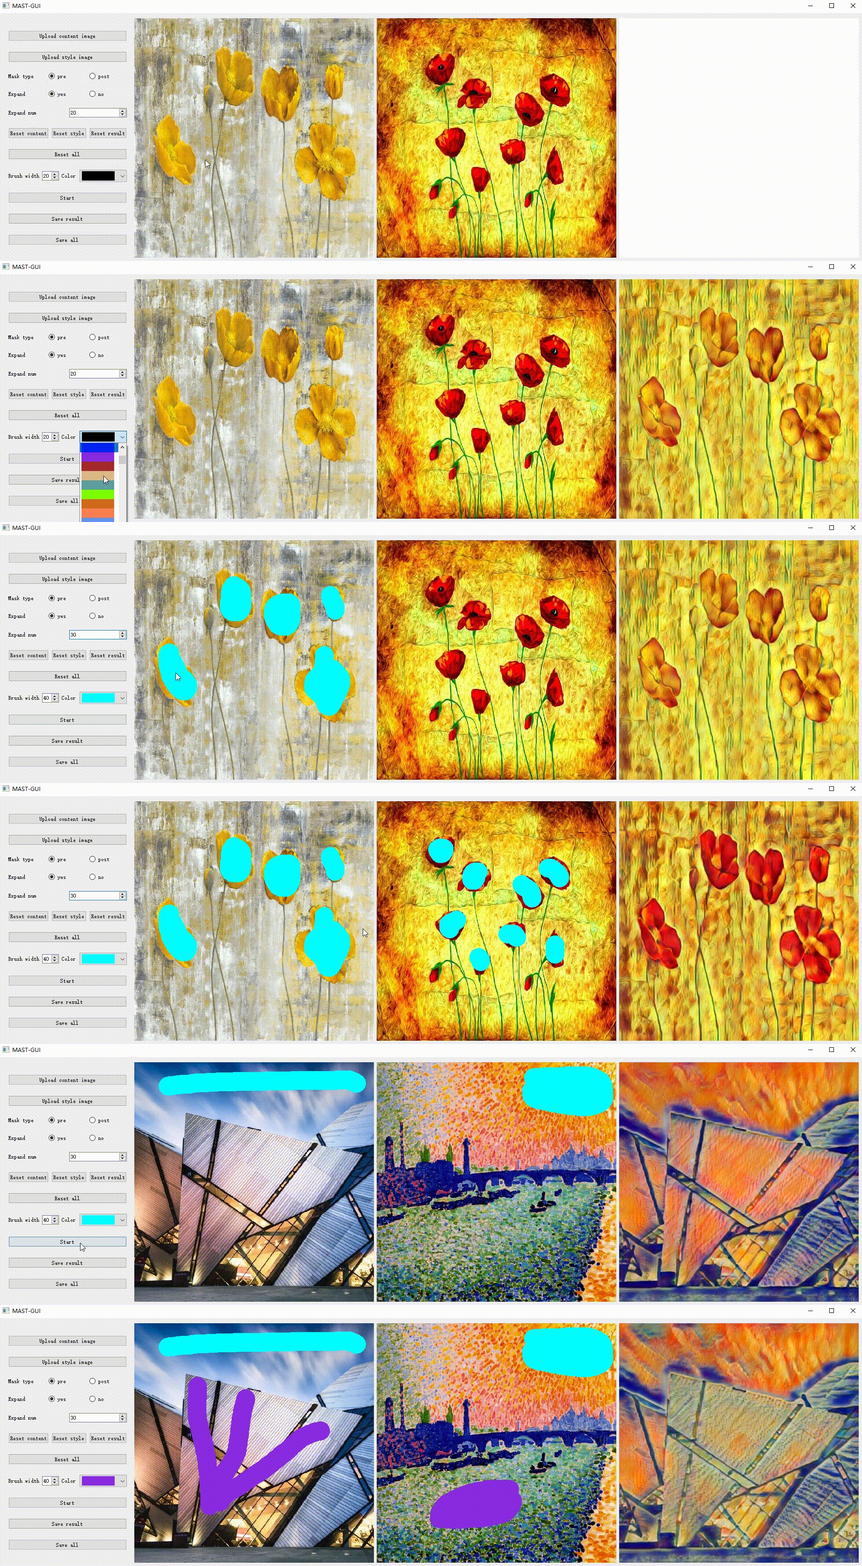</span> ## Getting Started MAST has been tested on CentOS 7.6 with python >= 3.6. It supports both GPU and CPU inference. If you don't have a suitable device, try running our [Colab demo](https://colab.research.google.com/drive/1JVGtVCk9D7c7fZv_CTmu-8dNz_x0d7NO?usp=sharing). Clone the repo: ``` git clone https://github.com/NJUHuoJing/MAST.git ``` Prepare the checkpoints: download checkpoints in [checkpoints.zip](https://drive.google.com/file/d/16R7monpAEN_hFuQPvaB6sYuBJMyaJiK7/view?usp=sharing) and unzip it into the root path of the project. Install the requirements: ``` conda create -n mast-env python=3.6 conda activate mast-env pip install -r requirements.txt # If you want to use post smoothing as the same as PhotoWCT, then install the requirements below; # You can also just skip it to use fast post smoothing, remember to change cfg.TEST.PHOTOREALISTIC.FAST_SMOOTHING=true pip install -U setuptools pip install cupy pip install pynvrtc ``` ## Running the Demo ### Artistic style transfer First set `MAST_CORE.ORTHOGONAL_CONSTRAINT=false` in [`configs/config.yaml`](configs/config.yaml). Then use the script [`test_artistic.py`](test_artistic.py) to generate the artistic stylized image by following the command below: ``` # not use seg python test_artistic.py --cfg_path configs/config.yaml --content_path data/default/content/4.png --style_path data/default/style/4.png --output_dir results/test/default # use --content_seg_path and --style_seg_path to user edited style transfer python test_artistic.py --cfg_path configs/config.yaml --content_path data/default/content/4.png --style_path data/default/style/4.png --output_dir results/test/default --content_seg_path data/default/content_segmentation/4.png --style_seg_path data/default/style_segmentation/4.png --seg_type labelme --resize 512 ``` ### Photo-realistic style transfer First set `MAST_CORE.ORTHOGONAL_CONSTRAINT=true` in [`configs/config.yaml`](configs/config.yaml). Then use the script [`test_photorealistic.py`](test_photorealistic.py) to generate the photo-realistic stylized image by following the command below: ``` # not use seg python test_photorealistic.py --cfg_path configs/config.yaml --content_path data/photo_data/content/in1.png --style_path data/photo_data/style/tar1.png --output_dir results/test/photo --resize 512 # or use --content_seg_path and --style_seg_path to user edited style transfer python test_photorealistic.py --cfg_path configs/config.yaml --content_path data/photo_data/content/in1.png --style_path data/photo_data/style/tar1.png --output_dir results/test/photo --content_seg_path data/photo_data/content_segmentation/in1.png --style_seg_path data/photo_data/style_segmentation/tar1.png --seg_type dpst --resize 512 ``` ## GUI For Artistic style transfer and User Editing We provide a gui for user-controllable artistic image stylization. Just use the command below to run [`test_gui.py`](test_gui.py) ``` python test_gui.py --cfg_path configs/config.yaml ``` ### Features 1. You can use different colors to control the style transfer in different semantic areas. 2. The button `Expand` and `Expand num` respectively control whether to expand the selected semantic area and the degree of expansion. See the [gif demo](#gui_demo) for more details. ## Google Colab If you do not have a suitable environment to run this project then you could give Google Colab a try. It allows you to run the project in the cloud, free of charge. You may try our Colab demo using the notebook we have prepared: [Colab Demo](https://colab.research.google.com/drive/1JVGtVCk9D7c7fZv_CTmu-8dNz_x0d7NO?usp=sharing) ## Citation ``` @inproceedings{huo2021manifold, author = {Jing Huo and Shiyin Jin and Wenbin Li and Jing Wu and Yu-Kun Lai and Yinghuan Shi and Yang Gao}, title = {Manifold Alignment for Semantically Aligned Style Transfer}, booktitle = {IEEE International Conference on Computer Vision}, pages = {14861-14869}, year = {2021} } ``` ## References - The post smoothing module is borrowed from [PhotoWCT](https://github.com/NVIDIA/FastPhotoStyle)
