KO
|
EN
gitlite — search
Search
#javascript
#python
#hacktoberfest
#react
#ai
#typescript
#llm
#go
#golang
#android
#machine-learning
#rust
#deep-learning
#linux
treetop-discovery
★ 13
Open GitHub ↗
No description available.
Download README (.md)
Explore Similar Repositories
measurement-units
:
Set of DTOs to deal with various physical units and conversions.
cuddly-palm-tree
:
No description available.
bottle_watter
:
Water Bottle Progress Tracker is a simple Go app to help you track your daily water intake
reimagined-happiness
:
No description available.
agent-api-examples
:
Examples for using agent-api paradigms and providers
// repository documentation
Was this content helpful?
★ 0
(0 ratings)
Select Rating:
★
★
★
★
★
Submit Feedback
Recent Feedback
×
Download README
Do you want to download the
README.md
file for
treetop-discovery
?
Download (.md)
# Treetop Discovery Treetop Discovery is an AWS CDK-based data discovery platform that builds searchable knowledge bases from IIIF (International Image Interoperability Framework) manifests and EAD (Encoded Archival Description) files using Amazon Bedrock. ## Quick Start for Simple Deployment ### AWS Requirements - **AWS Account**: Administrator permissions recommended - **AWS Regions**: Deploy in a region where Amazon Bedrock is available (e.g., us-east-1, us-west-2) - **Bedrock Model Access**: Enable access to embedding and foundation models in the Bedrock console ### Prerequisites Install these tools on your local machine: - `uv` ([installation instructions](https://github.com/astral-sh/uv)) - `aws` cli ([installation instructions](https://docs.aws.amazon.com/cli/latest/userguide/getting-started-install.html)) - AWS CDK cli ([installation instructions](https://docs.aws.amazon.com/cdk/v2/guide/getting_started.html)) - AWS CLI configured with your credentials (`aws configure`) > [!NOTE] > If you don't have `uv` installed, see [alternate Python setup](#alternative-python-setup-without-uv) below. ### Step 1: Install Dependencies ```bash # Clone the repository and navigate to it git clone https://github.com/nulib/treetop-discovery.git cd treetop-discovery # Activate virtual environment source .venv/bin/activate # Install Python dependencies uv sync --all-groups ``` > [!IMPORTANT] > If CDK cannot locate Python dependencies, restart your shell and re-activate the virtual environment. ### Step 2: Configuration > [!IMPORTANT] > **Choose Your Data Source Type First**: Treetop Discovery supports two data source types - **IIIF** or **EAD**. You must choose one during initial deployment. Additional data sources can be added later. Create your configuration file: ```bash cp config.toml.example config.toml ``` **For IIIF Data Sources** (digital collections with IIIF manifests): ```toml stack_prefix = "my-treetop" # Choose your stack name prefix # Recommended: Cross-region inference profiles (replace 123456789012 with your account ID) embedding_model_arn = "arn:aws:bedrock:us-east-1::foundation-model/cohere.embed-multilingual-v3" foundation_model_arn = "arn:aws:bedrock:us-east-1:123456789012:inference-profile/us.anthropic.claude-3-5-sonnet-20241022-v2:0" [data] type = "iiif" collection_url = "https://your-iiif-collection-api-url" [tags] project = "my-project" # ECR configuration (optional - defaults shown below) # Uncomment and modify only if you need to override defaults # [ecr] # registry = "public.ecr.aws" # Default # repository = "nulib-staging/treetop-iiif-fetcher" # Default # tag = "latest" # Default ``` **For EAD Data Sources** (archival XML files in S3): ```toml stack_prefix = "my-treetop" # Choose your stack name prefix # Recommended: Cross-region inference profiles (replace 123456789012 with your account ID) embedding_model_arn = "arn:aws:bedrock:us-east-1::foundation-model/cohere.embed-multilingual-v3" foundation_model_arn = "arn:aws:bedrock:us-east-1:123456789012:inference-profile/us.anthropic.claude-3-5-sonnet-20241022-v2:0" [data] type = "ead" [data.s3] bucket = "your-s3-bucket-name" prefix = "path/to/ead/files/" [tags] project = "my-project" # Note: ECR section not required for EAD workflows ``` #### Database Configuration (Optional) You can customize the database name and credentials for enhanced security: ```toml # Database configuration (optional) [database] name = "treetop" # Default: "treetop" - Database name [database.credentials] username = "myapp_db_user" # Default: "postgres" - Database username # password_exclude_chars defaults to '"\'@/\' - characters excluded from auto-generated passwords ``` **Database Configuration Options:** - **Database Name**: Defaults to "treetop" - **Username**: Defaults to "postgres", can be customized for security - **Password**: Auto-generated and stored securely in AWS Secrets Manager **Database Name Requirements:** - Must start with a letter - Can only contain letters and numbers (no hyphens, underscores, spaces, or special characters) - 1-63 characters long - Examples: ✅ `treetop`, `myproject`, `treetopabc` | ❌ `tree-top`, `tree_top`, `my project` **Database Username Requirements:** - Must start with a letter - Can only contain letters, numbers, and underscores (no hyphens, spaces, or special characters) - 1-16 characters long - Examples: ✅ `myapp_user`, `treetop_bedrock_user` | ❌ `my-app-user`, `user@domain` **Security Benefits:** - Uses descriptive database name "treetop" instead of generic "postgres" - Uses service-specific usernames instead of generic "postgres" - AWS automatically generates secure passwords with configurable character exclusions - Passwords are stored in AWS Secrets Manager and never exposed in configuration **Required Configuration Changes:** - `stack_prefix`: Choose a unique name for your deployment (e.g., "my-treetop") - **Account ID**: Replace `123456789012` in the `foundation_model_arn` (inference profile) with your AWS account ID - `collection_url` (IIIF only): Your institution's IIIF collection API endpoint - `bucket` & `prefix` (EAD only): S3 location where your EAD XML files are stored **Get Your AWS Account ID:** ```bash aws sts get-caller-identity --query Account --output text ``` **CDK Context Files:** - `cdk.context.json`: Auto-generated by CDK containing AWS account-specific context (VPC info, availability zones, etc.) - This file is excluded from git to prevent account-specific data from being committed - CDK will automatically create and populate this file when you run `cdk synth` or `cdk deploy` - You should not manually create or edit this file - let CDK manage it automatically **Data Source Requirements:** - **IIIF**: Your collection must expose a IIIF Collection API endpoint that lists manifest URLs - **EAD**: Your EAD XML files must be uploaded to S3 before deployment #### EAD File Preparation If you chose EAD as your data source, you need to prepare your files before deployment: 1. **Create S3 Bucket** (if you don't have one): ```bash # Note: S3 bucket names must be lowercase and globally unique aws s3 mb s3://your-ead-bucket-name ``` 2. **Upload EAD XML Files**: ```bash # Upload individual files aws s3 cp your-file.xml s3://your-ead-bucket-name/ead-files/ # Upload entire directory aws s3 sync ./local-ead-directory/ s3://your-ead-bucket-name/ead-files/ ``` 3. **Update Configuration**: Ensure your `config.toml` reflects the S3 location: ```toml [data.s3] bucket = "your-ead-bucket-name" # Must be lowercase prefix = "ead-files/" ``` > [!IMPORTANT] > **S3 Bucket Naming**: Bucket names must be lowercase, contain no underscores, and be globally unique across all AWS accounts. #### Finding Model ARNs **Enable Model Access:** Follow the [AWS documentation to enable model access](https://docs.aws.amazon.com/bedrock/latest/userguide/model-access-modify.html). You'll need to enable access to: - **Embedding models**: Amazon Titan Embed Text, Cohere Embed, or other embedding models - **Foundation models**: Anthropic Claude, Amazon Titan Text, or other foundation models **Get Model ARNs:** After enabling access, you can find ARNs using: ```bash # List available embedding models aws bedrock list-foundation-models --by-output-modality EMBEDDING # List available text generation models aws bedrock list-foundation-models --by-output-modality TEXT # List available inference profiles (recommended for better performance) aws bedrock list-inference-profiles ``` **ARN Format Requirements:** **For `embedding_model_arn`** - Use direct foundation model ARNs: - Format: `arn:aws:bedrock:REGION::foundation-model/MODEL_ID` - Example: `arn:aws:bedrock:us-east-1::foundation-model/cohere.embed-multilingual-v3` **For `foundation_model_arn`** - Use inference profile ARNs: - Format: `arn:aws:bedrock:REGION:ACCOUNT_ID:inference-profile/PROFILE_ID` - Example: `arn:aws:bedrock:us-east-1:123456789012:inference-profile/us.anthropic.claude-3-5-sonnet-20241022-v2:0` - **Benefits**: Inference profiles automatically route requests across regions for higher throughput and better availability **Common Model ARNs by Region:** **For `embedding_model_arn`** (direct foundation model ARNs): - **US East 1**: `arn:aws:bedrock:us-east-1::foundation-model/cohere.embed-multilingual-v3` - **US East 1** (Alternative): `arn:aws:bedrock:us-east-1::foundation-model/amazon.titan-embed-text-v2:0` - **US West 2**: `arn:aws:bedrock:us-west-2::foundation-model/cohere.embed-multilingual-v3` - **US West 2** (Alternative): `arn:aws:bedrock:us-west-2::foundation-model/amazon.titan-embed-text-v1` **For `foundation_model_arn`** (inference profile ARNs - replace 123456789012 with your AWS account ID): - **US Regions**: `arn:aws:bedrock:us-east-1:123456789012:inference-profile/us.anthropic.claude-3-5-sonnet-20241022-v2:0` - **US Regions** (Alternative): `arn:aws:bedrock:us-east-1:123456789012:inference-profile/us.anthropic.claude-3-7-sonnet-20250219-v1:0` > [!TIP] > **Use Inference Profiles for Production**: Inference profiles provide [cross-region inference](https://docs.aws.amazon.com/bedrock/latest/userguide/cross-region-inference.html) for better performance and availability. They automatically route requests to optimal regions within your geography. ### Step 3: Deploy ```bash # Make sure virtual environment is activated source .venv/bin/activate # Bootstrap CDK (required for first-time deployment in region) cdk bootstrap # Synthesize the CDK application to generate CloudFormation templates cdk synth # List available stacks to confirm name cdk ls # Output will show: my-treetop-Treetop # Deploy the stack (add `--require-approval never` to skip manual approval) cdk deploy ``` > [!NOTE] > **First-time Setup**: The `cdk bootstrap` command is required only once per AWS account/region combination. It creates necessary S3 buckets and IAM roles for CDK deployments. ### Step 4: Monitor Deployment CDK will deploy approximately 15-20 AWS resources including databases, compute services, storage, and AI/ML components. The deployment typically takes 10-15 minutes. > [!WARNING] > **Post-Deployment Data Loading**: After CDK deployment completes, the application will show CORS errors and be unusable until the initial data ingestion finishes. This process can take **several hours** depending on your collection size. Monitor progress using the steps below. **Required AWS Permissions:** This deployment requires Administrator permissions or a custom policy with extensive permissions across S3, RDS, Lambda, Step Functions, Bedrock, Cognito, API Gateway, Amplify, ECS, and IAM. **AWS Credentials Setup:** - Ensure your AWS CLI is configured with valid credentials (`aws configure` or AWS SSO) - For AWS SSO users: Refresh credentials if you get "invalid security token" errors (if you need help, see [Northwestern University Development](#nu-development-environment)) - The deployment process can take 15-30 minutes, so ensure your session won't expire mid-deployment #### CloudFormation Stack Outputs After deployment completes check the bottom for relevant stack outputs (if you miss them, just go to: AWS Console → CloudFormation → Your Stack → Outputs tab): - `Website URL`: Your Amplify application URL - `ApiUrl`: Your API Gateway endpoint URL - `UserPoolId`: Cognito User Pool ID (needed for creating users) - `KnowledgeBaseId`: Bedrock Knowledge Base ID - `DatabaseName`: Database name (defaults to "treetop") > [!TIP] > Save the `UserPoolId` and `UserPoolIdWebsite URL` from outputs. You'll need the `UserPoolId` to create Cognito users in the next step. `Website URL` is your application URL which can be retrieved manually by following step 6 below. #### Monitoring Data Loading Progress **Initial data loading takes hours and the UI shows CORS errors until complete.** ##### Step-by-Step Monitoring **1. Check Step Function Execution:** - AWS Console → Step Functions → `<stack-prefix>-data-pipeline` - Look for "RUNNING" or "SUCCEEDED" status - If failed, click execution to see error details - Expected runtime: 1-4 hours depending on collection size **2. Monitor Bedrock Knowledge Base Sync:** - AWS Console → Amazon Bedrock → Knowledge bases - Select your knowledge base (named `<stack-prefix>-knowledge-base`) - Click "Data source" tab → View sync jobs - Wait for sync status to change from "Syncing" to "Ready" **3. Verify Data Processing:** - AWS Console → S3 → Your **Data Processing Bucket** (the one with random suffix - see [Finding Your S3 Buckets](#finding-your-s3-buckets)) - Check for processed files in `data/ead/` folder (EAD workflows) or `data/iiif/` folder (IIIF workflows) - Files should appear as Step Function progresses - Note: Your original EAD files remain in the Config/Source Bucket unchanged **4. Check for Errors:** - AWS Console → CloudWatch → Log groups - Look for logs from Lambda functions: - `/aws/lambda/<stack-prefix>-get-iiif-manifest` (IIIF only) - `/aws/lambda/<stack-prefix>-process-ead` (EAD only) ### Step 5: Create User Account Before accessing the UI, create Cognito users using the `UserPoolId` from your stack outputs: 1. **Via AWS Console**: - Go to Amazon Cognito → User Pools - Select your pool (named `<stack-prefix>-user-pool`) - Click "Create user" - Set username, temporary password, and email - User must change password on first login 2. **Via CLI** (using UserPoolId from stack outputs): ```bash aws cognito-idp admin-create-user \ --user-pool-id <UserPoolId-from-stack-outputs> \ --username john.doe \ --user-attributes Name=email,Value=john@example.com \ --temporary-password TempPass123! \ --message-action SUPPRESS ``` ### Step 6: Locate and Test Your Application Your application URL is available in the stack outputs as `Website URL`. If you need to find it manually: 1. **Via AWS Console**: Go to AWS Amplify → Apps → `<your-prefix>-ui-<suffix>` → View App 2. **Via CLI**: ```bash aws amplify list-apps --query 'apps[?contains(name,`my-treetop-ui`)].{Name:name,Domain:defaultDomain}' --output table ``` The URL format is: `https://main.<app-id>.amplifyapp.com` **Testing Access:** - Navigate to your application URL - Log in with the Cognito user credentials you created - The chat interface should be available once data loading completes ### Step 7: Load Additional Data After your initial deployment, you can load additional datasets by manually invoking the Step Function: **For Additional IIIF Collections:** 1. Go to AWS Console → Step Functions 2. Select your state machine: `<stack-prefix>-data-pipeline` 3. Click "Start execution" 4. Use this JSON input (replace bucket name with your **Data Processing Bucket** - see [Finding Your S3 Buckets](#finding-your-s3-buckets) below): ```json { "s3": { "Bucket": "your-s3-bucket-name", "Key": "manifests.csv" }, "workflowType": "iiif", "collection_url": "https://your-new-collection-api-url" } ``` **For Additional EAD Files:** 1. Upload your EAD XML files to your S3 bucket 2. Go to AWS Console → Step Functions 3. Select your state machine: `<stack-prefix>-data-pipeline` 4. Click "Start execution" 5. Use this JSON input (replace bucket name with your **Data Processing Bucket** - see [Finding Your S3 Buckets](#finding-your-s3-buckets) below): ```json { "s3": { "Bucket": "your-s3-bucket-name", "Prefix": "path/to/new/ead/files/" }, "workflowType": "ead" } ``` > [!NOTE] > To load EAD data after initially deploying with IIIF, you must grant S3 `GetObject` and `ListObjects` permissions to both the state machine and EAD processing Lambda function. #### Finding Your S3 Buckets Your deployment creates **two S3 buckets**: 1. **Config/Source Bucket**: Stores your original EAD XML files (named from your `config.toml` - e.g., `my-treetop-ead-bucket`) 2. **Data Processing Bucket**: Stores processed data and results (auto-generated name with random suffix - e.g., `my-treetop-12345678abcd`) **For Step Function workflows, you need the Data Processing Bucket name:** **Method 1 - CloudFormation Outputs:** 1. AWS Console → CloudFormation → Your stack → Outputs tab 2. Look for output with key containing "bucket" or "s3" **Method 2 - S3 Console:** 1. AWS Console → S3 → Buckets 2. Look for bucket name starting with `<stack-prefix>-` and ending with random characters 3. Example: `my-treetop-12345678abcd` (**this is your Data Processing Bucket**) 4. Your Config/Source Bucket will match your `config.toml` bucket name exactly **Method 3 - AWS CLI:** ```bash # List buckets containing your stack prefix aws s3 ls | grep my-treetop # You'll see both buckets: # my-treetop-ead-bucket <- Config/Source Bucket # my-treetop-12345678abcd <- Data Processing Bucket (use this for Step Functions) ``` #### Expected Timeline - **Step Function**: 1-4 hours (varies by collection size) - **Bedrock Sync**: Additional 30-60 minutes after Step Function completes - **UI Access**: Available once Bedrock sync shows "Ready" status #### Troubleshooting Data Loading - **Step Function fails**: Check CloudWatch logs for specific Lambda errors - **Bedrock sync stuck**: Verify S3 permissions and file formats - **UI still shows CORS errors**: Bedrock sync may still be in progress - **No data in S3**: Check your source data configuration (collection URL or S3 path) --- ## Advanced Topics ### Architecture 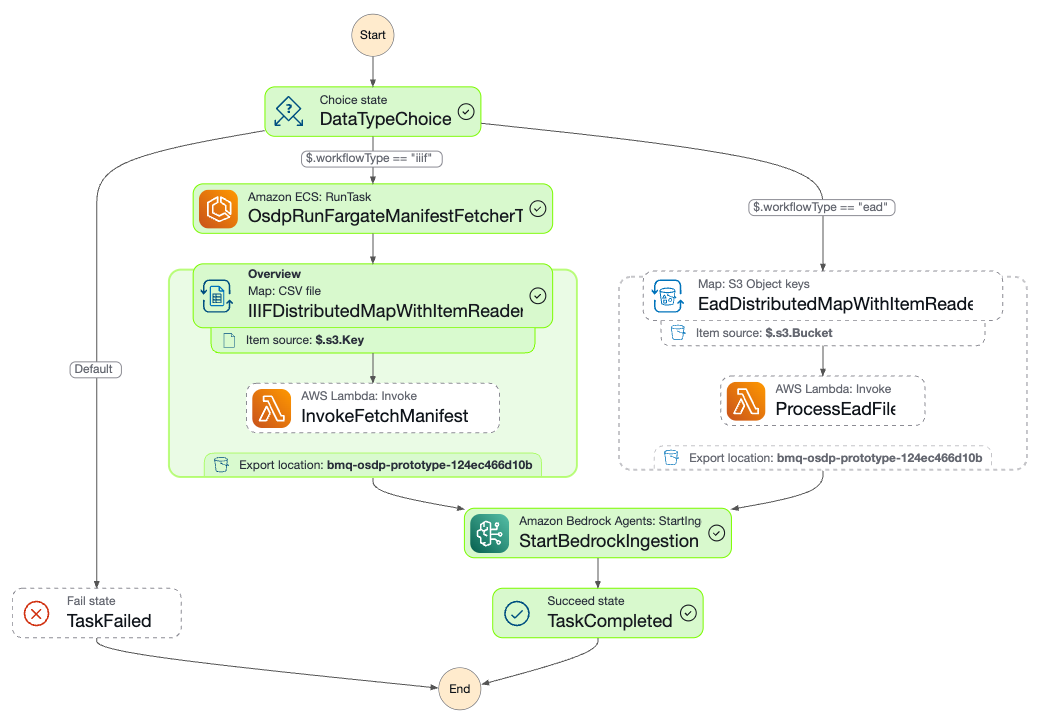 Treetop Discovery uses AWS CDK (Cloud Development Kit) to define and deploy cloud infrastructure as code. The CDK application creates the following AWS resources: **Core Infrastructure:** - S3 bucket for data storage - RDS Aurora PostgreSQL cluster for vector storage - VPC with subnets and security groups **Data Processing:** - Step Functions state machine for data ingestion - Lambda functions for IIIF/EAD processing - ECS tasks for IIIF manifest fetching (IIIF workflows only) **AI/ML Services:** - Amazon Bedrock Knowledge Base - IAM roles for Bedrock access **User Interface:** - Amazon Cognito User Pool for authentication - API Gateway with Lambda backend - AWS Amplify app for frontend hosting The core of the data processing is an AWS Step Function that orchestrates the ingestion workflow. The process begins by checking the `workflowType` to determine whether to process IIIF or EAD data. For IIIF data, it fetches manifest URLs from a collection API, processes each manifest using a Lambda function, and stores the results in S3. For EAD data, it processes XML files from a specified S3 location. Both workflows conclude by initiating a Bedrock ingestion job to make the data available for search and retrieval. ### Permissions This application creates several IAM roles and policies to ensure that the different AWS services have the necessary permissions to interact with each other securely. #### API - **Cognito User Pool**: Manages user authentication. - **Chat Lambda Function**: - Granted permissions to interact with Amazon Bedrock for invoking models (`bedrock:InvokeModel`), retrieving data (`bedrock:Retrieve`), and generating responses (`bedrock:RetrieveAndGenerate`). - The API Gateway uses a Cognito authorizer to protect the chat endpoint. #### Database - **RDS Cluster Security Group**: Allows inbound traffic on port 5432 from within the VPC, enabling services like Bedrock to connect to the database. - **Database Initialization**: A custom resource is granted permissions to execute SQL statements on the RDS cluster (`rds-data:ExecuteStatement`) and retrieve database credentials from AWS Secrets Manager (`secretsmanager:GetSecretValue`). #### Data Ingestion - **ECS Task Role**: The ECS task for fetching IIIF manifests is granted `s3:PutObject` permissions to write data to the S3 data bucket. - **Step Functions**: - The Step Function orchestrating the data pipeline has permissions to invoke Lambda functions (`fetch_iiif_manifest_function`, `process_ead_function`) and run the ECS task. - The Lambda functions for processing IIIF and EAD data are granted read and write access to the S3 data bucket. #### Knowledge Base - **Bedrock Knowledge Base Role**: A role is created for the Bedrock Knowledge Base with permissions to: - Read data from the S3 bucket. - Access the RDS database cluster for vector storage. - Invoke the embedding model in Bedrock. - Retrieve database credentials from AWS Secrets Manager. #### CI/CD Pipeline - **CodePipeline**: The pipeline is configured with a source from GitHub and uses a secret from AWS Secrets Manager for authentication. - **Pipeline Stages**: The linting, testing, and deployment steps in the pipeline have the necessary permissions to install dependencies, run commands, and deploy the CDK application. #### UI - **Amplify Build Function**: A Lambda function for building the UI is granted permissions to create and start deployments in AWS Amplify. ### Alternative Python Setup (without uv) If you prefer not to use `uv`, you can set up the environment with standard Python tools: Ensure you are using Python 3.12: ```bash python --version # Python 3.12.x ``` Create a virtual environment: ```bash python -m venv .venv ``` Activate it: ```bash source .venv/bin/activate ``` Install `uv` within the virtual environment: ```bash pip install uv ``` Install dependencies: ```bash uv sync --all-groups ``` ### Troubleshooting **Common Issues:** 1. **CDK synthesis fails**: Restart your shell and re-activate the virtual environment 2. **Bedrock model access denied**: Enable model access in the Bedrock console for your region 3. **UI shows CORS errors**: Wait for data loading to complete (can take hours) 4. **Authentication errors with AWS SSO**: Re-authenticate using your AWS SSO provider 5. **"Invalid bucket name" errors**: Ensure S3 bucket names are lowercase and contain no underscores 6. **"CDK bootstrap required" errors**: Run `cdk bootstrap` before deployment 7. **"Security token invalid" errors**: AWS credentials expired - refresh using SSO or `aws configure` --- ## Northwestern University Development > [!NOTE] > This section is specific to Northwestern University developers environments. ### NU Development Environment **Step 1: Clone Repository** ```bash git clone https://github.com/nulib/treetop-discovery.git cd treetop-discovery ``` Follow the main [Quick Start](#quick-start-for-simple-deployment) steps 1-2 for installation and configuration. **Step 2: Authentication Setup (Required before Step 3)** 1. Go to [aws.northwestern.edu](https://aws.northwestern.edu) 2. Click the "GENERAL USE LOGIN" button 3. Expand the name of the AWS staging account 4. Hit the "Access keys" button 5. Choose "Option 1: Set AWS environment variables" 6. Copy and paste the commands into your terminal > [!IMPORTANT] > Complete the authentication setup above before running `cdk synth` or `cdk deploy` in Step 3, or you'll get authentication errors. **Configuration Notes:** For NU developers, the `stack_prefix` is automatically set using the `DEV_PREFIX` environment variable in AWS, so it can be omitted from `config.toml`. ### ECR Repository Northwestern maintains the IIIF manifest fetcher Docker image in a public ECR repository: - **Registry**: `public.ecr.aws/nulib-staging` - **Repository**: `treetop-iiif-fetcher` - **Usage**: Uses Northwestern's public container registry for IIIF processing **Building and Pushing ECR Images:** ```bash # set your AWS PROFILE to the staging admin profile (it has permissions to push to the ECR repository) export AWS_PROFILE=[your-staging-profile] # Authenticate with ECR aws ecr-public get-login-password --region us-east-1 | docker login --username AWS --password-stdin public.ecr.aws/nulib-staging # Build image docker build -t public.ecr.aws/nulib-staging/treetop-iiif-fetcher:[tag] -f iiif/Dockerfile . # Un-comment and edit the reposiotry name to create the repository if it doesn't exist yet: # aws ecr-public create-repository --repository-name treetop-iiif-fetcher --region us-east-1 # Push image docker push public.ecr.aws/nulib-staging/treetop-iiif-fetcher:[tag] # Clear the profile variable after pushing unset AWS_PROFILE ``` **Image Development:** See [iiif/README.md](iiif/README.md) for detailed development instructions. ### NU Development Setup **Python Environment:** Follow the [Quick Start](#quick-start-for-simple-deployment) steps above. > [!TIP] > **VSCode Users**: Set Python interpreter via Command Palette (`⇧⌘P`) → `Python: Select Interpreter` → `./.venv/bin/python` **Node.js Setup:** ```bash node --version # Should be v22.x # Install Node.js dependencies for build function cd functions/build_function && npm i && cd ../.. ``` **Development Commands:** ```bash # Testing pytest # Linting ruff check . ruff check --fix . # Formatting ruff format . # CDK commands (run from project root) cdk ls # List stacks cdk synth # Generate CloudFormation cdk deploy # Deploy stack cdk diff # Compare local vs deployed ```
