KO
|
EN
gitlite — search
Search
#python
#javascript
#css
#typescript
#chatgpt
#openai
#machine-learning
#html
#nextjs
#js
#java
#go
esp32-I2Cbus
★ 29
Open GitHub ↗
ESP32 I2C master library for esp-idf
Download README (.md)
Explore Similar Repositories
cricleRoundring
:
百度echart中并没有圆角环形图,highchart的圆角环形图和项目中的有些出入,因此,写了一个,在这里分享一下
webgl-stuff
:
Circular set of points, that can change it's behaviour dynamically:
mpiGraph
:
MPI benchmark to generate network bandwidth images
Cute-File-Browser
:
Based on https://tutorialzine.com/2014/09/cute-file-browser-jquery-ajax-php
wordchampions
:
A fun word game!
// repository documentation
Was this content helpful?
★ 0
(0 ratings)
Select Rating:
★
★
★
★
★
Submit Feedback
Recent Feedback
×
Download README
Do you want to download the
README.md
file for
esp32-I2Cbus
?
Download (.md)
# **I2Cbus** I2C interface library in C++ for working with **Espressif ESP32 IoT Development Framework _(esp-idf)_**, that supports master mode. The intention of this library is to read and write to I2C slave devices (most sensors) with ease, by providing quick and specific functions aimed for 8-bit data. It is based on I2Cdev by Jeff Rowberg. ## Install You can clone it right into your project components directory or in your specific library path. ```git git clone https://github.com/natanaeljr/esp32-I2Cbus.git I2Cbus ``` ## Usage The ESP32 has two I2C controllers which can control two separated buses, so the library provides two ready-to-use objects: `i2c0` which corresponds to the I2C controller port 0, and `i2c1` which corresponds to the I2C controller port 1. However you can create your own object as you wish. ### Example ```C++ // default objects i2c0.begin(GPIO_NUM_16, GPIO_NUM_17); // sda, scl, default clock 100 Khz i2c1.begin(GPIO_NUM_21, GPIO_NUM_22, 400000); // sda, scl, 400 Khz // OR create an object which manages controller num 0 I2C_t myI2C(I2C_NUM_0); // configure and initialize myI2C.begin(GPIO_NUM_21, GPIO_NUM_22); myI2C.setTimeout(10); // default was 1000ms // start using myI2C.scanner(); myI2C.writeByte(DEVICE_ADDR, REG_ADDR, DATA); myI2C.readBytes(DEVICE_ADDR, REG_ADDR, LENGTH, BUFFER); myI2C.close(); ``` ### List of methods ```C++ // SETUP esp_err_t begin(gpio_num_t sda_io_num, gpio_num_t scl_io_num, uint32_t clk_speed = I2CBUS_CLOCKSPEED_DEFAULT); esp_err_t begin(gpio_num_t sda_io_num, gpio_num_t scl_io_num, gpio_pullup_t sda_pullup_en, gpio_pullup_t scl_pullup_en, uint32_t clk_speed = I2CBUS_CLOCKSPEED_DEFAULT); esp_err_t close(); void setTimeout(uint32_t ms); // WRITING esp_err_t writeBit(uint8_t devAddr, uint8_t regAddr, uint8_t bitNum, uint8_t data, int32_t timeout = -1); esp_err_t writeBits(uint8_t devAddr, uint8_t regAddr, uint8_t bitStart, uint8_t length, uint8_t data, int32_t timeout = -1); esp_err_t writeByte(uint8_t devAddr, uint8_t regAddr, uint8_t data, int32_t timeout = -1); esp_err_t writeBytes(uint8_t devAddr, uint8_t regAddr, size_t length, const uint8_t *data, int32_t timeout = -1); // READING esp_err_t readBit(uint8_t devAddr, uint8_t regAddr, uint8_t bitNum, uint8_t *data, int32_t timeout = -1); esp_err_t readBits(uint8_t devAddr, uint8_t regAddr, uint8_t bitStart, uint8_t length, uint8_t *data, int32_t timeout = -1); esp_err_t readByte(uint8_t devAddr, uint8_t regAddr, uint8_t *data, int32_t timeout = -1); esp_err_t readBytes(uint8_t devAddr, uint8_t regAddr, size_t length, uint8_t *data, int32_t timeout = -1); // TOOLS esp_err_t testConnection(uint8_t devAddr, int32_t timeout = -1); void scanner(); ``` Each method have an optional custom timeout for that specific call, if this value is not passed (default `-1`) or is `< 0`, it will use the default timeout. You can change the default timeout by calling `setTimeout(ms)`. @see header file for more notes and descriptions. ## Menuconfig You can change some settings (for debugging) in menuconfig under components and I2Cbus. 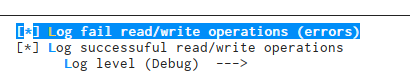 --- See also: SPIbus library https://github.com/natanaeljr/esp32-SPIbus Copyright © 2017 Natanael Josue Rabello [_natanael.rabello@outlook.com_]
