KO
|
EN
gitlite — search
Search
#typescript
#ai-agents
#deepseek-harness
#dsh-plugin
#open-source
#ai
#cli
#dsh
#claude-code
#codex
#developer-tools
#react
cytoscape.js-cxtmenu
★ 180
Open GitHub ↗
Context menu for Cytoscape.js
Download README (.md)
Explore Similar Repositories
100-words-design-patterns-java
:
GoF Design Patterns, each pattern described with story from real life.
kirk
:
A highly-flexible thread pool for Rust
epoll_threadpool
:
A small, clean, linux-only thread-pool implementation using epoll with support for sockets, scheduled callbacks and TCP connections.
IdentityServer4-Example
:
Example IdentityServer4 & Duende IdentityServer implementation.
php-gcm
:
An easy to use gcm library for PHP
// repository documentation
Was this content helpful?
★ 0
(0 ratings)
Select Rating:
★
★
★
★
★
Submit Feedback
Recent Feedback
×
Download README
Do you want to download the
README.md
file for
cytoscape.js-cxtmenu
?
Download (.md)
cytoscape-cxtmenu ================================================================================ [](https://zenodo.org/badge/latestdoi/16010906) 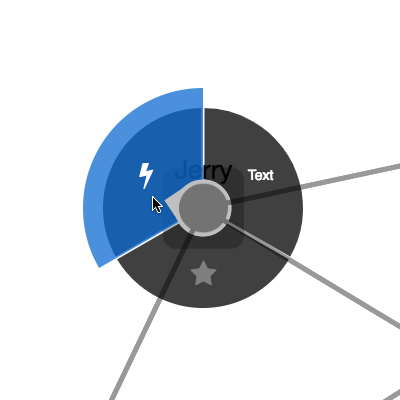 ## Description A circular, swipeable context menu extension for Cytoscape.js - Demo with default options: [demo](https://cytoscape.github.io/cytoscape.js-cxtmenu) - Demo with adaptative spotlight radius features: [demo](https://cytoscape.github.io/cytoscape.js-cxtmenu/demo-adaptative.html) - Demo with `outsideMenuCancel`: [demo](https://cytoscape.github.io/cytoscape.js-cxtmenu/demo-cancel-outside.html) This extension creates a widget that lets the user operate circular context menus on nodes in Cytoscape.js. The user swipes along the circular menu to select a menu item and perform a command on either a node, a edge, or the graph background. ## Dependencies * Cytoscape.js ^3.2.0 ## Usage instructions Download the library: * via npm: `npm install cytoscape-cxtmenu`, * via bower: `bower install cytoscape-cxtmenu`, or * via direct download in the repository (probably from a tag). Import the library as appropriate for your project: ES import: ```js import cytoscape from 'cytoscape'; import cxtmenu from 'cytoscape-cxtmenu'; cytoscape.use( cxtmenu ); ``` CommonJS require: ```js let cytoscape = require('cytoscape'); let cxtmenu = require('cytoscape-cxtmenu'); cytoscape.use( cxtmenu ); // register extension ``` AMD: ```js require(['cytoscape', 'cytoscape-cxtmenu'], function( cytoscape, cxtmenu ){ cxtmenu( cytoscape ); // register extension }); ``` Plain HTML/JS has the extension registered for you automatically, because no `require()` is needed. ## CSS You can style the font of the command text with the `cxtmenu-content` class, and you can style disabled entries with the `cxtmenu-disabled` class. ## API You initialise the plugin on the same HTML DOM element container used for Cytoscape.js: ```js let cy = cytoscape({ container: document.getElementById('cy'), /* ... */ }); // the default values of each option are outlined below: let defaults = { menuRadius: function(ele){ return 100; }, // the outer radius (node center to the end of the menu) in pixels. It is added to the rendered size of the node. Can either be a number or function as in the example. selector: 'node', // elements matching this Cytoscape.js selector will trigger cxtmenus commands: [ // an array of commands to list in the menu or a function that returns the array /* { // example command fillColor: 'rgba(200, 200, 200, 0.75)', // optional: custom background color for item content: 'a command name', // html/text content to be displayed in the menu contentStyle: {}, // css key:value pairs to set the command's css in js if you want select: function(ele){ // a function to execute when the command is selected console.log( ele.id() ) // `ele` holds the reference to the active element }, hover: function(ele){ // a function to execute when the command is hovered console.log( ele.id() ) // `ele` holds the reference to the active element }, enabled: true // whether the command is selectable } */ ], // function( ele ){ return [ /*...*/ ] }, // a function that returns commands or a promise of commands fillColor: 'rgba(0, 0, 0, 0.75)', // the background colour of the menu activeFillColor: 'rgba(1, 105, 217, 0.75)', // the colour used to indicate the selected command activePadding: 20, // additional size in pixels for the active command indicatorSize: 24, // the size in pixels of the pointer to the active command, will default to the node size if the node size is smaller than the indicator size, separatorWidth: 3, // the empty spacing in pixels between successive commands spotlightPadding: 4, // extra spacing in pixels between the element and the spotlight adaptativeNodeSpotlightRadius: false, // specify whether the spotlight radius should adapt to the node size minSpotlightRadius: 24, // the minimum radius in pixels of the spotlight (ignored for the node if adaptativeNodeSpotlightRadius is enabled but still used for the edge & background) maxSpotlightRadius: 38, // the maximum radius in pixels of the spotlight (ignored for the node if adaptativeNodeSpotlightRadius is enabled but still used for the edge & background) openMenuEvents: 'cxttapstart taphold', // space-separated cytoscape events that will open the menu; only `cxttapstart` and/or `taphold` work here itemColor: 'white', // the colour of text in the command's content itemTextShadowColor: 'transparent', // the text shadow colour of the command's content zIndex: 9999, // the z-index of the ui div atMouse: false, // draw menu at mouse position outsideMenuCancel: false // if set to a number, this will cancel the command if the pointer is released outside of the spotlight, padded by the number given }; let menu = cy.cxtmenu( defaults ); ``` You get access to the cxtmenu API as the returned value of calling the extension. You can use this to clean up and destroy the menu instance: ```js let menu = cy.cxtmenu( someOptions ); menu.destroy(); ``` ## Build targets * `npm run test` : Run Mocha tests in `./test` * `npm run build` : Build `./src/**` into `cytoscape-cxtmenu.js` * `npm run watch` : Automatically build on changes with live reloading (N.b. you must already have an HTTP server running) * `npm run dev` : Automatically build on changes with live reloading with webpack dev server * `npm run lint` : Run eslint on the source N.b. all builds use babel, so modern ES features can be used in the `src`. ## Publishing instructions This project is set up to automatically be published to npm and bower. To publish: 1. Build the extension : `npm run build:release` 1. Commit the build : `git commit -am "Build for release"` 1. Bump the version number and tag: `npm version major|minor|patch` 1. Push to origin: `git push && git push --tags` 1. Publish to npm: `npm publish .` 1. If publishing to bower for the first time, you'll need to run `bower register cytoscape-cxtmenu https://github.com/cytoscape/cytoscape.js-cxtmenu.git` 1. [Make a new release](https://github.com/cytoscape/cytoscape.js-cxtmenu/releases/new) for Zenodo.
