KO
|
EN
gitlite — search
Search
#python
#typescript
#nodejs
#react
#java
#node
#usb
#deep-learning
#keras
#tensorflow
#docker
#golang
voltpillager
★ 33
Open GitHub ↗
No description available.
Download README (.md)
Explore Similar Repositories
Dense-FCN-for-tampering-localization
:
No description available.
Presentations
:
Any presentation we've given at FortyNorth Security
DockController
:
Dock Controller - Control Your Dock
safer-illinois-app
:
Source code repository of "Safer Illinois" App - the official COVID-19 app of the University of Illinois.
NekoAgent
:
A PaperSpigot fucker.
// repository documentation
Was this content helpful?
★ 0
(0 ratings)
Select Rating:
★
★
★
★
★
Submit Feedback
Recent Feedback
×
Download README
Do you want to download the
README.md
file for
voltpillager
?
Download (.md)
# Voltpillager ## Introduction This is the Voltpillager repo for CPU undervolting. The folder structure is listed below. Have a look at each folder for further descriptions. ``` ├── additional // Supporting Code │ ├── aes-faulty-block-finder // Code for unwrap AES-CBC │ ├── dfa-aes // DFA analysis of faulty AES result │ ├── precision // 5.2 Timing Precision - Jitter test │ ├── remote-reset // Raspberry Pi code for turning on and off the motherboard │ ├── sgx-software-enable // Code for enabling SGX if it is "software-controlled" │ └── stability // Code for processing stability Test and generage diagram ├── docs // Website (TODO) ├── lib // Voltpillager Library (Also Plundervolt lib as bonus) ├── poc // Folder for PoCs │ ├── delayed-write // 6. Delayed Write PoC │ ├── mul // 5.1 Multiple PoC, and non-enclave glitching framework │ ├── oe-file-encryptor // 5.1 OE file encryptor PoC │ ├── sgx-aes-ni // 5.1 SGX AES-NI PoC │ ├── sgx-aes-ni-mbed // 5.1 Mbed AES-NI PoC │ ├── sgx-crt-rsa // 5.1 SGX CRT-RSA PoC ├── voltpillager-firmware // Voltpillager Teensy4.0 Firmware └── voltpillager-board // Schematics for Voltpillager ``` This repo contain submodules, you can run the following commands to get them ``` git submodule init git submodule update ``` ## Environment Setup ### Enable SGX There are usually 3 BIOS settings for SGX: (Disabled, Enabled, Software-Controlled). If there are no SGX configurations in BIOS, most probably it doesn't support SGX or it is software-controlled by default. In case of Software-Controlled, you can use `additional/sgx-software-enable` to enable it. ### Set CPU Frequency `additional/setfreq.sh` can be used for setting cpu frequency. But it require the following package `sudo apt install linux-tools-common linux-tools-generic linux-tools-$(uname -r)` For temperature monitoring `sudo apt install lm-sensors` is required ### Install SGX SDK and Driver The PoCs are tested on Intel SGX driver V2.6 and Intel SGX-SDK V2.8. You can run `additional/install_SGX.sh` to install them on a clean Ubuntu 18.04 system. ### Hardware Requirement 1. Teensy 4.0 Development Board (~20£) [[BUY]](https://shop.pimoroni.com/products/teensy-4-0-development-board) [[Support]](https://www.pjrc.com/store/teensy40.html) 2. 2 * Bus Driver, you can choose between the following (~1£) * SN74LVC1G07DRLR [[BUY]](https://uk.farnell.com/texas-instruments/sn74lvc1g07drlr/buffer-line-driver-non-invert/dp/2334883RL) [[Datasheet]](https://www.ti.com/lit/ds/symlink/sn74lvc1g07.pdf?ts=1591037569523) * or NL17SZ07XV5T2G [[BUY]](https://uk.farnell.com/on-semiconductor/nl17sz07xv5t2g/buffer-non-inverting-single-sot/dp/2534484?MER=sy-me-pd-mi-alte) [[Datasheet]](http://www.farnell.com/datasheets/2007350.pdf) 3. SOT IC Adapter (~10£) [[BUY]](https://uk.farnell.com/schmartboard/204-0003-01/ic-adaptor-sc70-soic-sot-to-dip/dp/2483414?ost=204-0003-01) [[Datasheet]](http://www.farnell.com/datasheets/1934984.pdf) ## Connections ### Voltpillager (SVID Interface) The following diagram shows how to build Voltpillager Board. 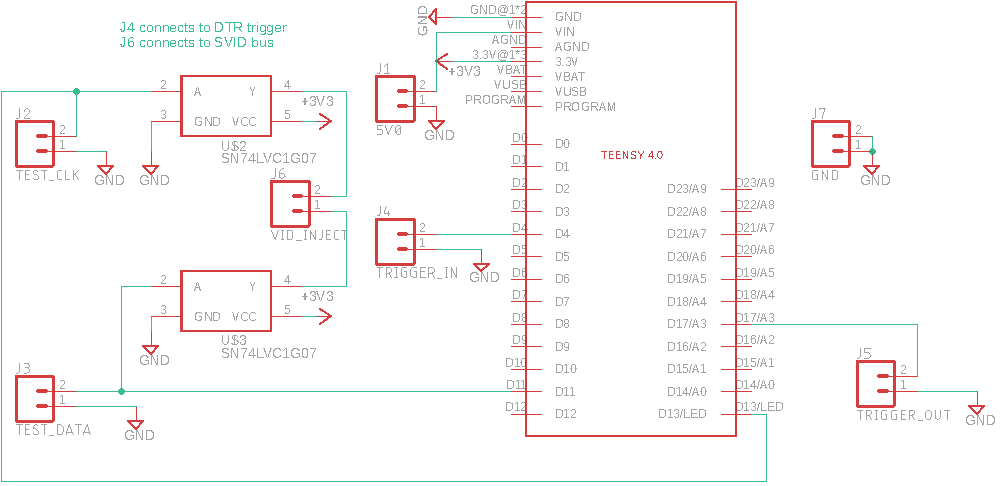 Instructions for using Voltpillager Board * `VID_INJECT (J6)` is used for connecting to SVID interface * `TRIGGER_IN (J4)` is used for connecting to trigger (DTR) * Other test pins can be connect to an oscilloscope for debugging * RS232 is 12V, so you'll need to use a voltage level convertor or solder the pin on the 5V side of MAX232 chip out. * Remember to connect a common GND too :) ### RaspberryPi for Resetting the PC The system may crash during test, so connect a raspberry pi to the Front Panel power/reset pin could be useful for resetting it when crash. We have a simple script for powering on/off or reset the motherboard which can be run on raspberry pi. (See `additional/remote-reset`) The following connection is used by the script: * Front Panel Power - connects to GPIO2 * Front Panel Reset - connects to GPIO3 ## Publications * VoltPillager: Hardware-based fault injection attacks against IntelSGX Enclaves using the SVID voltage scaling interface (USENIX Security '21) [[LINK]](https://www.usenix.org/conference/usenixsecurity21/presentation/chen-zitai)
