KO
|
EN
gitlite — search
Search
#javascript
#python
#hacktoberfest
#react
#ai
#typescript
#llm
#go
#golang
#android
#machine-learning
#rust
#deep-learning
#linux
OctoPrint-Smuff
★ 18
Open GitHub ↗
OctoPrint Plugin for SMuFF
Download README (.md)
Explore Similar Repositories
jsii-publish
:
Dockerfile and Github action for publishing JSII packages
tcp-warp
:
A userspace tunnel between two hosts mapping ports on client machine to addresses reachable from server machine.
APIs
:
Scripts para acesso de APIs de interesse público
Env
:
A Powershell version of Python's venv
module_robot
:
xenomai realtime ; ethercat soem ; module robot
// repository documentation
Was this content helpful?
★ 0
(0 ratings)
Select Rating:
★
★
★
★
★
Submit Feedback
Recent Feedback
×
Download README
Do you want to download the
README.md
file for
OctoPrint-Smuff
?
Download (.md)
# OctoPrint-Smuff This is a plugin for OctoPrint which handles tool changes on [the SMuFF](https://sites.google.com/view/the-smuff). >**In a nutshell:** This plugin runs in the background and tracks tool change GCodes (**Tx**) via the **octoprint.comm.protocol.gcode.queuing** and **octoprint.comm.protocol.gcode.send** hooks of OctoPrint. When triggered, the plugin will take care of sending the according commands to the SMuFF via the serial interface. ## Setup Install the plugin via the bundled [Plugin Manager](https://github.com/foosel/OctoPrint/wiki/Plugin:-Plugin-Manager) directly from the OctoPrint Repository or manually by using this URL: https://github.com/technik-gegg/OctoPrint-Smuff/archive/master.zip From SMuFF firmware **V2.06** on, you're able to connect with the SMuFF directly via the onboard USB connector to your Raspberry Pi. This is not only the most convenient way but also seems the most reliable. For further information on this topic, please have a look at the **Configuration** section. In order to allow this plugin communicate correctly with the SMuFF, as a first step, you have to do the following: - Connect the SMuFF via **USB** to the Raspberry Pi **OR** - Setup the **UART** mode on your Raspberry Pi and connect your SMuFF controller board via a 3-Wire serial interface (UART) ## Setting up your Raspberry Pi for UART connection Open the **/boot/config.txt** file on your Raspberry Pi and add the following lines to it: 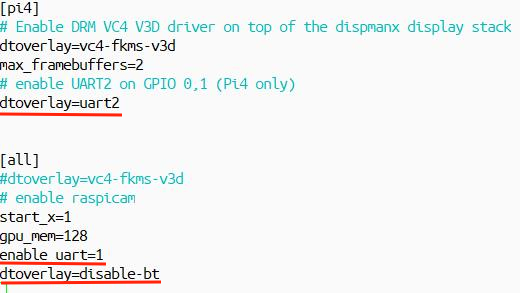 Save the configuration and reboot. After rebooting, make sure you'll see the **ttyS0** device (RPI-3) or the **ttyAMA1** device (RPI-4) in your **/dev** folder. >**Notice:** *If you're having problems connecting the SMuFF to the Raspi 3, try removing the **dt-overlay=disable-bt** from the config.txt, reboot and try again* For the physical serial connection get a 3-Wire cable and connect the pins **6 or 9 (GND)**, **8 (TX, aka GPIO14 aka UART0_TXD)** and **10 (RX aka GPIO15 aka UART0_RXD)** of the Raspi-3 expansion header to the serial interface of your SMuFF. On SKR (E3) controller boards that's usually the header named **TFT**. 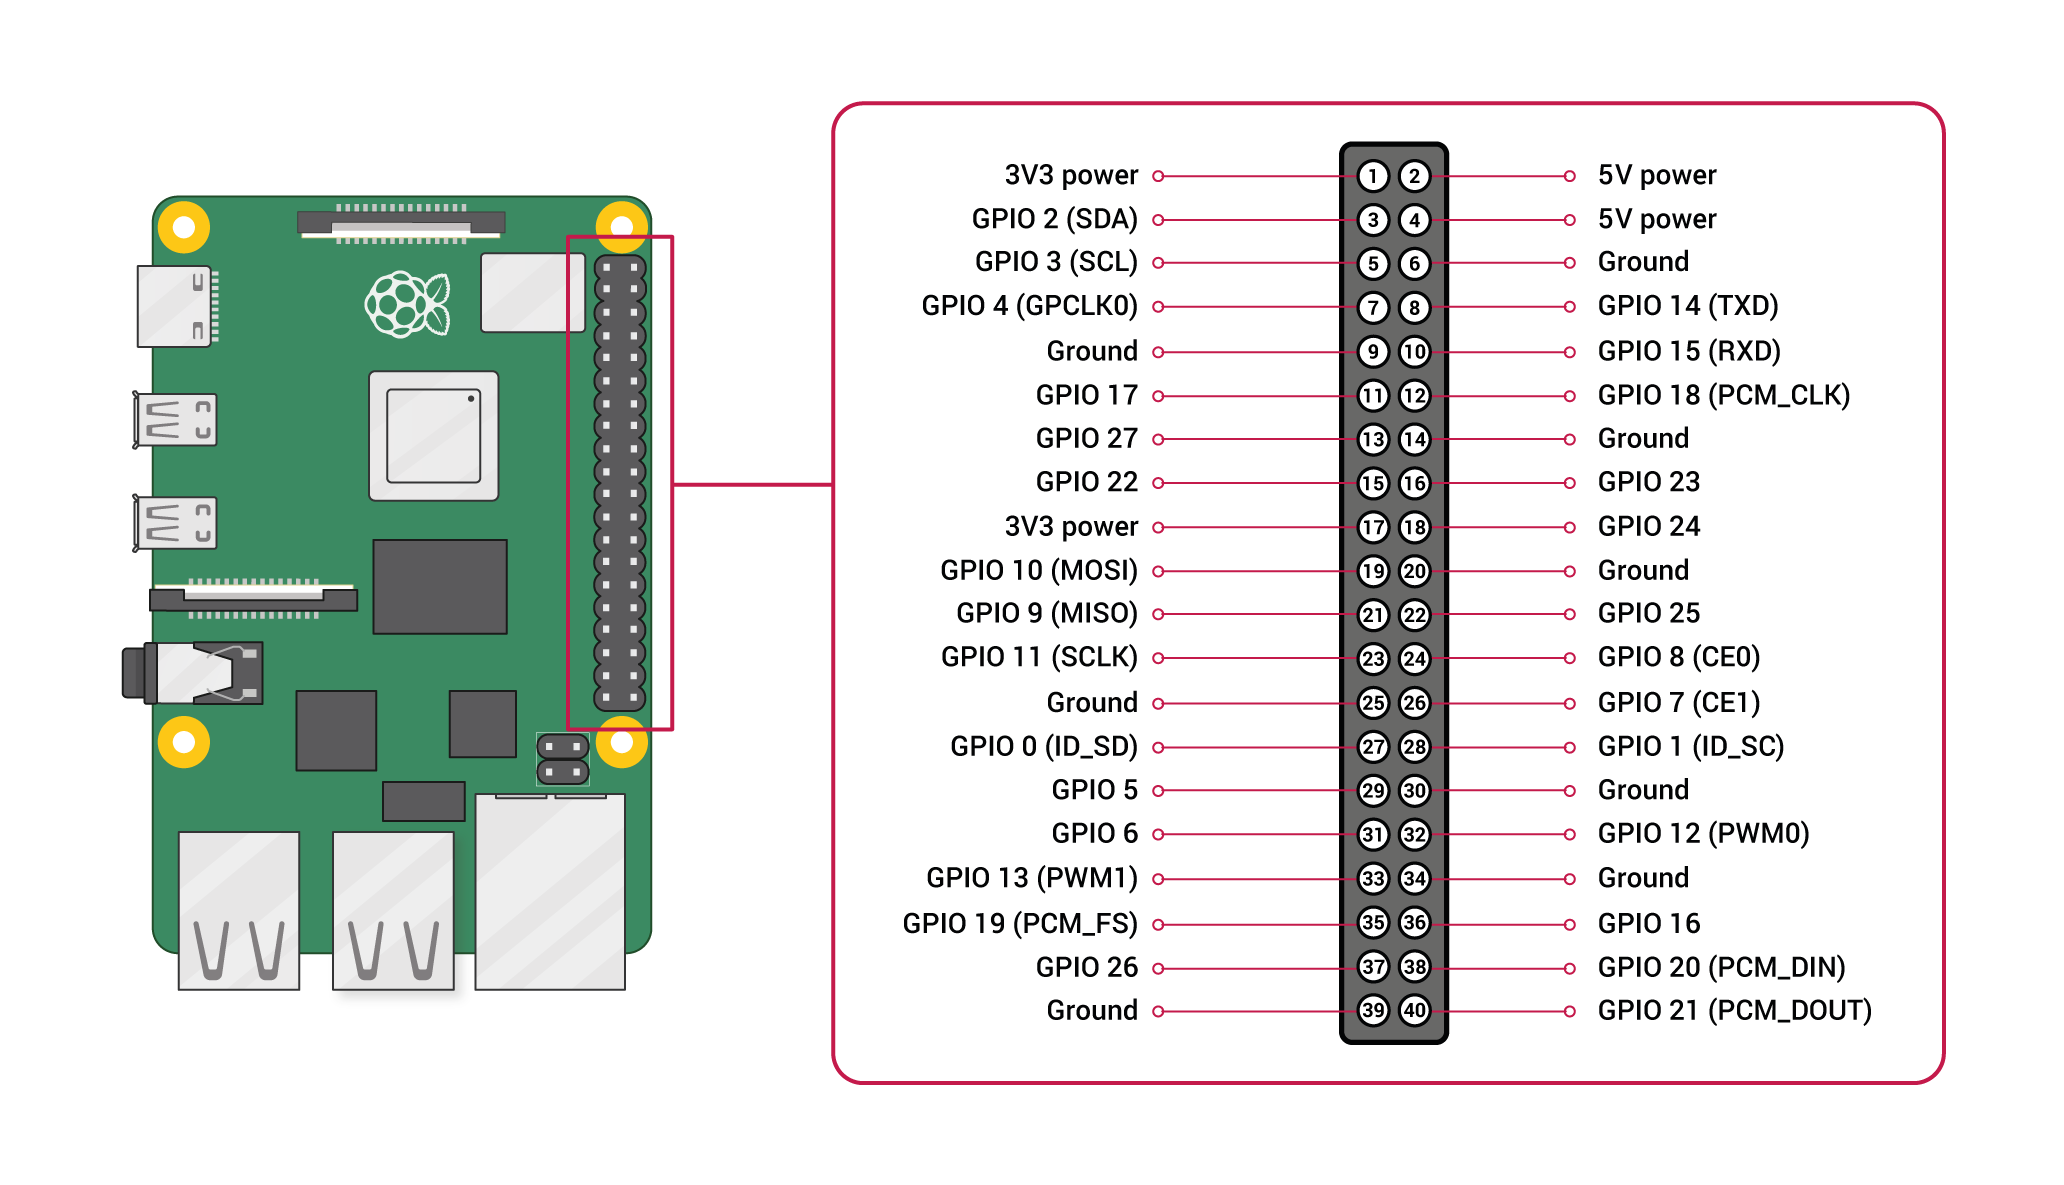 *Image: Raspberry Pi expansion header* For the Raspberry **Pi 4** I'd recommend using the 2nd UART from the PL011, since it's a "real" UART. The TX and RX signals for this UART can be found at the pins **27 (TX, aka GPIO0 aka UART2_TXD)** and **28 (RX,aka GPIO1 aka UART2_RXD)**. Those pins are not being used on the Pi 3. The **GND** is available on pin **30**. Make sure that you have a cross-over connection for the TX and RX lines: - GND goes to GND - TX goes to RX - and RX goes to TX >**Notice**: *You don't have to wire any of the power pins (+5V or +3.3V), since both, the Raspberry and the SMuFF, are supposed to be powered on their own.* Also, make sure that you have your SMuFF configured at the same baudrate you'll be using in the plugin (**115200 baud** is recommended). ## Configuration For the configuration of this plugin, please head over to the SMuFFs main website [How to section](https://sites.google.com/view/the-smuff/how-to/configure/the-octoprint-plugin?authuser=0), where you'll find a comprehensive write-up with step-by-step instruction. ## Marlin Setup **Important** In order to make SMuFF and plugin play well together with Marlin, you have to modify some settings in your printers firmware, recompile and flash it to your printer. [This section](https://sites.google.com/view/the-smuff/how-to/configure/the-marlin-firmware?authuser=0) on the SMuFF website will explain in detail what you've got to do step-by-step. ## Slicing Multi Material Models To set up a test print, you need to slice a multi material model first and then upload it to OctoPrint. >**Please notice:** This plugin won't work, if you copy the sliced model directly onto your printers SD-Card. You have to use the OctoPrints internal storage for this and print it from there. To be able to slice multi material models you need to set up you slicer accordingly. There's a fantastic video on YouTube covering this topic from [Michael (a.k.a.Teaching Tech)](https://www.youtube.com/channel/UCbgBDBrwsikmtoLqtpc59Bw) which covers all the known slicers [here](https://www.youtube.com/watch?v=xRtvbICRh1w). Allthough Michael is referring to dual extrusion, the process is still the same for more than two materials. One important point is that you need to have configured all tools (i.e. feedrate, temperatures, etc.) according to your printer, before you move on setting up the different processes for each individual material (or color). ## Looking for multi material models? If you're looking for high quality models to print, have a look at [Roman Tyr's (a.k.a. Cipis) Printables collection](https://www.printables.com/de/social/18-cipis/models). He has a really nice collection of models for multi material 3D printing. If you download one (or more) of his models, please make sure to leave him a like. *** ## Recent Changes **V1.2.2** - bug fixes - fixed a couple of minor bugs, introduced by the new IDEX feature when plugin is operating in "Single mode" (when option "2nd SMuFF" isn't ticked). **V1.2.1** - Added pseudo commands *@SMuFF T++* / *@SMuFF T--* handling - extended the tool change pseudo GCode to handle **T++** / **T--** instructions, which will automatically increment or decrement the current tool number in order to achieve an automatic tool change, whenever a filament runout has been detected (for continous printing). In order to use this feature, you'll need a plugin that is able to detect a filament runout and send custom GCodes, such as the [Filament Sensor Simplified](https://plugins.octoprint.org/plugins/filamentsensorsimplified/) plugin. - added the option of using two SMuFFs on an **IDEX printer**. Tools are numbered sequentially, i.e. 0-4 on the first SMuFF/printhead, 5-9 on the second, if both SMuFFs support 5 tools/materials. Your OctoPrint printer profile has to be modified accordingly. You have to configure port and baudrate for each SMuFF. Both SMuFFs status infos are displayed in the OctoPrint Navbar separately. The SMuFF console supports switching between the two instances and the buttons will affect the currently selected instance. **Please keep in mind, this feature is "Work In Progress" and may need some further modifications!** **V1.2.0** - Updated plugin for the latest SMuFF firmware, version (V3.13) ##### Please be aware: You must update your SMuFF firmware to the latest version before you move on using this version of the plugin - extracted core functions of the SMuFF into *smuff_core.py* in order to be able to share the same code base between OctoPrint and Klipper. - integrated all new features of V3.13 of the SMuFF firmware. - added a SMuFF specific tab to the OctoPrint interface, which makes debugging a lot easier - in case you have to. - assigned the most common functions to buttons in the new SMuFF-Tab for controlling the SMuFF directly, so you don't need an extra plugin for that. - extended the status indicator in the navbar. It now displays the status of both feeders and also reports if a jam was detected (in which case it'll turn red). - the communication with the SMuFF has improved and is now more stable than in the previous versions. It will also recover automatically if the connection gets interrupted.
