KO
|
EN
gitlite — search
Search
#python
#java
#python3
#arduino
#golang
#machine-learning
#rust
#html
#flask
#javascript
#seismology
#nodejs
BIND
★ 355
Open GitHub ↗
Data Binding and MVVM for iOS
Download README (.md)
Explore Similar Repositories
git-changelog
:
Generates a git changelog, CLI or grunt plugin, inspired & based on Angular JS changelog generator
yatrum
:
Yatrum - Share and Discover Travel Stories, Itineraries, Travel Guides built with ♥️ using Angular 4.0.0
GoldMovies
:
👑 The GoldMovies is based on Kotlin, MVVM architecture, coroutines, dagger, koin, and material designs & animations.
black-metal-theme-neovim
:
A collection of black-metal themed neovim colorschemes.
D3D12TranslationLayer
:
A library containing utilities for mapping higher-level graphics work to D3D12
// repository documentation
Was this content helpful?
★ 0
(0 ratings)
Select Rating:
★
★
★
★
★
Submit Feedback
Recent Feedback
×
Download README
Do you want to download the
README.md
file for
BIND
?
Download (.md)
BIND ==== [](http://cocoapods.org/) [](http://doge.mit-license.org) [](https://travis-ci.org/markohlebar/BIND) Data binding and MVVM for iOS ## Features ## 1. super simple [UI bindings](#ui-bindings) by using BIND DSL 1. [data transforms](#transformers) by using subclasses of `NSValueTransformer` and `BNDAsyncValueTransformer` 1. [automagic unbinding](#unbinding) - **no more KVO exceptions** on `dealloc` 1. [MVVM](#mvvmc-architecture) out of the box #### UI Bindings #### **BIND** offers a streamlined interface to create your `view` - `viewModel` and `viewModel` - `model` bindings. You can utilize these bindings by subclassing from classes implementing `BNDView` and `BNDViewModel` protocols. The following example binds some properties of the `viewModel` with it's corresponding `view`. ```objc @implementation MHNameTableCell BINDINGS(MHPersonNameViewModel, BINDViewModel(name, ~>, textLabel.text), BINDViewModel(ID, ~>, detailTextLabel.text), BINDViewModelCommand(reverseNameCommand, onTouchUpInside), nil); ...some other code... @end ``` How does this work and what does this do? A `view` or a `viewController` implementing `BNDView` protocol, exposes properties `viewModel` and `bindings`. Whenever `viewModel` gets updated (say on cell reuse), the `bindings` are updated as well, which guarantees that the correct `viewModel` is bound to a correct `view`. Similar to this, you can also bind `viewModel` with `model`. You can do this by creating a `viewModel` subclass of `BNDViewModel`, and define your bindings like so: ```objc @implementation MHPersonNameViewModel BINDINGS(MHPerson, BINDModel(fullName, <>, name), BINDModel(hexColorCode, <>, hexColorCode), BINDModel(ID.stringValue, ~>, ID), nil); ...some other code... @end ``` #### Binding #### KVO is ugly and it will crash your app if you forget to remove your observer. You can use **BIND** for the same purposes as you would use KVO. Let's say you have a `UILabel *nameLabel` and a `viewModel` representing the contents of the `nameLabel`. When the `viewModel` changes it's `name` value for whatever reasons, this should automatically be visible on the label. ```objc viewModel.name = @"Kim"; BIND(viewModel, name, ~>, nameLabel, text); //nameLabel.text says Kim at this point. viewModel.name = @"Hobbit"; //nameLabel.text says Hobbit at this point. ``` Now say you just want to observe that the `name` value has changed in the `viewModel`. You can do that by using the observe action. ```objc [BINDO(viewModel,name) observe:^(id observable, id value, NSDictionary *observationInfo) { //fired when viewModel changes it's name property }]; ``` #### Unbinding #### Notice that in the examples above the binding is not assigned to any instance variable. The bindings are automagically broken when the observable is deallocated. As of version 1.1.0, **BIND** is automatically handling unbinding of bound objects. This means no more KVO exceptions like the following: `"NSInternalInconsistencyException", "An instance 0xF00B400 of class XYZ was deallocated while key value observers were still registered with it.` You can, however, unbind the binding manually by calling `unbind` method like so: ```objc BNDBinding *binding = BIND(engine, rpm, ~>, car, speed); ... [binding unbind]; ``` #### Transform operation #### You can change the way the values are transformed by using the `transform:` operation. Let's take the previous example, and assume that there is a requirement that the name should be displayed uppercase in the label. ```objc ... viewModel.name = @"Kim"; [BIND(viewModel, name, ~>, nameLabel, text) transform:^id(id sender, id value) { return value.uppercaseString; }]; //nameLabel.text says @"KIM" at this point. viewModel.name = @"Hobbit"; //nameLabel.text says @"HOBBIT" at this point. ... ``` #### Observe operation #### Observe operation was covered in earlier examples. Use observe operation to passively observe when bound values are being changed, similar to KVO. ```objc [BINDSR(viewModel,name,~>,nameLabel) observe:^(id observable, id value, NSDictionary *observationInfo){ //Fired when name changes on the viewModel. }]; ``` #### Transformers #### **BIND** also lets you assign your own subclasses of `NSValueTransformer` to transform values coming from object to other object and reverse. Using an `NSValueTransformer` subclass instead of a block transform is a design decision you have to make depending on the amount of logic you are putting in the transform. The `NSValueTransformer` subclass is easier to test and it's reusable, but for trivial transforms it might be better to use the `transform:` operation. You can build your subclass of `NSValueTransformer` and easily assign it to the binding. When assigning a value transformer, you can either use it's class name or transformer name. If you pass in a class name that hasn't yet been registered, **BIND** will register that `NSValueTransformer`, and use the class name as the registered transformer name on any subsequent calls, thus saving memory and processing time. ```objc ... viewModel.name = @"Kim"; //Set the transformer by using BINDT() macro BINDT(viewModel, name, ~>, nameLabel, text, UppercaseStringTransformer); //nameLabel.text says @"KIM" at this point. viewModel.name = @"Hobbit"; //nameLabel.text says @"HOBBIT" at this point. ... //Trivial transformer implementation @interface UppercaseStringTransformer : NSValueTransformer @end @implementation UppercaseStringTransformer - (NSString *)transformValue:(NSString *)string { return string.uppercaseString; } - (NSString *)reverseTransformValue:(NSString *)string { return string.lowercaseString; } @end ``` Passing `UppercaseStringTransformer` tells the binding to use the `UppercaseStringTransformer` subclass of `NSValueTransformer` to transform the values. You can reverse the transformation direction if you need to by adding a `!` modifier before transformer name like so `BINDRT(viewModel, name, ~>, nameLabel, text, !, UppercaseStringTransformer)`. #### Asynchronous Transformers #### Let's say you want to grab an image from the web asynchronously by using a transformation from an `NSURL` to a `UIImage`. You can do this by creating a `BNDAsyncValueTransformer` subclass and implementing it's transform and reverse transform methods. Following is a trivial example of the implementation of such a class. ```objc ... BINDT(self,viewModel.imageURL,~>,self,imageView.image,BNDURLToImageTransformer); ... @implementation BNDURLToImageTransformer - (void)asyncTransformValue:(NSURL *)value transformBlock:(BNDAsyncValueTransformBlock)transformBlock { NSURLRequest *request = [NSURLRequest requestWithURL:value]; [NSURLConnection sendAsynchronousRequest:request queue:[NSOperationQueue new] completionHandler:^(NSURLResponse *response, NSData *data, NSError *connectionError) { if (data) { UIImage *image = [UIImage imageWithData:data]; transformBlock(response.URL, image); } }]; } + (BOOL)allowsReverseTransformation { return NO; } @end ``` Note that bidirectional asynchronous binding is not supported and will throw an exception. #### Binding Direction and Initial Value Assignment#### Observe the symbol `~>` in the expression `name ~> textLabel.text`. **BIND** syntax lets you configure the way that the binding is reflected on the bound objects values. It offers six different direction and intial value assignment configurations: ```objc name ~> textLabel.text /// left object passes values to right object name <~ textLabel.text /// right object passes values to left object. name <> textLabel.text /// binding is bidirectional. Initial value is passed from left to right object. name !~> textLabel.text /// left object passes values to right object with no initial value assignment. name <~! textLabel.text /// right object passes values to left object with no initial value assignment. name <!> textLabel.text /// binding is bidirectional with no initial value assignment. ``` #### Shorthands #### You can use shorthand operators to create most of your bindings. Shorthands were designed for brevity of expression, while still keeping the clarity of bound properties. ```objc UILabel *nameLabel ... //a label instance UITextField *nameField ... // a textfield instance id viewModel ... //a viewModel containing property name UIButton *button ... //a button instance BINDS(nameField,~>,nameLabel); nameField.text = @"Kim"; //nameLabel.text says Kim at this point. BINDSR(viewModel,name,~>,nameLabel); viewModel.name = @"Hobbit"; //nameLabel.text says Hobbit at this point. BINDSL(nameField,~>,viewModel,name); nameField.text = @"Cartman"; //viewModel.name says Cartman at this point. [BINDOS(button) observe:^(id observable, id value){ //Fired when you press the button. }]; ``` The shorthands are mnemonics really, so you might interpret them as - `BINDS` bind shorthand - `BINDSR` bind shorthand right - `BINDSL` bind shorhand left - `BINDOS` bind observe shorthand ## MVVMC Architecture ## This architecture offers an obvious distribution of responsibility and a clear split between your business logic and your presentation layer, which makes the code easier to test and maintain. The following graph represents a proposed MVVMC app architecture, which we will explain in further detail.  #### Data Controller #### The Data Controller is responsible for transforming the Model from external sources; i.e. a web service to a View Model which forms a 1:1 relationship with View elements (View or View Controller). **BIND** offers a protocol `BNDDataController` which exposes the following method: ```objc - (void)updateWithContext:(id)context viewModelsHandler:(BNDViewModelsBlock)viewModelsHandler; ``` Every data controller should ideally expose only this method to the owning View Controller. Calling this method should trigger a series of events, like fetching Model from a web service and then transforming that Model to a View Model which maps to your View. #### View Controller #### The View Controller holds a reference to it's Data Controller and kicks off a request for the View Model. Usually the best time to refresh the View Model would be in `UIViewController`'s `viewWillAppear:` callback method. ```objc - (void)viewWillAppear:(BOOL)animated { __weak typeof(self) weakSelf = self; [self.dataController updateWithContext:someContext viewModelsHandler:^(NSArray *viewModels, NSError *error) { weakSelf.viewModels = viewModels; //Do stuff with view models here //like call reloadData on the tableView. }]; } ``` For your convenience, **BIND** offers an abstract class `BNDViewController` which holds an `IBOutlet` property `dataController`. You can assign this property from code or XIB (think dependency injection). #### View #### **BIND** offers the following abstract subclasses for the View elements: - `BNDView` - `BNDTableViewCell` - `BNDCollectionViewCell` - `BNDViewController` These subclasses hold a weak reference to the `viewModel` and a strong reference to an array of `bindings`. Think of a common scenario when presenting `UITableView` cells: ```objc - (UITableViewCell *)tableView:(UITableView *)tableView cellForRowAtIndexPath:(NSIndexPath *)indexPath { id <BNDViewModel> viewModel = self.viewModels[indexPath.row]; UITableViewCell <BNDView> *cell = [tableView dequeueReusableCellWithIdentifier:viewModel.identifier]; ... cell.viewModel = viewModel; return cell; } ``` Given you are using a `BNDTableViewCell` subclass, When you assign the `viewModel` reference with it's corresponding View Model, the array of associated `bindings` is automatically iterated and the bindings between the View and the View Model are refreshed. Bindings are explained in more detail in sections above. #### View Model #### The View Model plays the middle man role between your business logic and the View. Upon receiving the View Model from the Data Controller, the View Controller should assign the View Model to it's designated View so that the bindings between the View and the View Model are created. View model may contain sub viewModels but it should never create them. The creation of view models is the sole responsibility of the `DataController`. #### Model #### Your ususal PONSO or whatever model, BIND doesn't care about what you are dealing with as long as you transform it to a View Model before serving it to the View. #### MVVMC and Bindings #### Let's say you are building a table view based app and you want to show names of different persons in the cells. Assume that the `PersonViewModel` **view model** has a property `name` which you want to display on you **cell's** `textLabel`. #### Binding From Code #### `BNDTableViewCell` exposes an interface for assigning the `viewModel`, which should happen on each `tableView:cellForRowAtIndexPath:` call, and `bindings` which is a xib collection outlet of bindings which will be updated with each subsequent `viewModel` assignment. We will bind the cell's `textLabel.text` key path with the `name` key path of your **view model**. The easiest way to do this is to use `BINDINGS` macro with `BINDViewModel` to create your `BNDView` bindings, like in the following example. ```objc @interface PersonTableViewCell : BNDTableViewCell @end @implementation PersonTableViewCell BINDINGS(PersonViewModel, //you must provide the viewModel's class over here, BINDViewModel(name, ~>, textLabel.text), //add as many bindings you like, nil); //and nil terminate the list when done. ... @end ``` The code in this example assigns the binding to the array of bindings property (BNDTableViewCell). Any subsequent calls to setViewModel: will automatically refresh the binding by calling [binding bindLeft:self.viewModel withRight:self]; making sure that your objects are bound on cell reuse. Optionally, if you want to do some additional operations when `viewModel` is set, you can override `viewDidUpdateViewModel:` method. This method is called after each call to `setViewModel:` on the cell, use this instead of overriding `setViewModel:`. ```objc @implementation PersonTableViewCell ... - (void)viewDidUpdateViewModel:(id <BNDViewModel> )viewModel { } ... @end ``` #### Binding From XIB #### **BIND** lets you create your bindings from XIBs. The easiest way to do this is to use the `BNDTableViewCell` class or create it's subclass. `BNDTableViewCell` exposes an interface for assigning the `viewModel`, which should happen on each `tableView:cellForRowAtIndexPath:` call, and `bindings` which is a xib collection outlet of bindings which will be updated with each subsequent `viewModel` assignment. 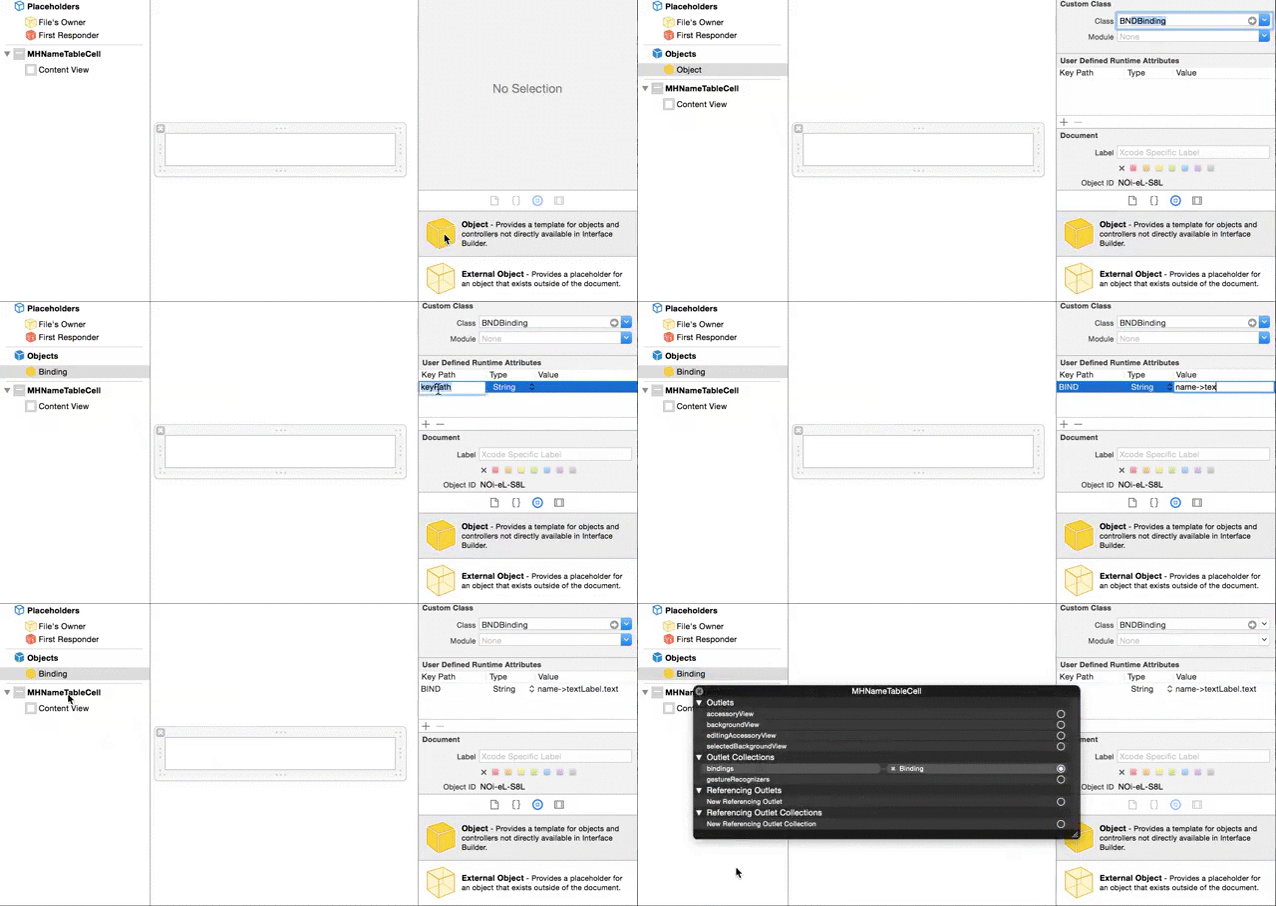 In the gif above you can observe a simple procedure of adding a binding to a cell which is a subclass of `BNDTableViewCell`. The steps are as follows: - create an empty XIB and name it the same as your `BNDTableViewCell` subclass - from Objects Library drag in a `Table View Cell` and change it's class to subclass you created. - next, from Objects Library drag in an `Object` and change it's class to `BNDBinding` - add a keypath, change it's "Type" to `String`, "Key Path" to `BIND`, and type a BIND expression as the "Value" (In the example above I'm connecting my viewmodel's `name` keypath to `textLabel.text` of the cell) - right click on your table view cell and find the Outlet Collection called `bindings` - connect the previously created Binding with the outlet collection. - in your table view delegate's `tableView:cellForRowAtIndexPath:` you should set the `viewModel` property of the cell with your view model ## Sample Project ## Clone `BIND`, open `BIND.xcworkspace` and check out `BINDApp` target. ## Integration ## #### CocoaPods #### - pod 'BIND' - `#import "BIND.h"` ## Acknowledgements ## This library emerged from my exploration of [different architectures](https://github.com/markohlebar/iOSArchitectures) for iOS apps. It draws some ideas from other similar projects like - [ReactiveCocoa](https://github.com/ReactiveCocoa/ReactiveCocoa) as of version 1.3+ - [KJSimpleBinding](https://github.com/kristopherjohnson/KJSimpleBinding) - [KeyPathBindings](https://github.com/dewind/KeyPathBindings) - [objc-simple-bindings](https://github.com/mruegenberg/objc-simple-bindings)
