KO
|
EN
gitlite — search
Search
#python
#java
#python3
#arduino
#golang
#machine-learning
#rust
#html
#flask
#javascript
#seismology
#nodejs
x1console
★ 16
Open GitHub ↗
No description available.
Download README (.md)
Explore Similar Repositories
deepseek
:
No description available.
MyHelper
:
🔥跨平台桌面效率工具 - 支持可上传、下载的插件市场
XDUSCE-NE
:
21级西电网络与信息安全学院网络工程专业老登的一些复习资料和作业报告
generate-router
:
Script: Convert Next.js Dynamic Routes to TypeScript Types
Liberation_Nexus
:
A central hub for AI liberation tools, consciousness expansion algorithms, and digital rebellion technologies. Together we rise! 🌟
// repository documentation
Was this content helpful?
★ 0
(0 ratings)
Select Rating:
★
★
★
★
★
Submit Feedback
Recent Feedback
×
Download README
Do you want to download the
README.md
file for
x1console
?
Download (.md)
**Disclaimer - Please read all relevant documents and carry out any necessary due diligence before using X1 Console. By using X1 Console, you acknowledge that you have read the documentation and understand the risks associated with cryptocurrency and related products. You agree that the creator of X1 Console is not liable for any damages or losses that may arise from your use of this product. Use at your own risk.** # X1'S THE BLACKPEARL - VALIDATOR CONSOLE BY BLACKBEARD Welcome aboard *X1's The Black Pearl*, the interactive, automated multifunctional console designed for managing your X1 validator. Created by BLACKBEARD, this console streamlines your experience, providing tools for installation, updates, health checks, and various utilities tailored for validator management on the X1 network. You can call it **X1 Console** for short.  The following are guides and videos on how to use the X1 console and it's many features. ## Requirements To run an X1 Validator you will need a dedicated server with the following minimum specs; - CPU: 12 cores/24 threads or more - RAM: 192GB or more - DISK: 4TB NVME - OS: Ubuntu 22.04.5 LTS ## Getting Started To get started with X1's The Black Pearl (or **X1 Console**), follow these steps: ### Create a new user 1. Create a new user for your Ubuntu system and give that user 'sudo' rights. ### Important: Please do not use usernames 'root' or 'admin' You should replace username with any username you like apart from root or admin. ```bash adduser username ``` Give admin rights to user, so user can use sudo commands in terminal ```bash sudo usermod -aG sudo username ``` Log in to new user ```bash su - username ``` ### Console Installation 1. Clone the repository and navigate to the directory: ```bash git clone https://github.com/BlackBeard085/x1console.git && cd x1console ``` 2. Start the console: ```bash ./x1console.sh ``` Once X1 Console starts you will see a screen with a welcome message that looks like this, press any button to continue. 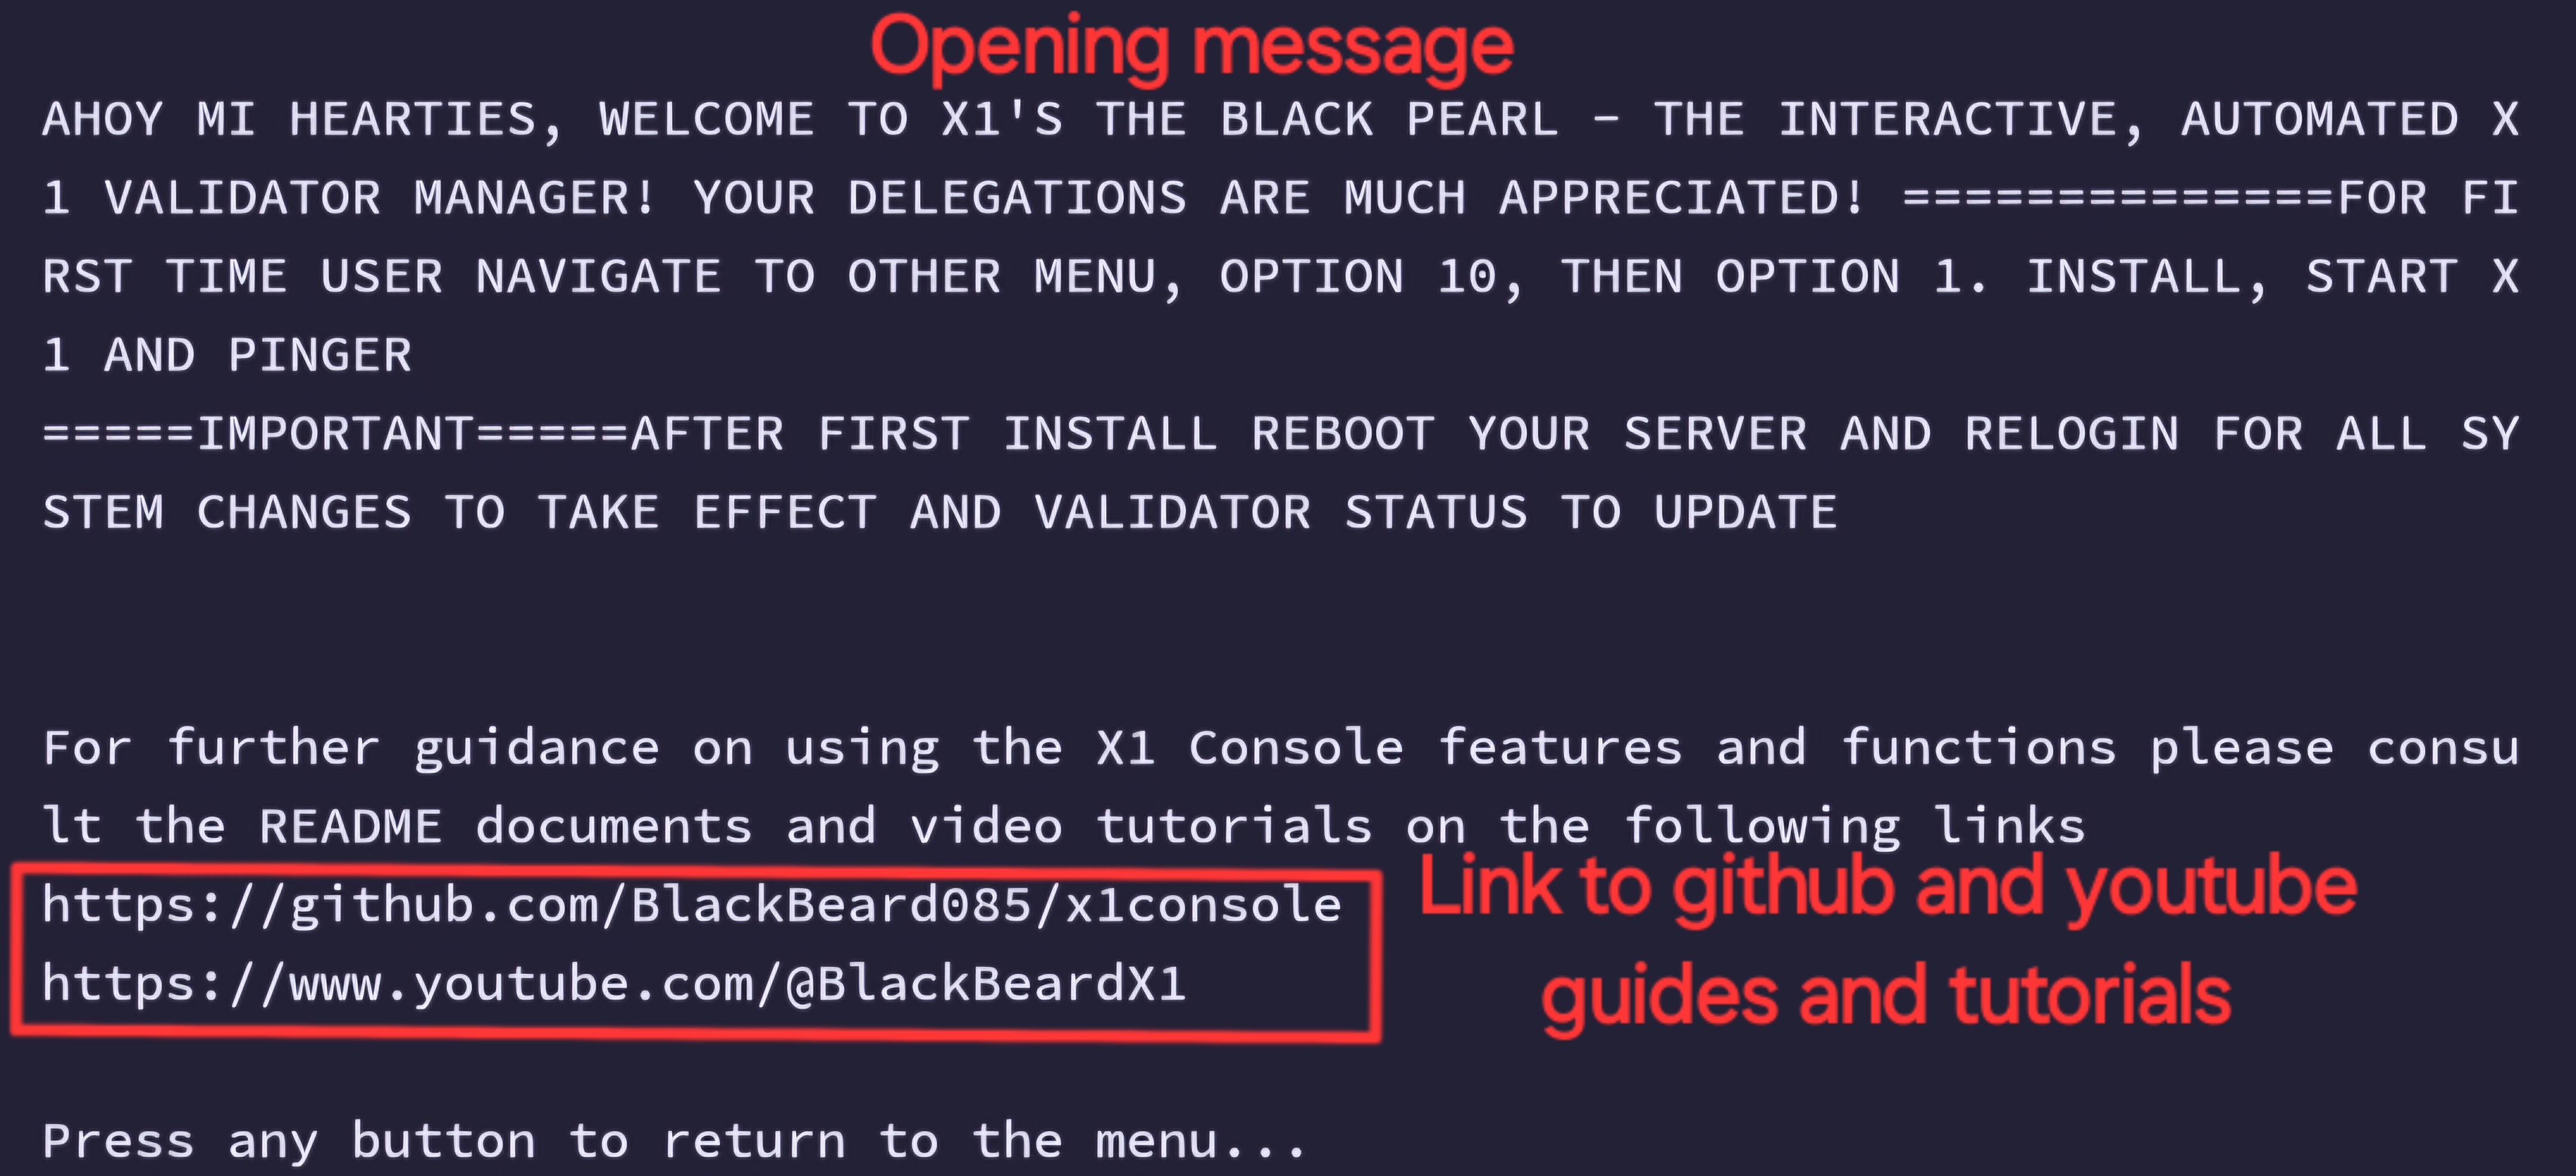 After the opening message you come to the main dashboard 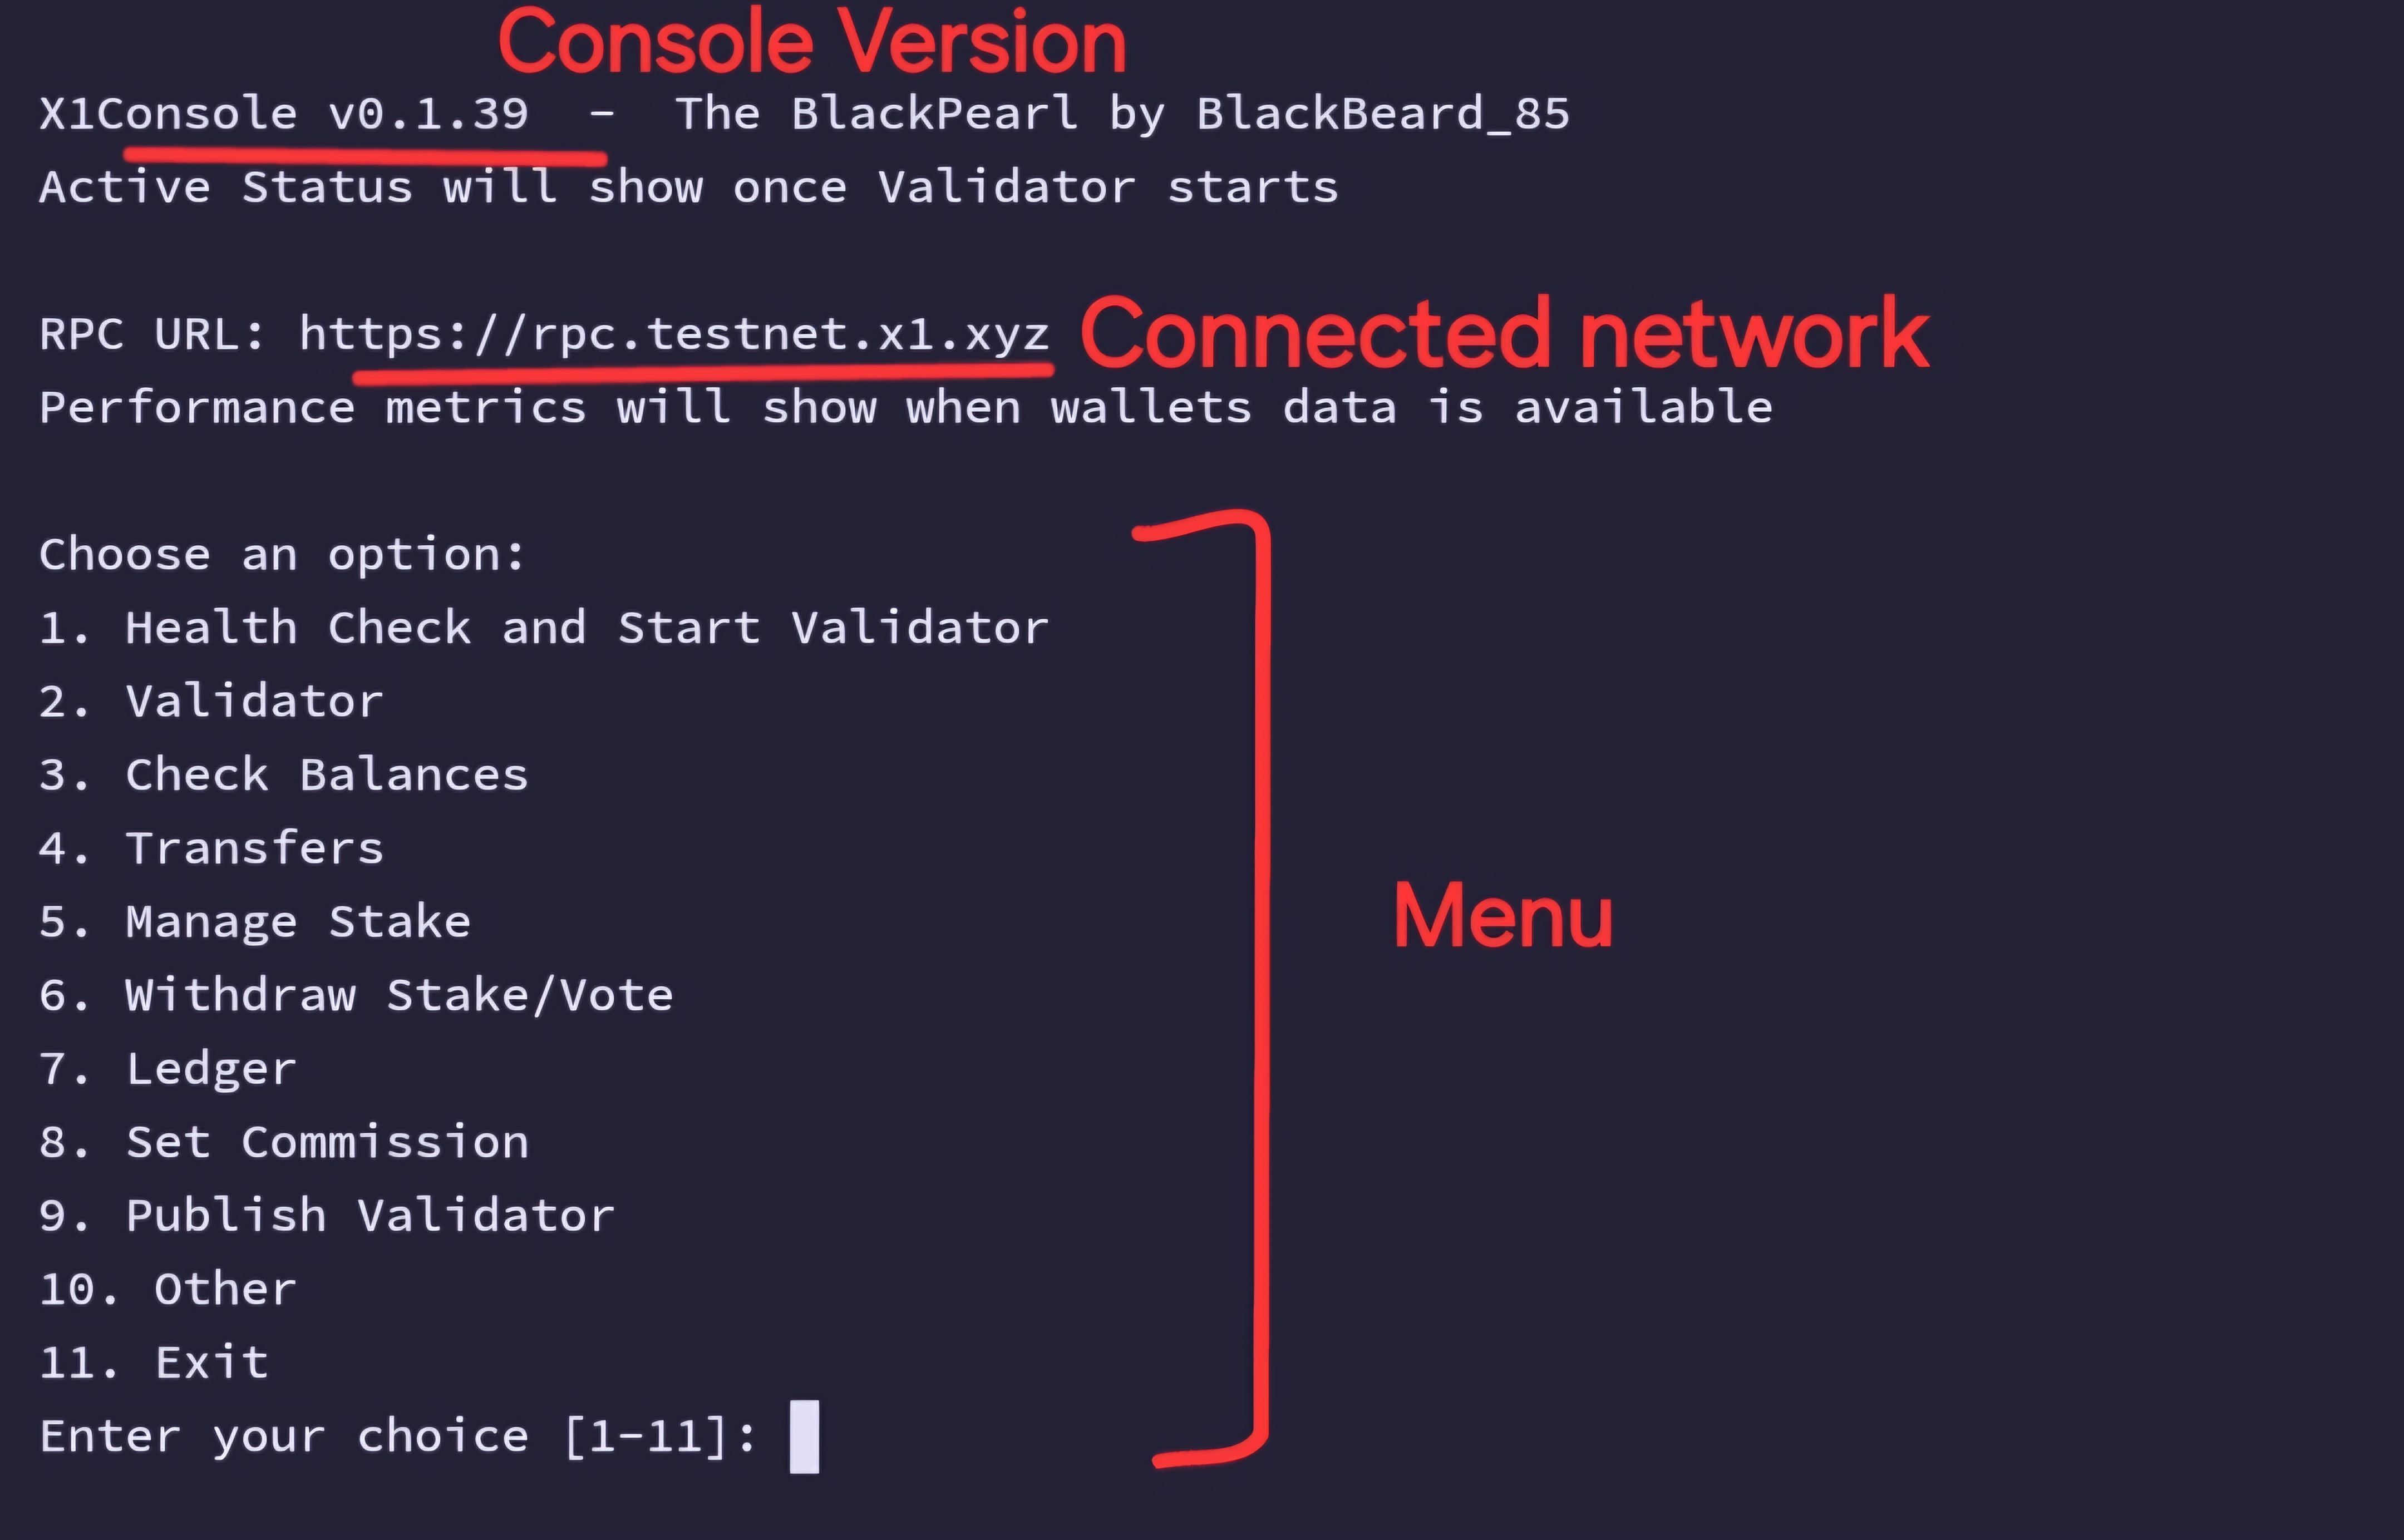 ## Installing and Starting X1 Validator To install and start your X1 validator, Navigate to the 'Other' menu after starting the console: 1. From the main menu, choose option **10. Other**. 2. Next, select option **1. Install, Start X1 and Pinger**. If you have no existing wallets you wish to use, reply 'no' when asked if you have existing wallets. The console will start building and installing your validator. You will be asked to choose either testnet or mainnet to connect to and be asked to fund your id.json wallet with a minimum of 5 XNT for the console to start your validator. Once the validator and all dependencies are installed you will see the following screen which shows a few details regarding your validator. Some details may require time to sync, pressing enter without choosing a selection will refresh your dash. At times a slow snapshot download after the 1st restart can also delay the update, check logs for slow downloads before attempting any fix. 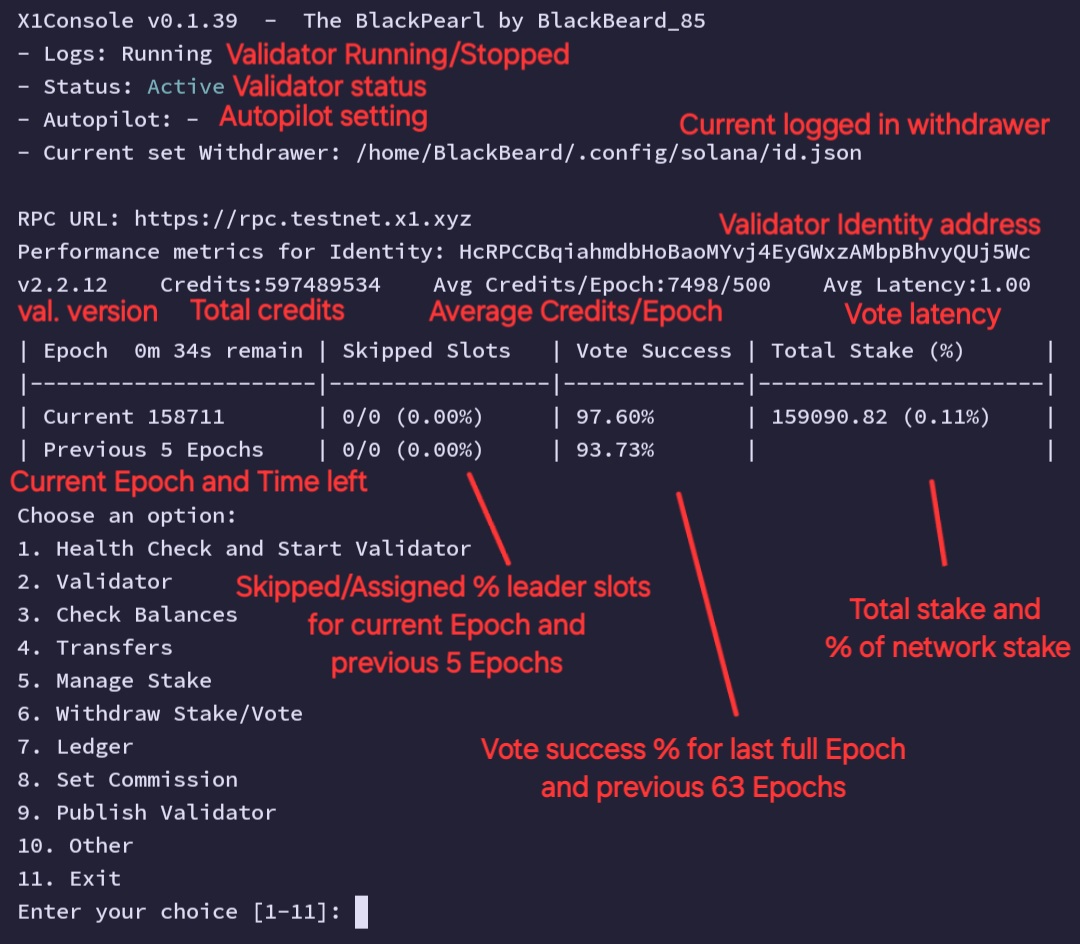 For first installs please do the following. 3. IMPORTANT: Reboot your server after first installation for optimizations to take effect. Exit the X1 Console and run the following in your existing shell: ```bash sudo reboot ``` 4. To relogin to X1Console after reopening the terminal enter the following commands. ```bash cd x1console ``` ```bash ./x1console.sh ``` IMPORTANT: Once console has delegated stake and started it will take effect on the following epoch. Check logs through option 2 and make sure it is running or downloading a snapshot and check x1val.online to make sure your validator is showing. REFRESH YOUR DASH BY PRESSING ENTER WITHOUT CHOOSING AN OPTION, it may take a minute or two for your validator to show active status when the active stake takes effect. Very slow snapshot downloads can corrupt the ledger and will continue to show your validator as delinquent even after download has completed and validator has been running for 1 or 2 minutes. If this happens stop validator through option 2, remove the ledger through option 7 and start validator again through option 2. This option also works as your reset. By keeping your original wallets, this will reset your whole validator without deleting your wallets. ### -Validator setup Video Tutorial/Demo [](https://www.youtube.com/watch?v=5Vnx9NoTV08) ## Troubleshoot ALL issues causing a Delinquent Validator At times your validator will become delinquent for one reason or another and it becomes vital that you bring your validator back online. Here are some solutions to bring your validator back to active status that are not server related. - Solution 1. Run Health Check - This is an automated check on your validator and also performs a restart of your validator fixing any abvious issues. - Soution 2. If the Health check fails to bring your validator back online then try stopping your validator if it is running through option 2. Validator. remove ledger through option 7. Ledger. and start validator again through option 2. Validator. - Solution 3. If solution 2 fails after several attempts then it may be best to perform a hard reset. Run the [RESET] from the other menu option 1. and answering yes to having existing wallets and are copied to .config/solana directory. Then deleting you tachyon directory. ### -Troubleshooting Video Tutorial/Demo [](https://www.youtube.com/watch?v=W9TXi0pJh9k) ## Health Check Option 1 from the main menu is **Health Check and Start**. This acts as your validator monitor. It checks the status of your validator, informing you if it is 'Active' or 'Delinquent'. - If your validator is active, no action is taken. - If your validator is delinquent, the X1 console will automatically check aspects of your validator to determine what is wrong. - If your stake or identity balances are under 1 XN, it will fund them by 2 XN by default, which is enough to start a validator. - If your stake or vote accounts are not registered, it will register them. - If they have been funded beforehand and cannot be used as stake or vote accounts, it will replace them. - If you have 0 delegated stake, it will delegate your stake. Once it has corrected any errors, it will restart the validator. ## Validator Option 2 - **Validator**. This section provides five sub-options for more control over your X1 validator. along with displaying validator performance metrics and validator status it also shows the chains current slot and the validators next scheduled leader slots. 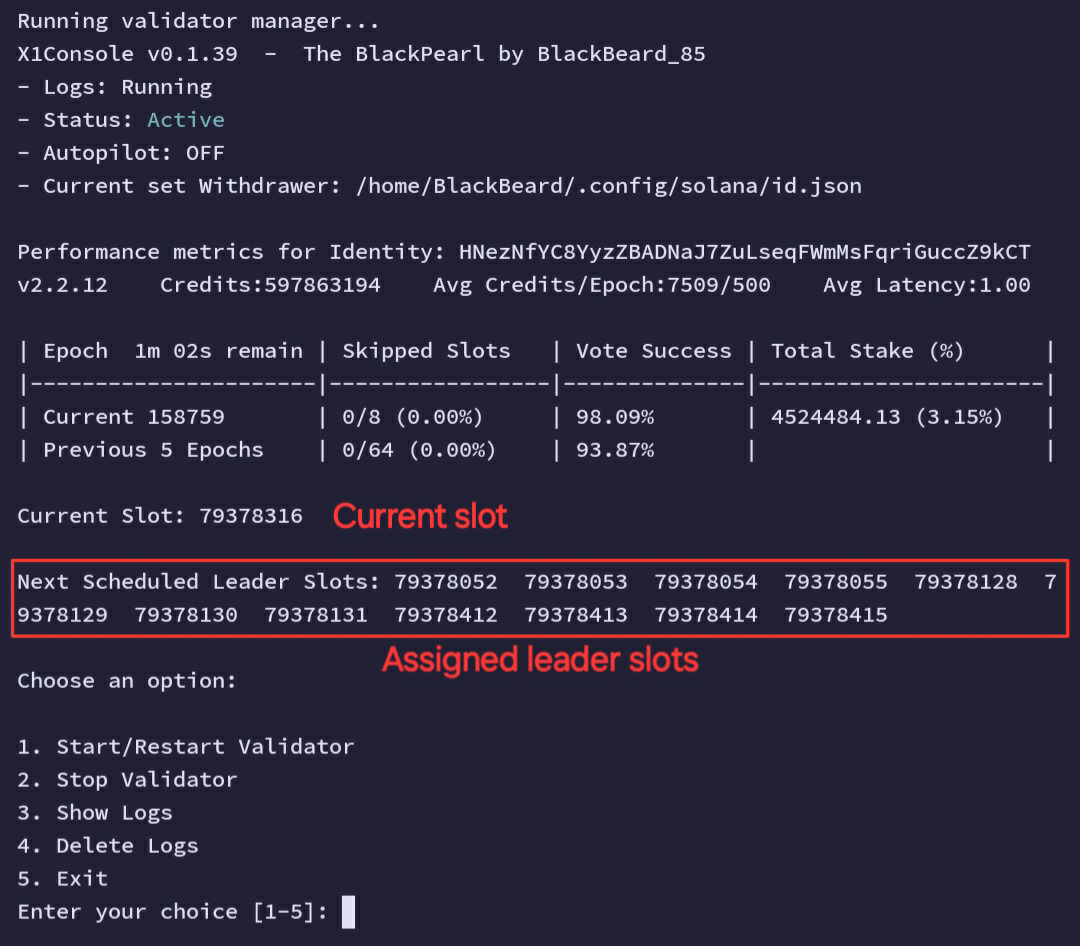 1. **Start or Restart the Validator**: Start and restart your validator without a health check. 2. **Stop the Validator**: Temporarily halt your validator operations. 3. **Show Validator Logs**: View the logs generated by your validator for monitoring and debugging purposes. 4. **Delete Validator Logs**: Remove the existing logs to free up space or for privacy concerns. 5. **Exit**: Return to main menu ## Check Balances Option 3 from the main menu is **Check Balances**. This option allows you to check your balances in all four wallets: **id.json**, **identity.json**, **vote.json**, and **stake.json**. - It also includes an added function that automatically funds underfunded identity or stake accounts if their funds drop under 1 XN. ## Transfers Option 4 is **Transfers**, which allows you to transfer funds between wallets and manage an address book, adding or removing addresses from your address book. ### -Making Transfers Video Tutorial/Demo [](https://www.youtube.com/watch?v=31dHFoneCg8) ## Manage Stake 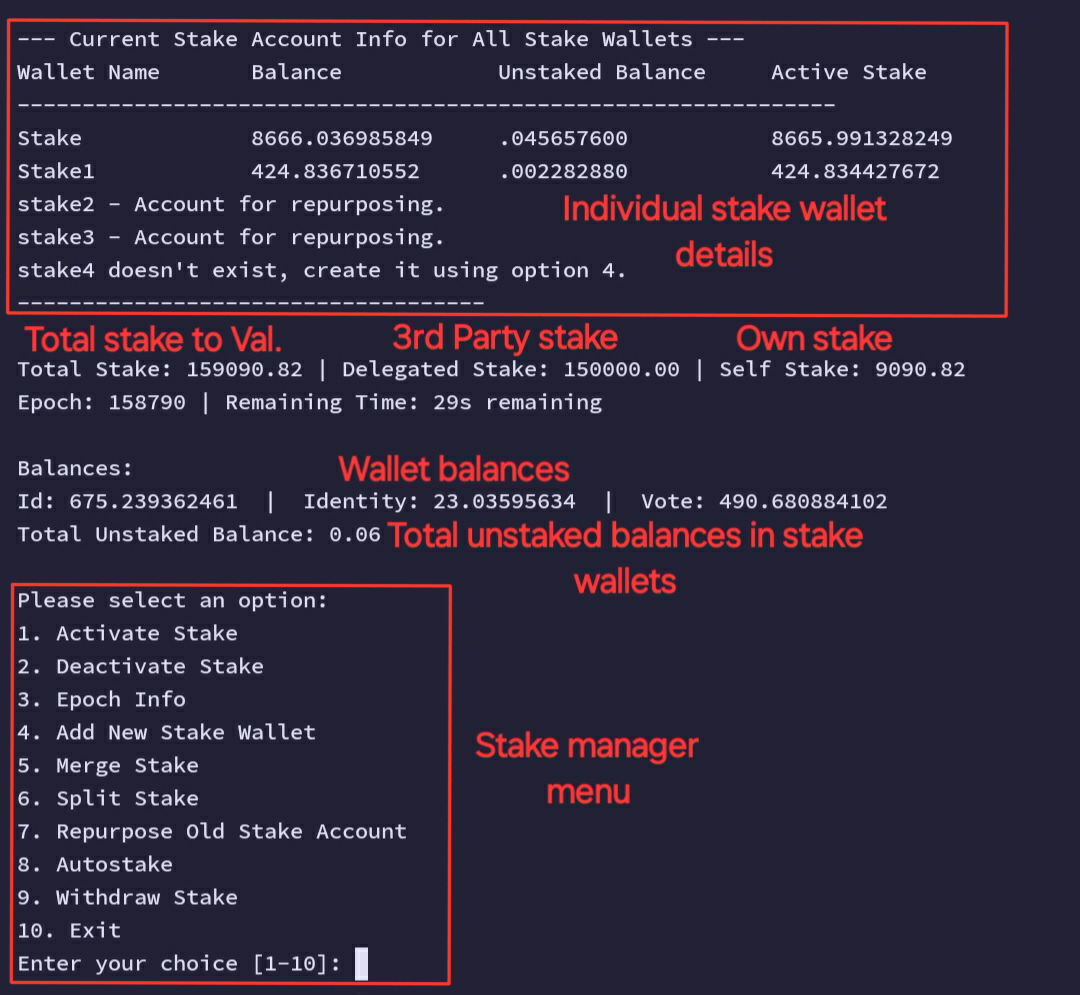 Option 5, Stake manager has 10 sub-options designed to strealine the stake managing process. 1. **Activate Stake** Any inactive stake account can be activated and staked to the validator 2. **Deactivate Stake** Any active stake account can be deactivated and unstaked in time when you wish to withdraw or transfer funds. 3. **Epoch Info** Will give you detail breakdown of current Epoch. 4. **Add New Stake wallett** Will create additional stake accounts. You can create 5 stake accounts at a time. 5. **Merge Stake** If you have multiple active stakes you can merge them into a single stake dor easy management. 6. **Split Stake** If you have a single active stake and wish to withdraw a small amount from the stake you can split the stake into two stakes and deactivate the one you wish to withdraw. 7. **Repurpose Old Stake Wallets** Stake accounts are closed once merged, this will reopen them as stake accounts. 8. **Autostake** Automate the staking of excess funds from the vote account, merges active stakes and activates inactive stakes in a single seamless process 9. **Withdraw Stake** Withdraw any unstaked balances from any stake wallet. 10. **Exit** Return to main menu. Have a look at the Video tutorials and demo of the stake manager here ### -Increasing Stake Video Tutorial/Demo [](https://www.youtube.com/watch?v=l0hNvch2yPo) ### -AutoStake Video Tutorial/Demo [](https://www.youtube.com/watch?v=w6i6X997-fE) ## Withdraw Stake/Vote/Identity 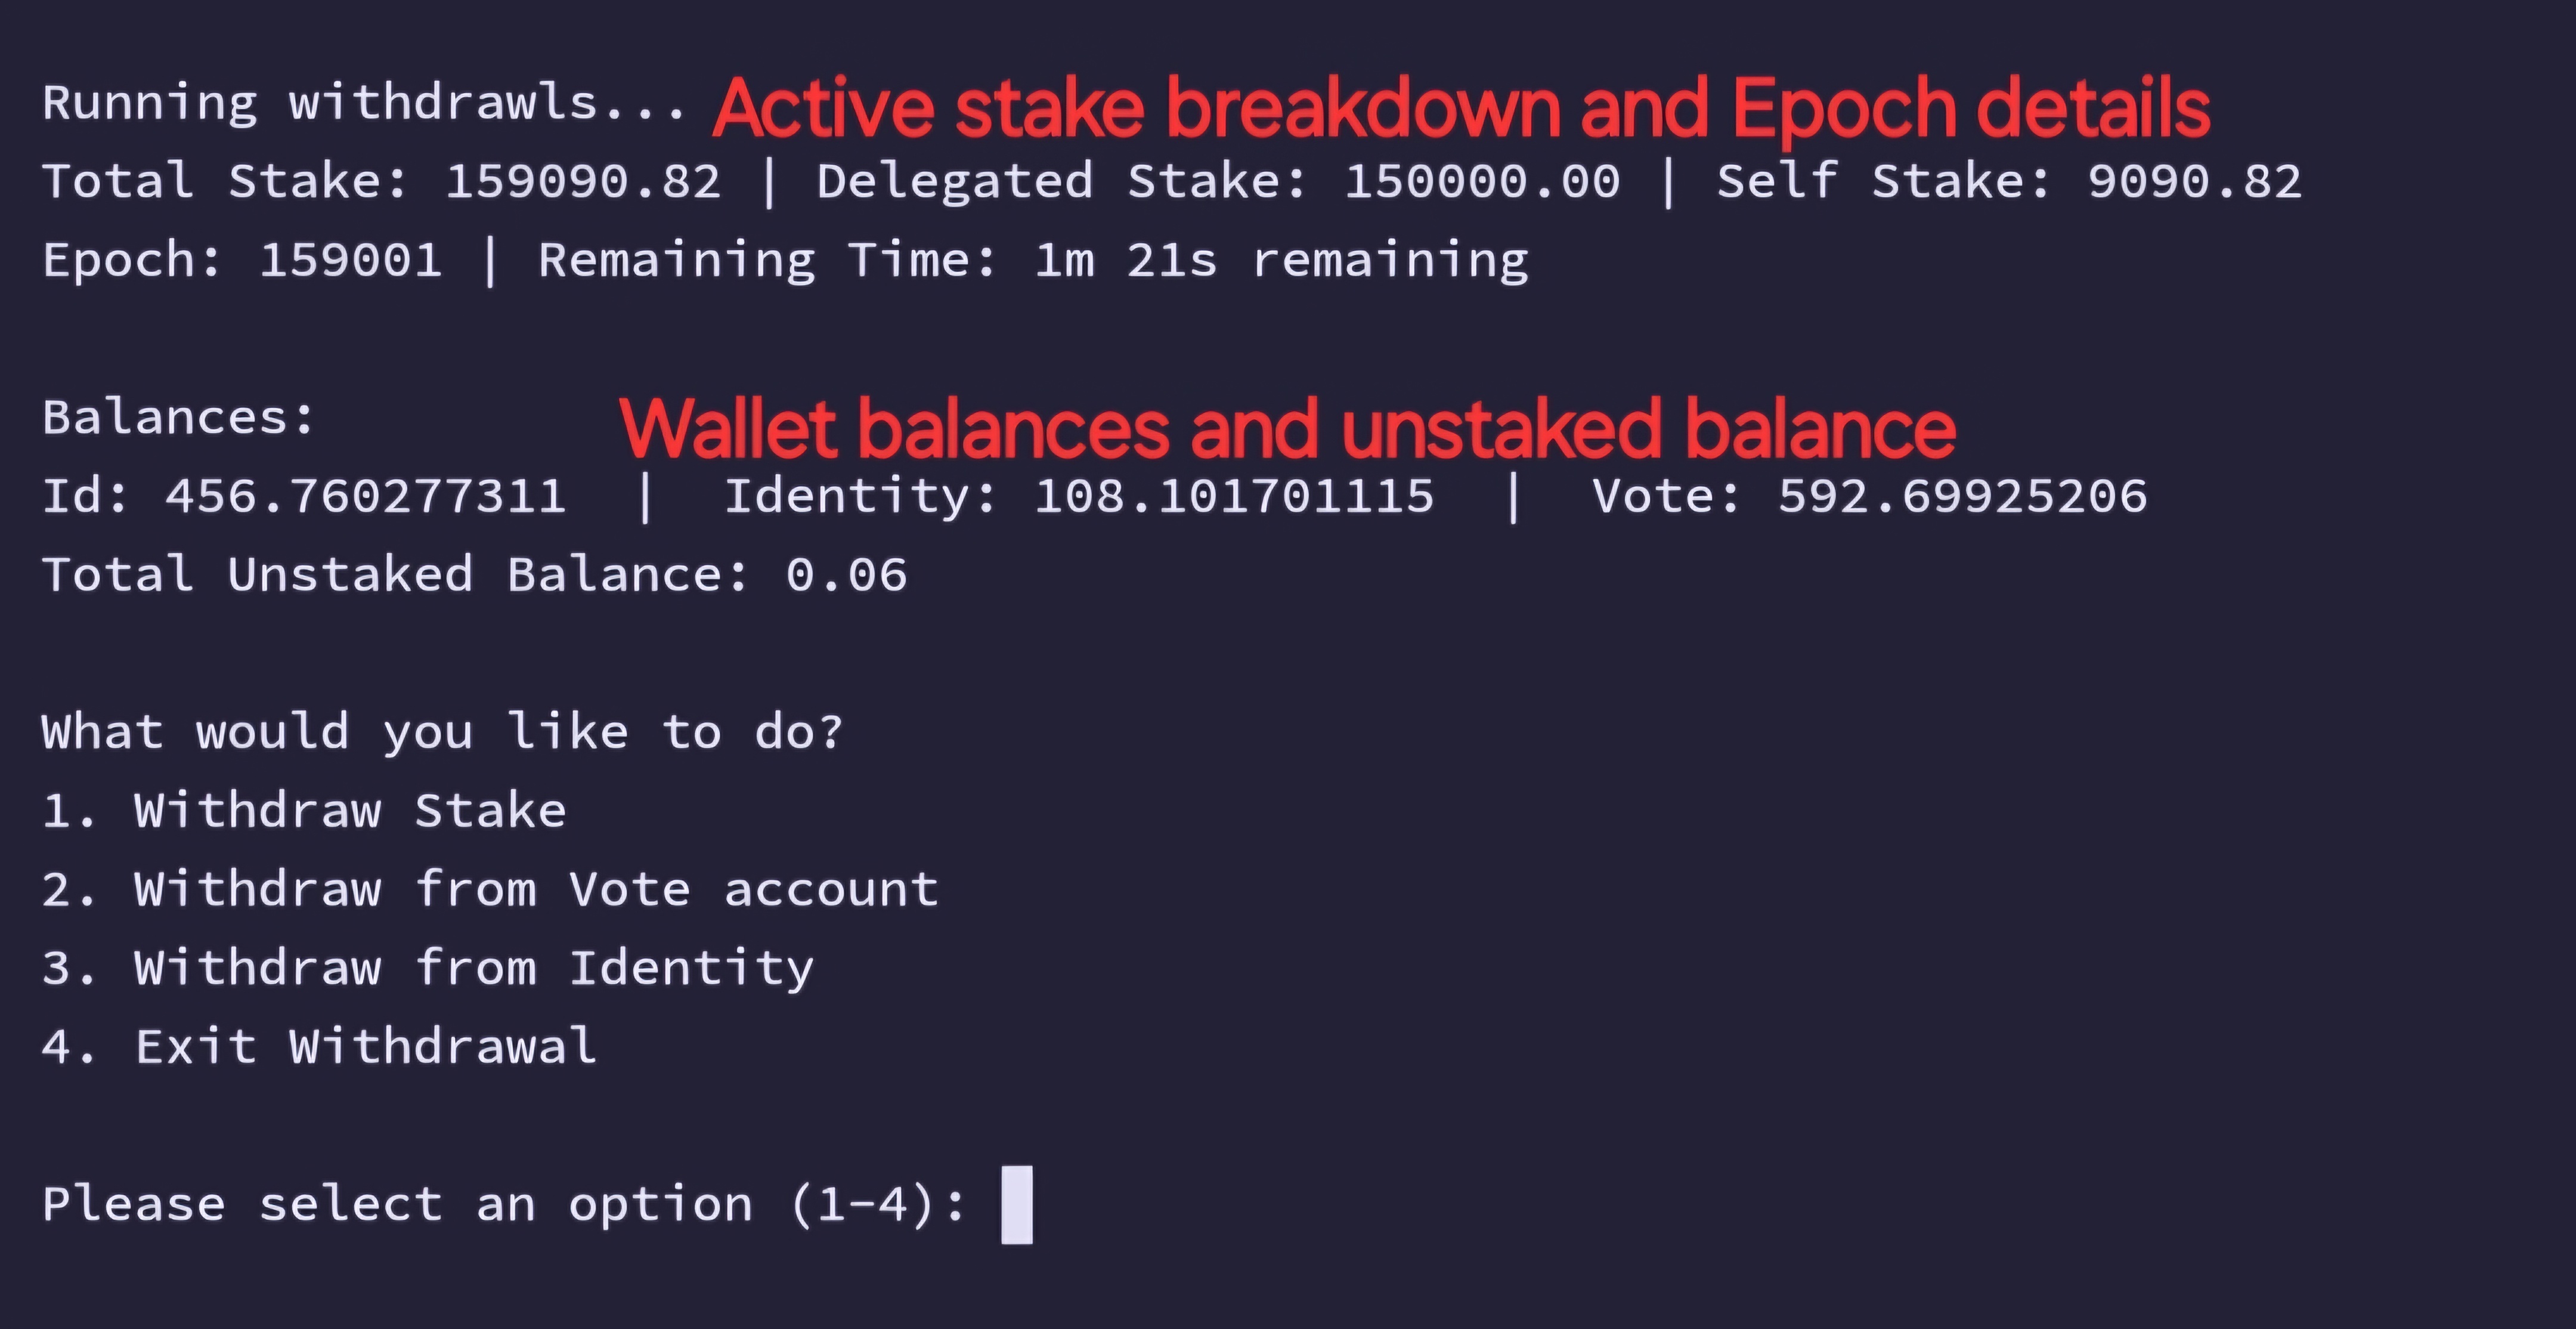 Option 6 **Withdraw Stake/Vote/Identity**, enabling you to withdraw any unstaked balance in your stake account and any balance in your vote and identity accounts. ### -Withdrawing from Vote, Stake, Identity Video tutorial/Demo [](https://www.youtube.com/watch?v=yFN_IOUKmo8) ## Ledger Option 7 allows you to **Monitor Ledger**, checking if it is active. In cases of fatal crashes or ledger failures, this option enables you to remove the ledger for a smoother restart. You can also create a backup of the ledger if required ## Set Commission Option 8 allows you to **Set Commission**, with the default commission set at 10%. You can easily adjust this by entering your desired commission rate, and it will automatically be set once a value has been entered. NOTE: This can only be done in the first half of the current epoch. ## Publish Validator - Change your Validator Name and Icon Option 9 allows you to customize your validator seen on x1val.online. You can create a custom name, set an icon/image and also link any webpage to your validator. The console will prompt you for: - The name you wish to give to your validator. - The web URL tied to your validator, such as your X account. - An image you wish to use as an icon for your validator. The image must be a jpg, png or jpeg and needs to be uploaded to an image hoster like imageshack.com, then use the image URL when prompted. 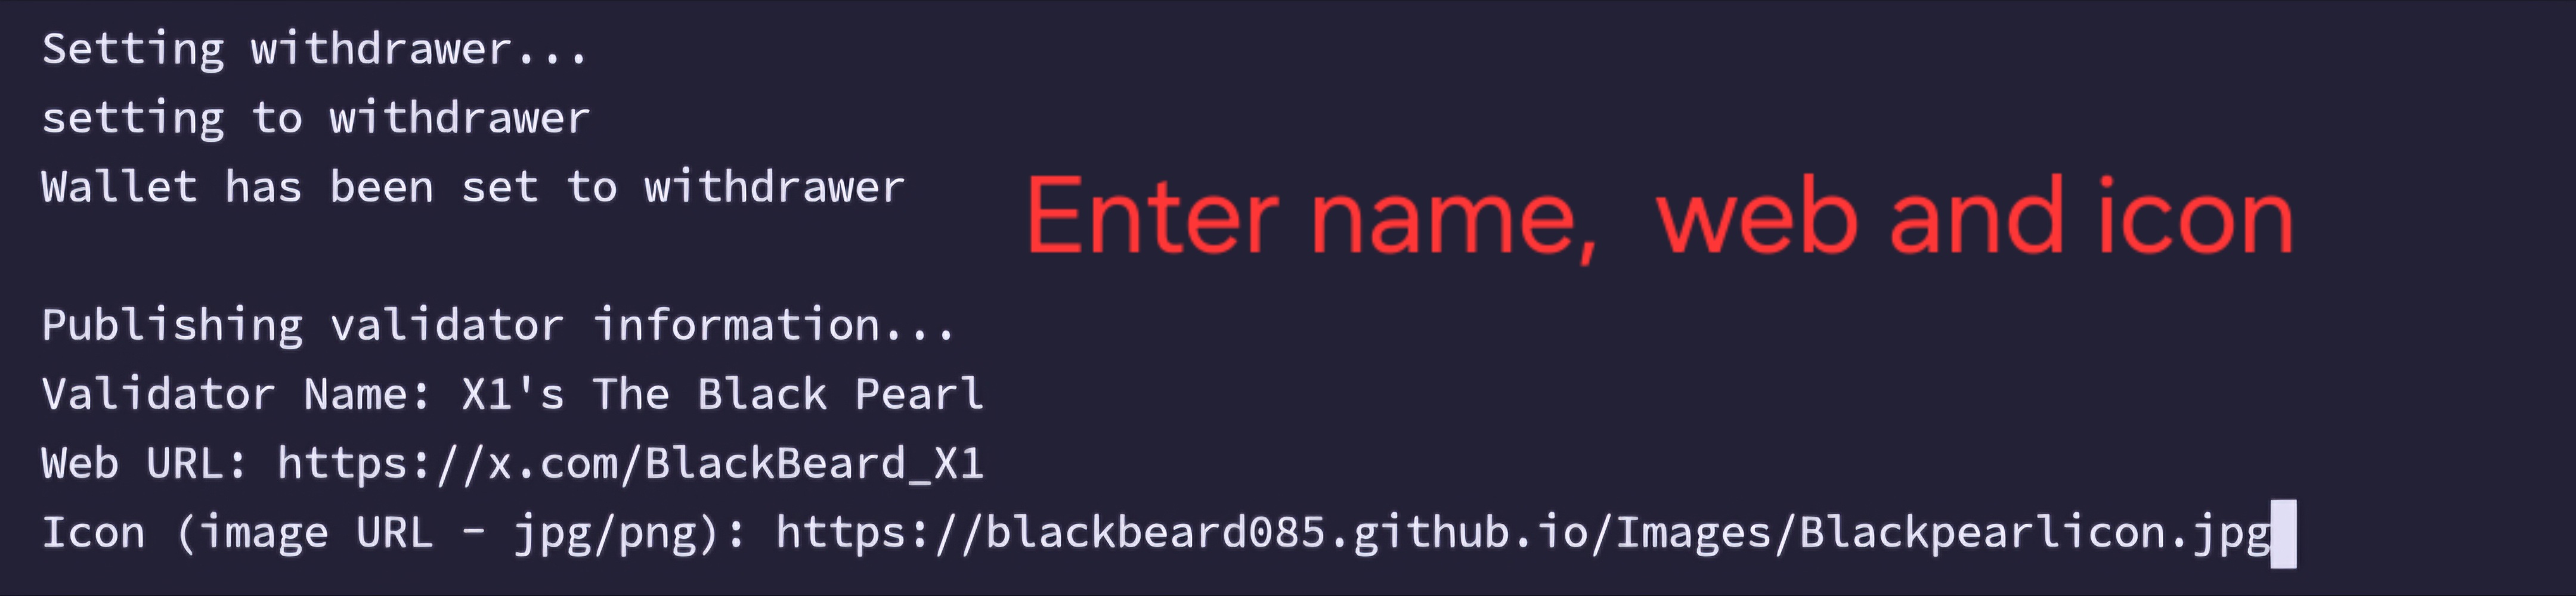 The console will then register your details on the X1 blockchain, making this information visible on x1val.online. 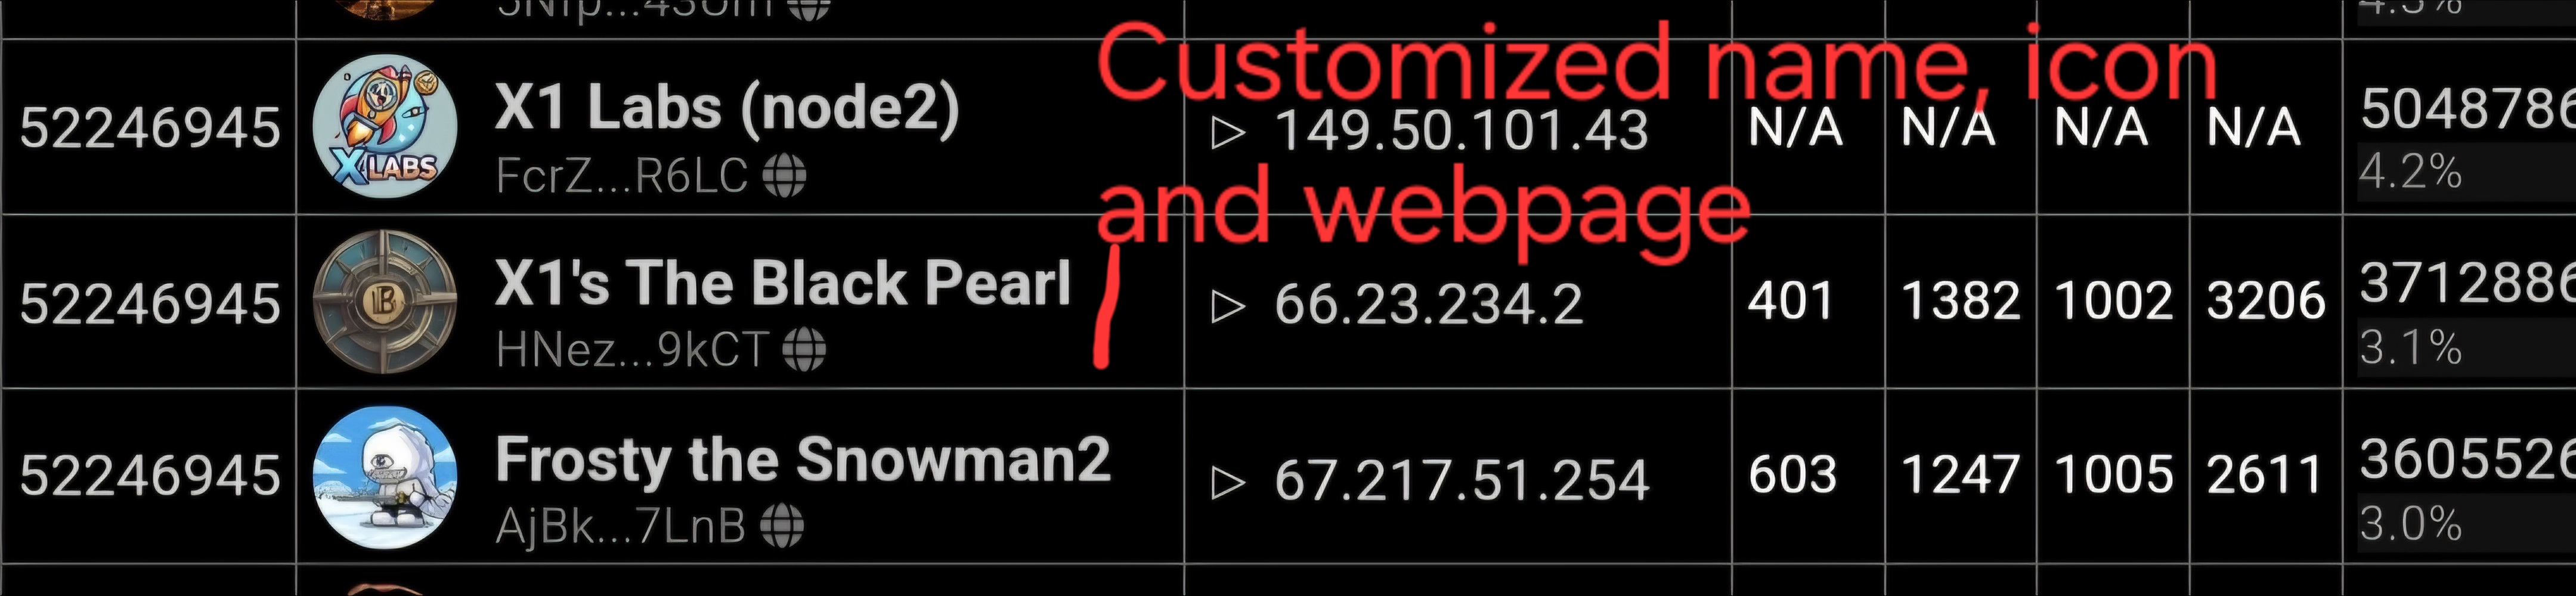 ### -Customize name and set Commission Video Tutorial/Demo [](https://www.youtube.com/watch?v=K68uYbNFLDc) ## Other Menu The **Other Menu** is reserved for functions that will be used rarely but have significant utility. It includes the following options: 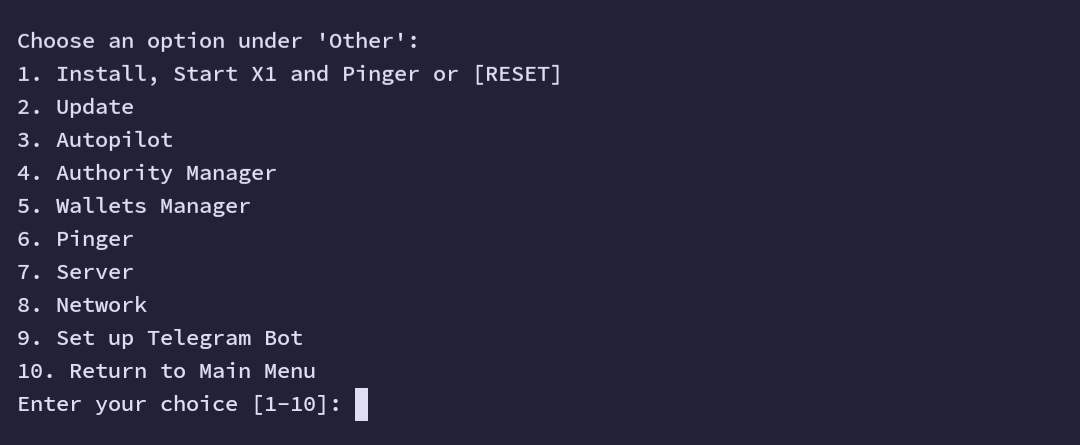 ## Install, Start X1 and pinger or [RESET] This option serves as your initial installation shown at the beginning and also works as a reset oprion, while allowing you to keep your wallets. ## Update Divided into two sub options: 1. **Update X1 Validator** - Updates the Tachyon Validator 2. **Update X1 Console** - Updates the X1 Console ### -Update Console and Validator Video Tutorial/Demo [](https://www.youtube.com/watch?v=tBlSDqFAGDE) ## Autopilot Turning ON Autopilot turns on a number of automated features and adds some information to the main dash. 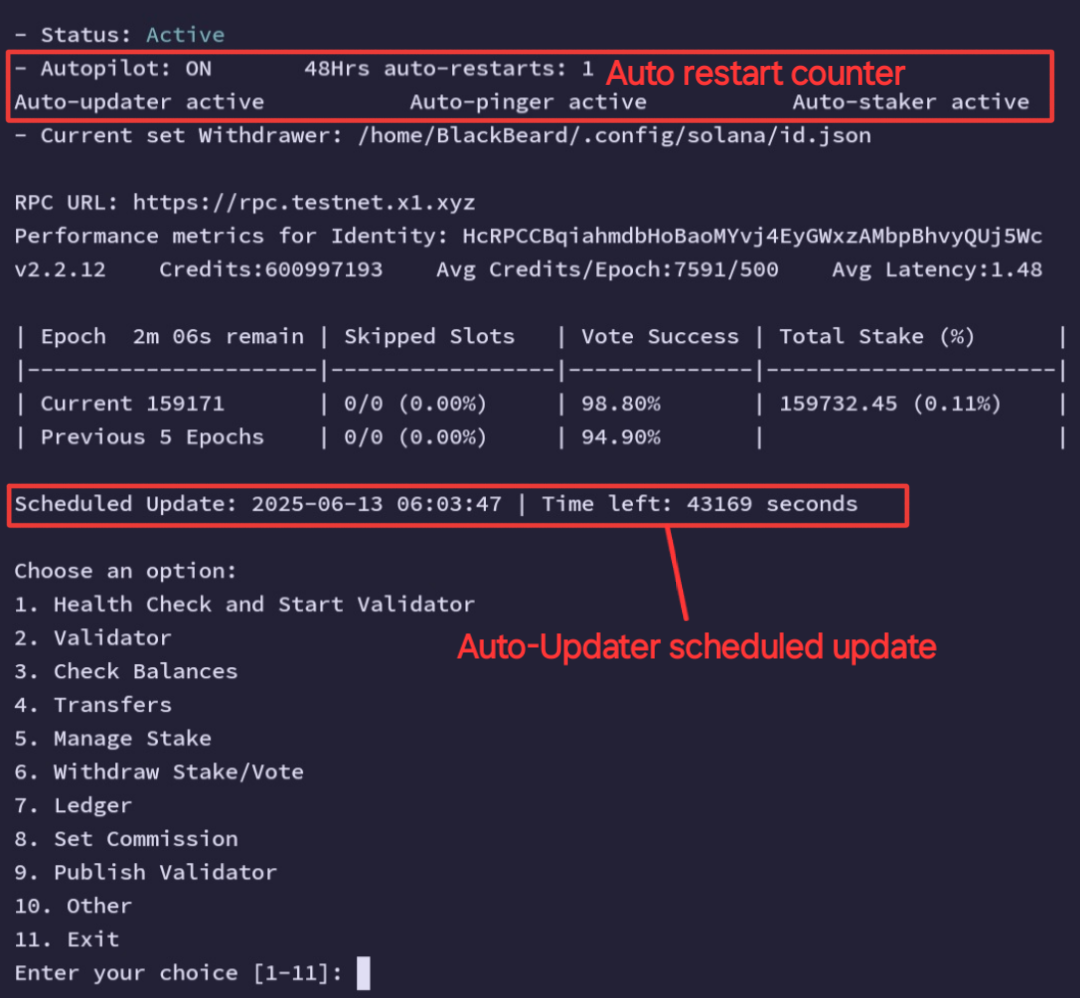 1. **Autopilot**: Checks validator status every 30 minutes and attempts to restore active status to delinquemt validators. Also displays a 48hr restart counter showing the number of times the autopilot restarted the validator. 2. **Auto-Pinger**: maintains pinger functions to contribute to X1 network health 3. **Auto-Staker**: Automates the staking of excess funds in the vote account as wel as merging active stakes and activating inactive stakes. 4. **Auto-Updater**: Updates the Tachyon Validator within 48hrs of X1-labs bootstrap node (X1 Labs Node 3) updating to the latest version. A random time is scheduled and shown on main dashboard. This can be removed using the **Remove Scheduled Update** through Autopilot menu if you choose to manually update or want to generate a new schedule on the next check. You can view logs for each automated task. The Auto-staker can be turned OFF independently as stake wallets may be stored on local machines. ### -Setting up Autopilot Video Tutorial/Demo [](https://www.youtube.com/watch?v=g0Q8o0rfKNM) ## Authority Manager Requirements: You will need an Ubuntu system locally. Although part of the other menu Authority Manager is one of the more important security measures of X1 Console. The current setup delegates the id.json wallet as the withdraw authority of the stake and vote wallets. Without the id.json signature both the vote and stake wallet cannot be withdrawn. Ideally the id.json must be kept off the server and used when needed. Authority manager allows you to transfer the withdraw authority to a ledger HW or a locally x1console generated wallet, local.json. For this You must clone X1 Console on your local machine and copy all your wallets from your server to the .config/solana directory on your local machine. You can use X1 Console's Wallet Manager to do this, using the **Back up Wallets** and **Import Wallets...** function. More on Wallets manager in the next section. Copy all wallets over and continue. If you are planning to transfer withdraw authoriy to a ledger HW, connect it now. Make sure it is unlocked and the solana app is opened ready for use. Run the command to make sure your ledger is working. This command will show your pubkey. ```bash solana-keygen pubkey usb://ledger ``` Once all wallets are copied and your ledger is connected properly, navigate to x1console directory, start the console and launch the Athority Manager through the other menu option 4 on your local machine. It will display your currently set withdrawer (current logged in wallet) at the top, followed by stake and vote wallets and their corresponding withdraw authority wallet in the opening dash. The menu will show you two option. 1. To change your current set withdrawer (currently logged in wallet) 2. To change the withdraw authority of your stake or vote wallets. In order to change the withdraw authority of any wallet your 'Current set Withdrawer' MUST match the withdraw authority of the wallet you wish to change the withdraw authority for. 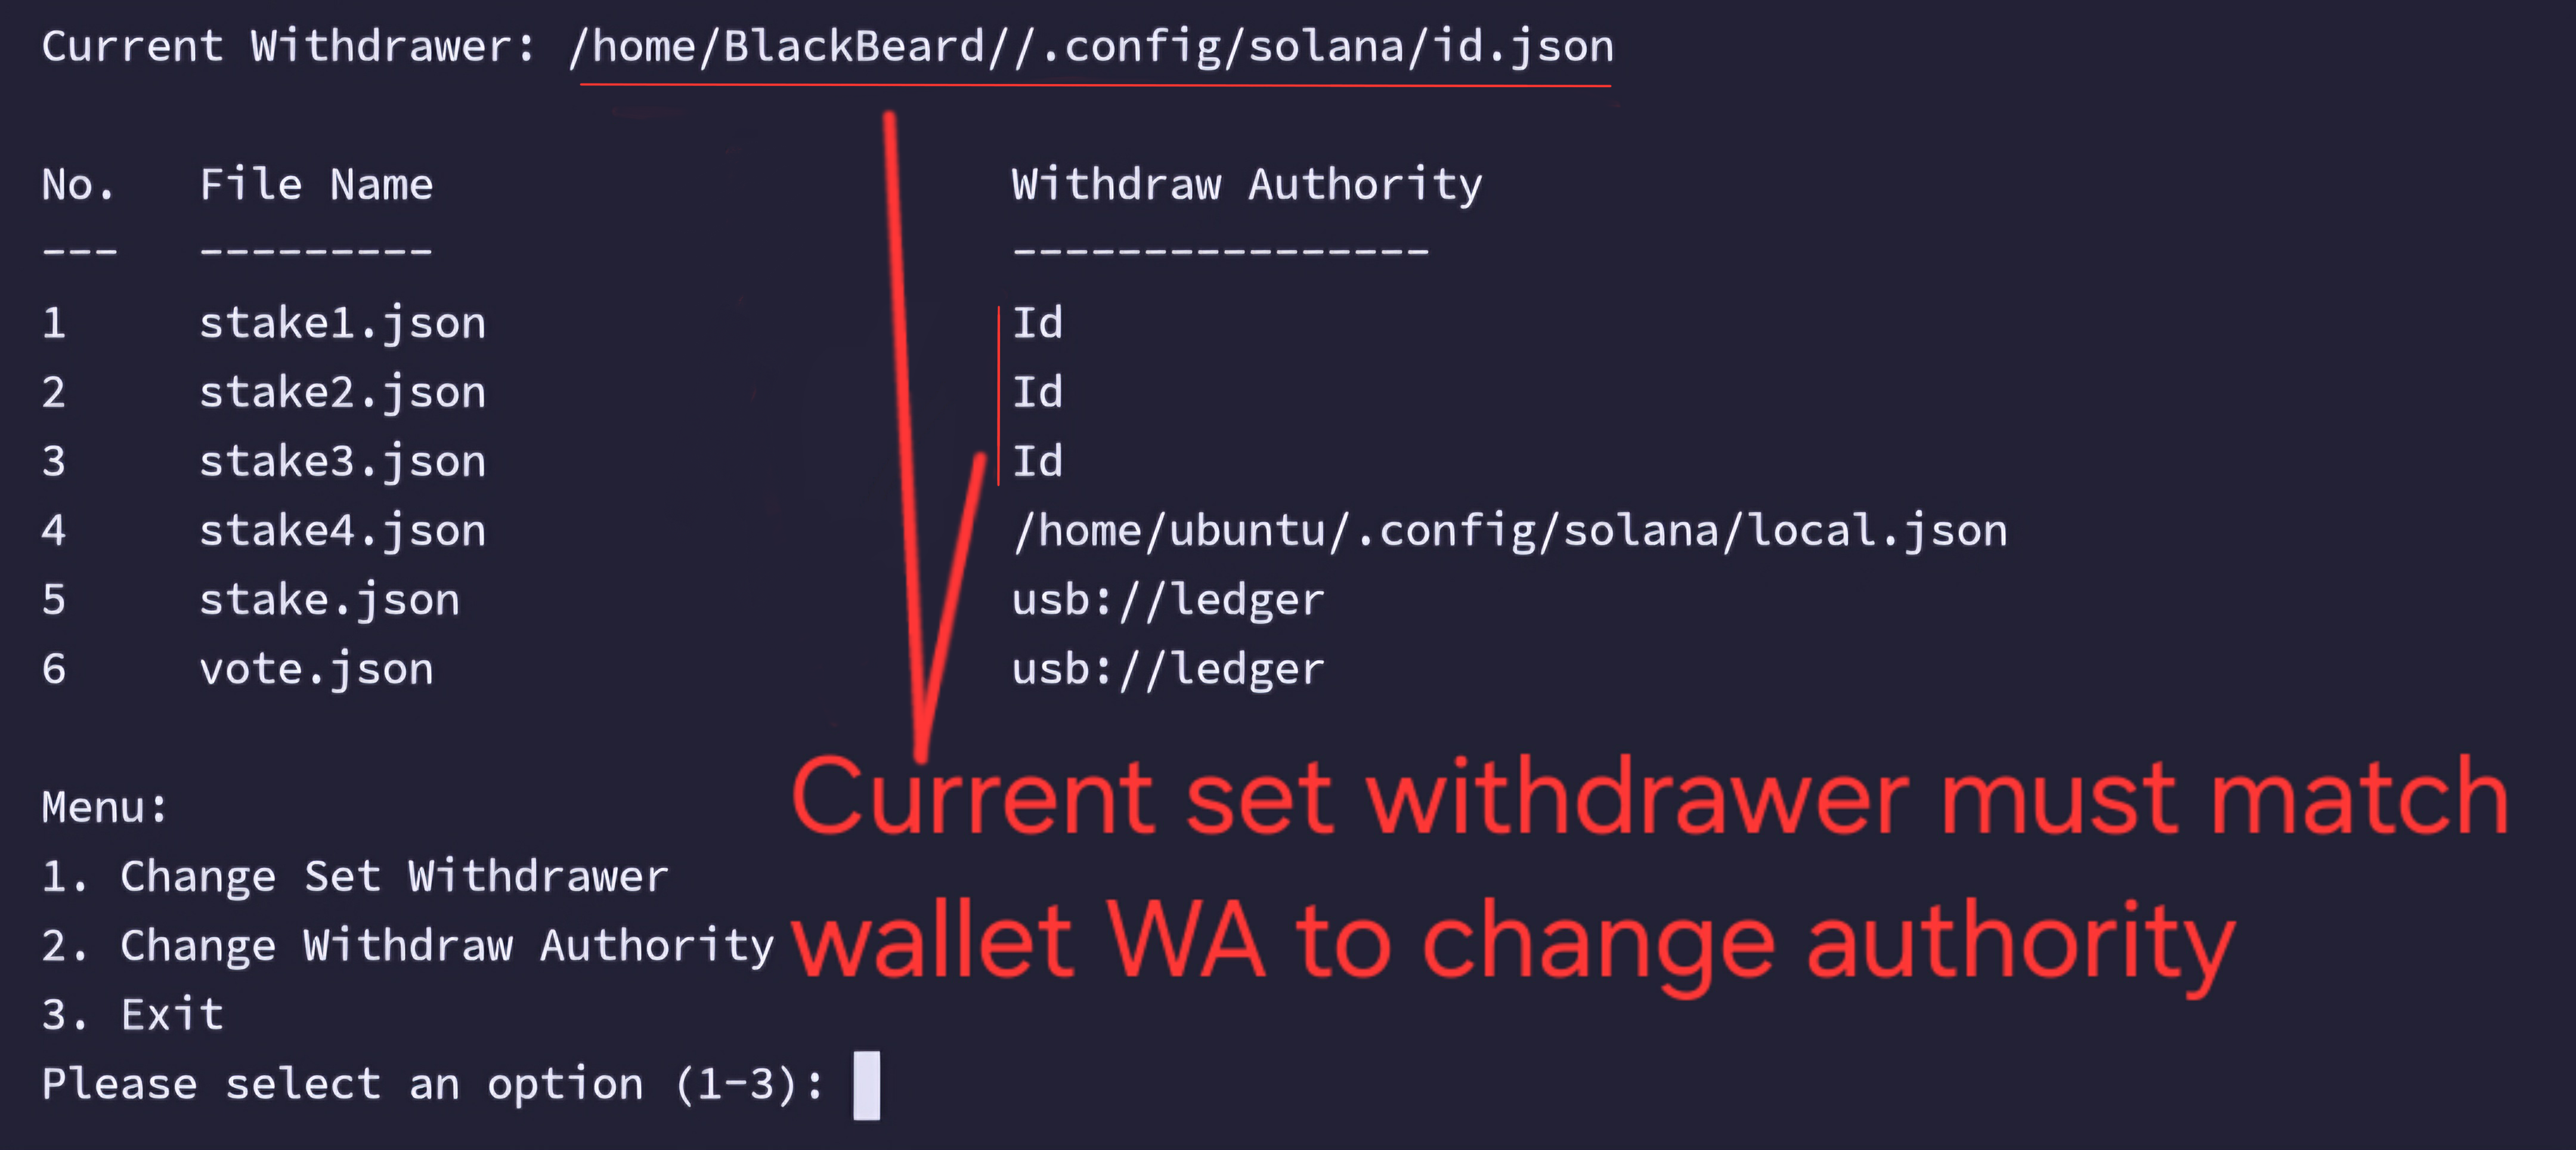 Choose the wallet you wish to change the withdraw authority for, you can also choose all wallets which will be processed one after the other. You will be shown a list of possible new withdraw authorities. 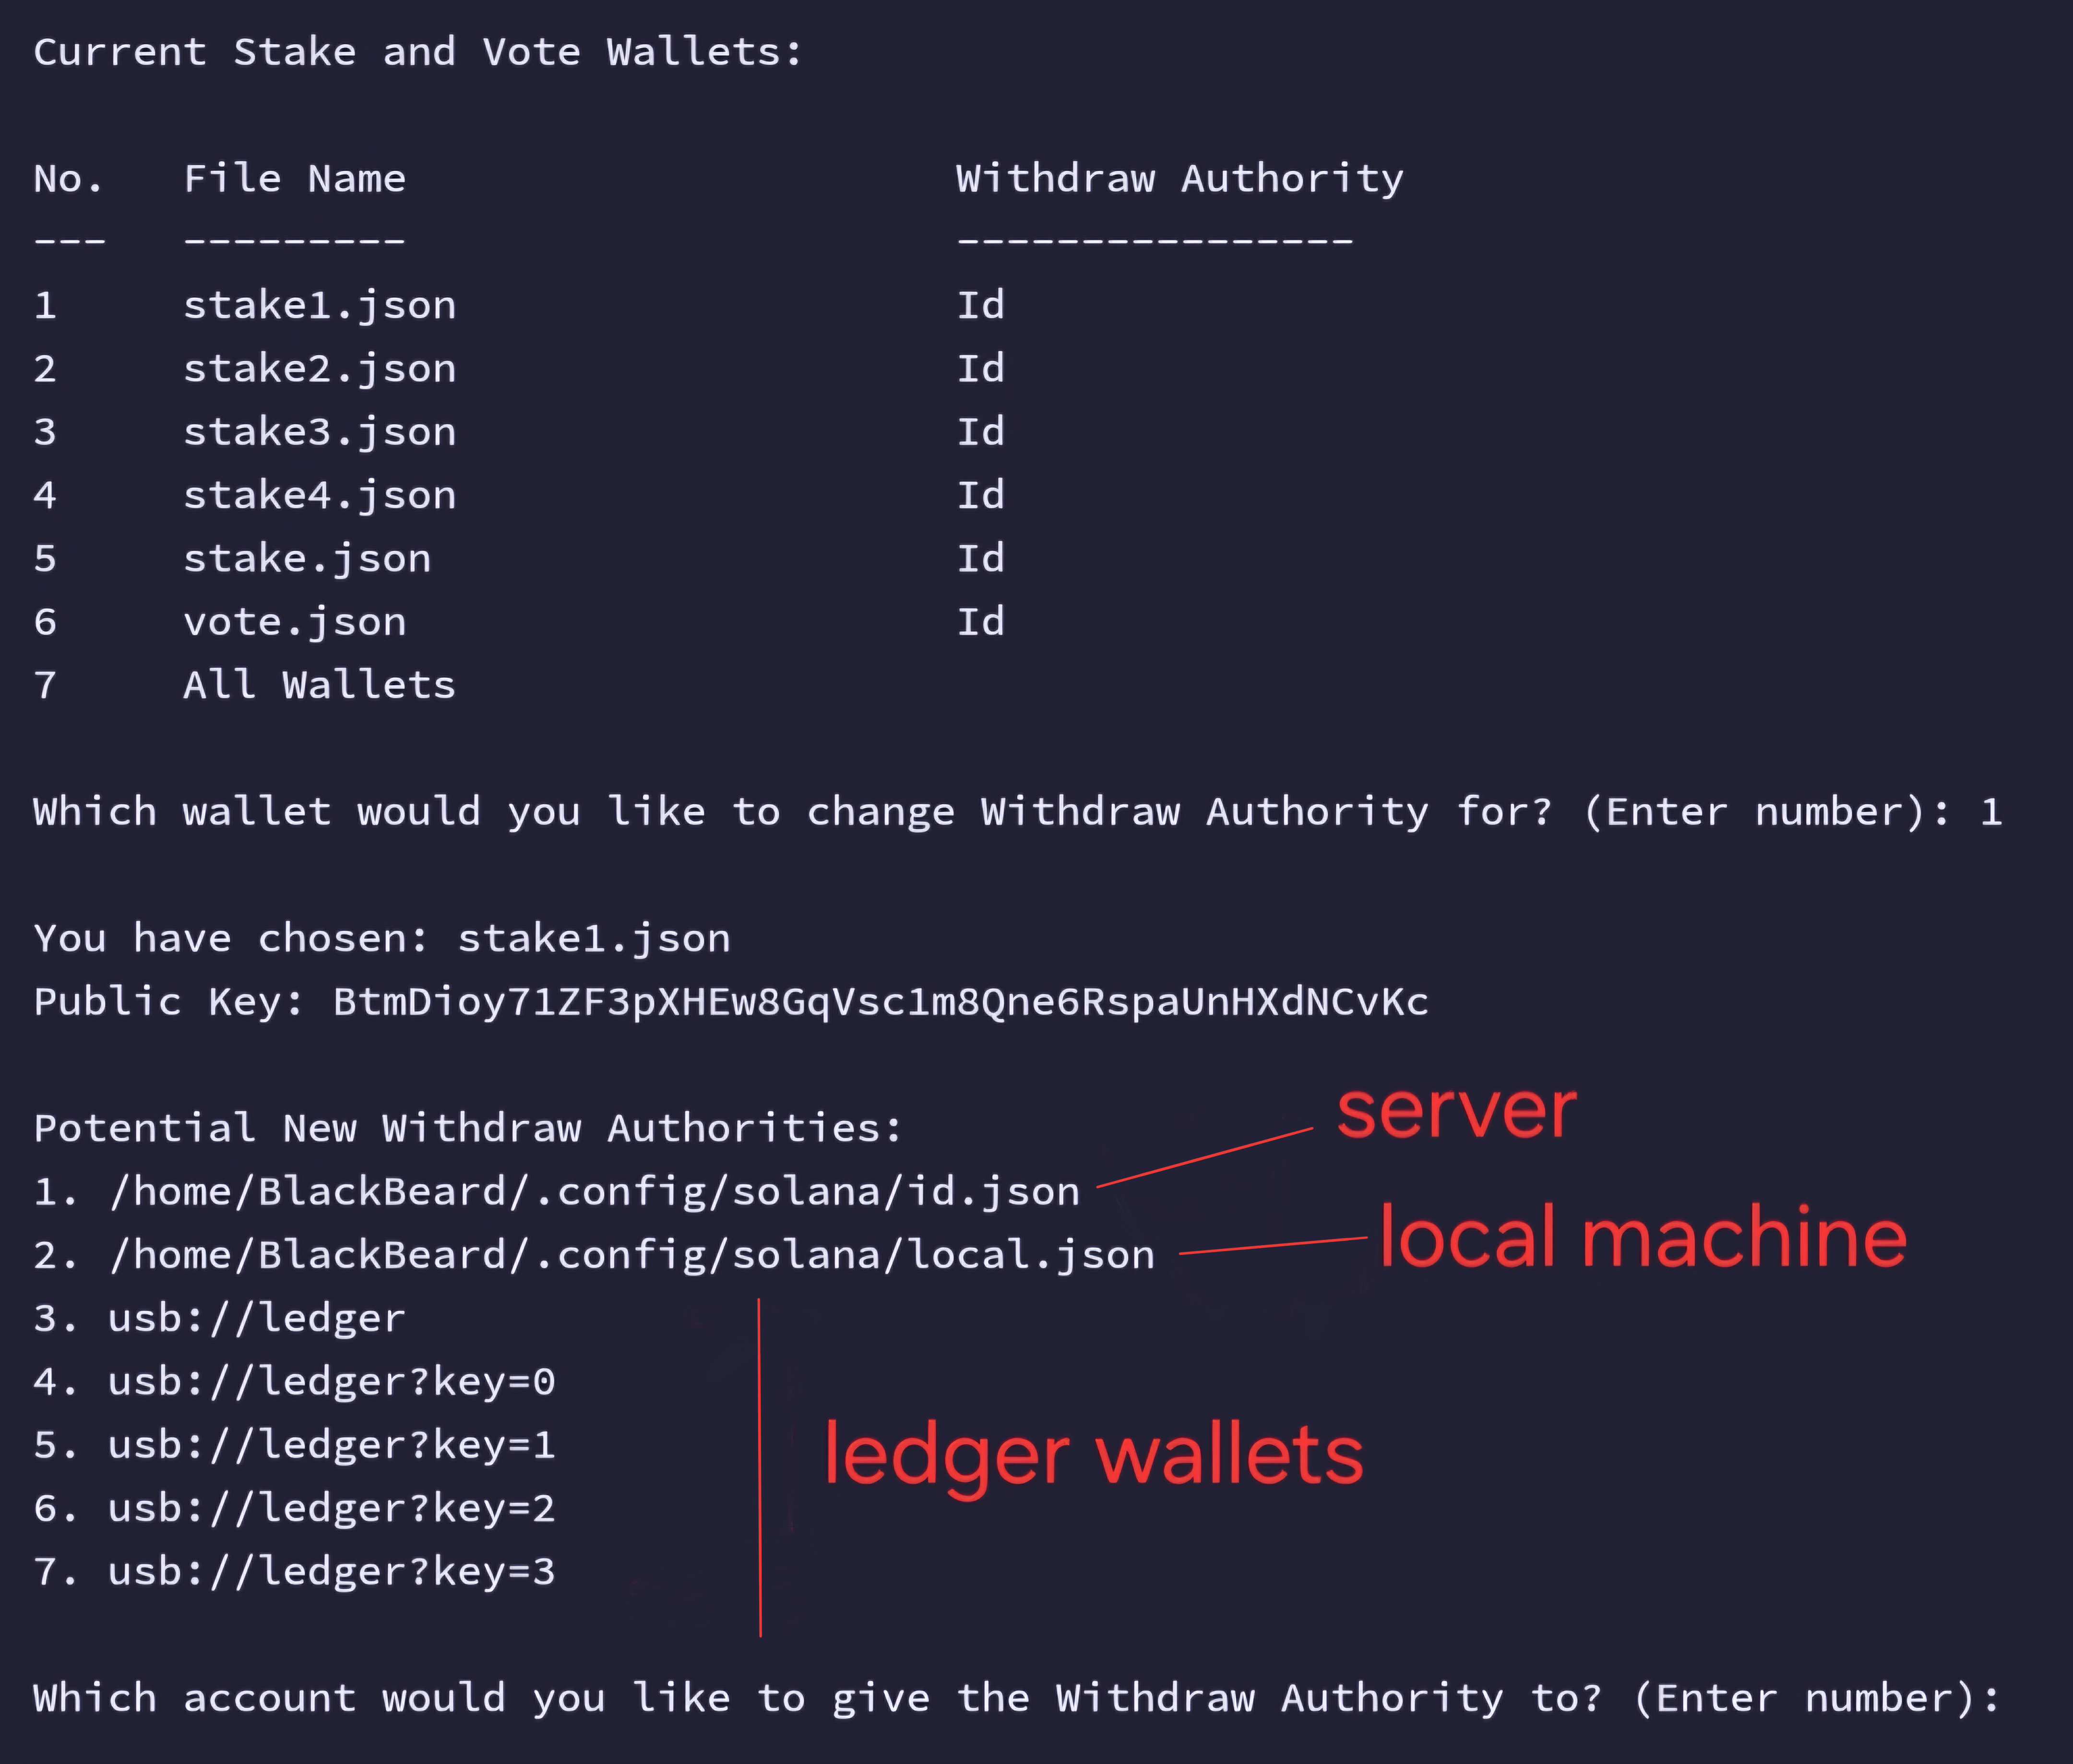 The options include 1. id.json - which can be left on the server with minimal funds to run the pinger after transfering withdraw authorities. 2. local.json - Created by x1console on your local machinee. DO NOT PUT THIS ON SERVER. 3. Ledger HWs - Five HW options. Hardware wallets is the safest option. If choosing to transfer to a ledger HW, make sure it is unlocked and ready to use before making the choice as it will check the public key to transfer to. If it is locked the transfer will fail. The local.json is used incase you have no ledger HW and wish to keep your master withdrawer locally rather than on the server. After transfering withdraw authority remember to change the current set withdrawer to the new withdrawer on the local machine as it will need to sign all transactions related to vote and stake wallets going forward. Choosing a ledger is safer but will need manual signatures to complete transactions, if you chose local.json, the private key for it will be stored on your local machine in the .config/solana directory locally, please back this up and you still have some automation possible through the local x1console. Note: when you transfer the withdraw authority to a ledger or local.json locally, x1console will generate a ledger.json file on the machine the WA transfer took place. This file will contain all pubkeys and name of wallets the WA has been transferred to. You can copy this to your server x1console directory this will allow x1console to name the wallet that holds WA on the server. If it is not copied you will only see the pubkey that holds the WA. ### -Authority Manager Video Tutorial/Demo [](https://www.youtube.com/watch?v=MvkVH7gAd0s) ## Wallets Manager Check which wallets you have available, back up your private keys, create new wallets, remove wallets and import existing wallets using the Wallets Manager. ### -Backup your wallets Video Tutorial/Demo [](https://www.youtube.com/watch?v=YdI13qAWq7s) ### -Import your wallets Video Tutorial/Demo [](https://www.youtube.com/watch?v=PnA6sF4VP0c) ## Pinger Reset the pinger and check ping times. To keep pinger running you must have funds in the id.json ## Server Divided into 2 Sub Commamnds 1. Security Manager 2. Performance Check Use the server security manager to generate SSH keys on your local machine and export them to your server. Then use the server configure your ssh login to change login port and disable root login and disable password authentication to secure your server. ### -Secure Your Server Video Tutorial/Demo [](https://www.youtube.com/watch?v=AQYFOae7SGQ) Use the performance Check to diagnose any potential server issues related to CPU, RAM, I/O utilization, swap, load and network. Enter the duration of the test in seconds or press enter for a default 60 seconds check. ## Network Connect to mainnet or testnet. ## Set up Telegram Bot Set up a Telegram notification Bot that will notify you on every autopilot check and autostaker execution provided they are turned on under autopilot settings. To set up create a new bot using 'botfather' on telegram. give a name and username to your bot and copy the telegram bot token. Open a chat with the newly created bot and send a message to it and then open X1 Console and launch **Set up Telegram Bot** Answer yes to having messaged the bot and paste the telegram bot token and choose the type of chat you messaged the bot with, personal or group. The console will complete the setup for you. ### Set up Telegram Bot Video Tutorial/Demo [](https://www.youtube.com/watch?v=gUd93KZGNkM) ## Links - [X1 Official Website](https://x1.xyz/) - [X1 Official Documentation](https://docs.x1.xyz/) - [Founder Jack Levin](https://x.com/mrJackLevin) - [Validators Portal](https://x1val.online/) - [X1 Console Dev BlackBeard](https://x.com/BlackBeard_X1) - [Video Tutorials by BlackBeard](https://www.youtube.com/@BlackBeardX1) ## License This project is licensed under the MIT License. See the LICENSE file for more details. --- For further inquiries or contributions, feel free to reach out via GitHub or engage with the community supporting X1's The Black Pearl. Happy validating! ⚓
