KO
|
EN
gitlite — search
Search
#javascript
#python
#hacktoberfest
#react
#ai
#typescript
#llm
#go
#golang
#android
#machine-learning
#rust
#deep-learning
#linux
Home-Power-Monitor
★ 9
Open GitHub ↗
esp8266 sct-013
Download README (.md)
Explore Similar Repositories
MOZ-s-Particles
:
a cheap prefab for vrchat
hsu.ai
:
Harbour.Space University AI course
dog_breed_retrival
:
A project aimed to classify dog breeds and search for the most matched image in the database
openeo-vue-components
:
Common Vue components for openEO.
Android-basis2senior
:
安卓,从基础到进阶,主要为了复刻抖音,因此集中于视频、拍照等方面。
// repository documentation
Was this content helpful?
★ 0
(0 ratings)
Select Rating:
★
★
★
★
★
Submit Feedback
Recent Feedback
×
Download README
Do you want to download the
README.md
file for
Home-Power-Monitor
?
Download (.md)
# Home-Power-Monitor I create this project to monitor the power consumption for every room in my home. 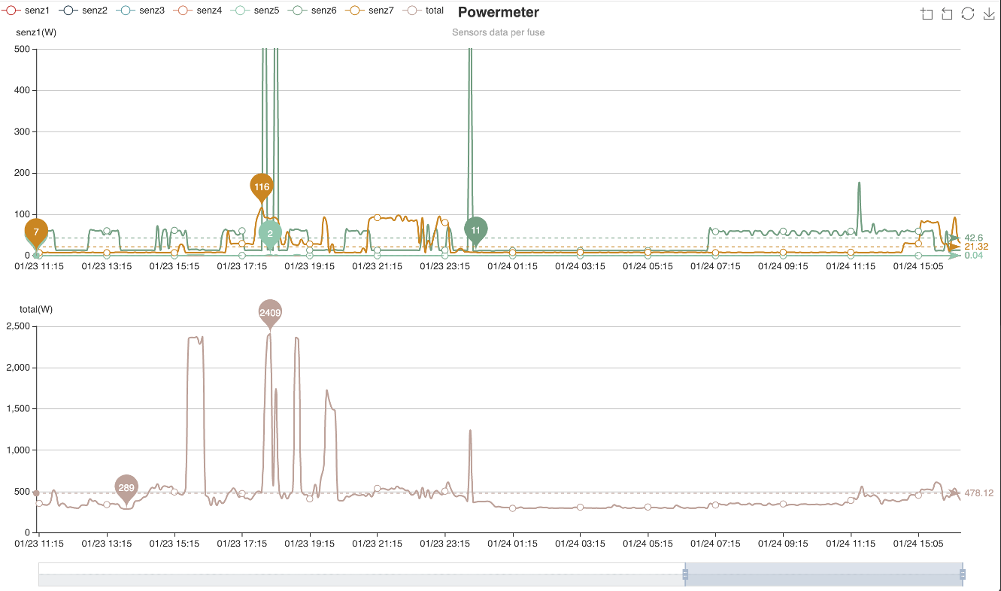 ### Home Assistant integration ``` - platform: rest resource: http://192.168.xx.xx/json name: power_sensors json_attributes: - in1 - in2 - in3 - in4 - in5 - in6 - in7 - in8 value_template: "OK" scan_interval: 60 - platform: template sensors: power_fuse1: value_template: "{{ state_attr('sensor.power_sensors', 'in1')}}" unit_of_measurement: "W" power_fuse2: value_template: "{{ state_attr('sensor.power_sensors', 'in2')}}" unit_of_measurement: "W" power_fuse3: value_template: "{{ state_attr('sensor.power_sensors', 'in3')}}" unit_of_measurement: "W" power_fuse4: value_template: "{{ state_attr('sensor.power_sensors', 'in4')}}" unit_of_measurement: "W" power_fuse5: value_template: "{{ state_attr('sensor.power_sensors', 'in5')}}" unit_of_measurement: "W" power_fuse6: value_template: "{{ state_attr('sensor.power_sensors', 'in6')}}" unit_of_measurement: "W" power_fuse7: value_template: "{{ state_attr('sensor.power_sensors', 'in7')}}" unit_of_measurement: "W" power_fuse8: value_template: "{{ state_attr('sensor.power_sensors', 'in8')}}" unit_of_measurement: "W" - platform: integration source: sensor.power_fuse1 name: fuse1_used_energy unit_prefix: k round: 2 ``` ### The Circuit  Futures: * small enough to be placed in the fuse block * no external wires, data is exposed over wifi * use non invasive sensors for measurements of the current on every fuse * WiFi manager * OTA updates EasyEDA link https://easyeda.com/marius.motea/power_meter Components list: * 1 x ESP-12 * 8 x SCT013 non invasive current sensors 30A * 8 x PJ-320A Phone Jack 3.5 mm * 2 x ADS1115 * 1 x HLK-PM03 3.3v mini power supply * 1 x 2 pin header * 4 x 10K smd resistors * 8 x 22ohm smd resistors * 3 x 1uF smd capacitor Acessing the ip of the device will return a json with power consumption for every input ### 0.9" OLED display The code was updated to support the popular OLED display on I2C bus. Since the update was made after the PCB development you need to solder the I2C data lines manually. The best pads for this are the bus pull up resistors R3 and R4. For the power connection you can use the pads made to flash the esp8266 controller.  ### InfluxDB Cloud The most easy way to store the readings of this device is to use a free InfluxDB cloud account. The free account will store the information for the last 30 days. SSL validation was disabled for InfluxDB servers since the CA certificate need to be manually updated about every 9 months and this require library update and firmware compilation. The following credentials need to be updated in the sketch: ``` #define INFLUXDB_URL "https://eu-central-1-1.aws.cloud2.influxdata.com" // InfluxDB v2 server or cloud API authentication token (Use: InfluxDB UI -> Data -> Tokens -> <select token>) #define INFLUXDB_TOKEN "ayIsLDXI63f8bPfVqVJyOV5xxxxxxxxxxxxxxxxxxxxxxxxxxxxxxxxbNWXJJxjA3OTHVS4YbuvHow==" // InfluxDB v2 organization id (Use: InfluxDB UI -> User -> About -> Common Ids ) #define INFLUXDB_ORG "marius.motea@example.com" // InfluxDB v2 bucket name (Use: InfluxDB UI -> Data -> Buckets) #define INFLUXDB_BUCKET "marius.motea's Bucket" ``` ### Web app with PHP/MySQL The device return an json on every http get request with the number of watts for every input (circuit). To put the data in the database you need to set a cron that run at a number of minutes (depending on requirements) and insert the values from json in the database. Credentials and device ip must be set first in config.php. On web interface access there is a SELECT in the database for the records in the last 30 days. Echarts javascript plugin is used to render the values in graphs. I upload my own setup were i use input8 for total consumption and this is displayed in a second graph. crontab example for data fetching every 5 minutes: ``` */5 * * * * php /var/www/html/powermeter/cron.php ```
