KO
|
EN
gitlite — search
Search
#python
#java
#python3
#arduino
#golang
#machine-learning
#rust
#html
#flask
#javascript
#seismology
#nodejs
rpitvheadend
★ 10
Open GitHub ↗
No description available.
Download README (.md)
Explore Similar Repositories
vagrant-electron
:
Vagrant Machine for Electron development
CurrentCenterPositionMap
:
Put a pin always in the center of a map
vimrc
:
My .vimrc
blarg
:
a humble blab.im clone
Bonfire.xDB.Peek
:
No description available.
// repository documentation
Was this content helpful?
★ 0
(0 ratings)
Select Rating:
★
★
★
★
★
Submit Feedback
Recent Feedback
×
Download README
Do you want to download the
README.md
file for
rpitvheadend
?
Download (.md)
## Raspberry PI TVHeadend Server \#raspberrypi #rotary #lcd #flask #sse #tvheadend #oscam ### Introduction: This RPI TVHeadEnd Server is a platform based on Raspberry PI hardware, which creates a headless DVB-S2 Tuner (DVBSky S960 USB Box) and streams the video to any network client. This platform supports conditional access via “oscam” server. Youtube video link [](https://youtu.be/uBy8dHAQwYI) ###Hidden Agenda - local and remote control examples You can either recreate this to have similar platform or rip out three “goodies” for your own Raspberry Pi projects. Respective two github repositories provide you: Python **Rotary Encoder Knob** class based on interrupts (to preserve processor's power and save energy). Example of **simple pygame interface** using above rotary class encoder and cheap SainSmart 1.8" TFT LCD display. All this together gives you a lean system with as little as possible components and GPIO lines to leverage your projects with powerful user control. Local control is good, remote control via mobile, tablet or computer is even better. There are plenty of projects connecting processes on RPI with mobile apps. Here you will be given a plain piece of python code to create an interactive HTML5 page you can open in any modern browser and control your RPI remotely. ## Quick links: - [Go to local user interface via LCD and rotary switch](https://github.com/petervflocke/rotaryencoder_rpi#local-user-interface-via-lcd-and-rotary-knob) - [Go to web user interface based RPI/flask Server App](https://github.com/petervflocke/flasksse_rpi#web-user-interface-for-rpi) - [Screenshots](https://github.com/petervflocke/rpitvheadend/blob/master/res/README.md#raspberry-pi-tvheadend-server-screenshots) ... or continue reading hardware and software parts: ## Steps to prepare the server platform ## 1. Hardware: #### Prepare rotary switch, Use any a 2-bit quadrature-encoded rotary encoder for example Alps EC11 Encoder. Solder resistors and capacitors directly on the switch and protect them with heat shrink tubing. Use below wiring digram. 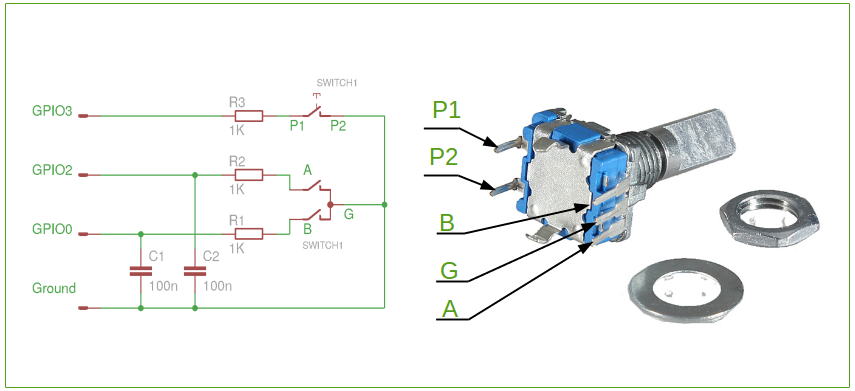 #### Prepare display: I used cheap [SainSmart 1.8″ Color TFT LCD Display](http://www.sainsmart.com/sainsmart-1-8-spi-lcd-module-with-microsd-led-backlight-for-arduino-mega-atmel-atmega.html) . This 1.8″ display has 128 x 160 pixels resolution and is capable of displaying 18-bit colors. Measure: 5 cm x 3.5 cm x 0,6 cm thick. 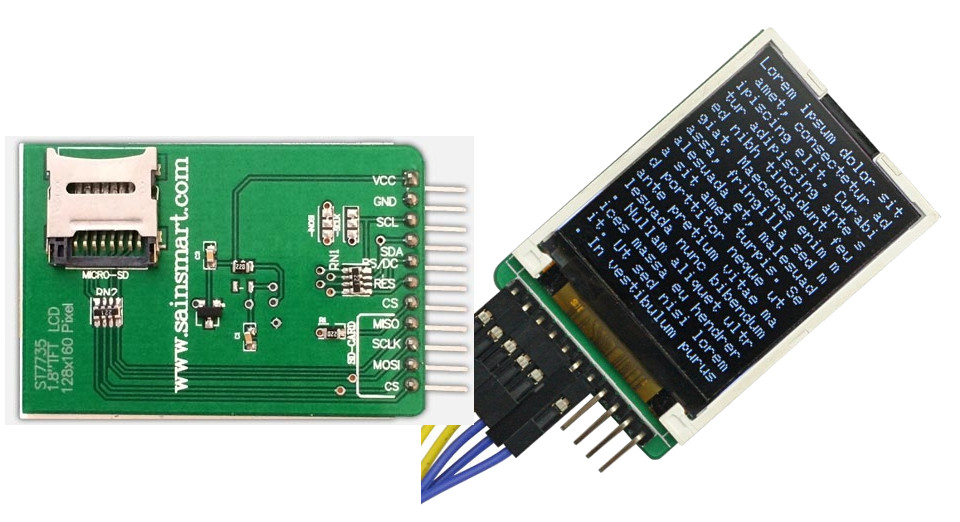 My display has fixed back-light (there are versions with PWN backlight). The Micro-SD-Card reader is left unused. The display is driven by a ST7735R controller and is well supported by new linux kernel. Refer to the software installation part. For the SainSmart 1.8″ Color TFT LCD Display connection refer to the wiring diagram: 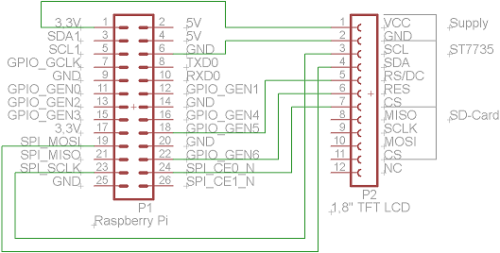 >**Note:** >When the screen is not used you can switch the VCC line off. The display will still work (powering via data lines?) with a dark screen – still testing. #### Prepare the power supply: Let's power the RPI using dedicated pads instead via micro USB. This let us avoid cables sticking out of the box and all issues with too thin USB power cables, etc. Following the RPI forum: https://www.raspberrypi.org/forums/viewtopic.php?f=28&t=137305 You can solder the +5V wire to the points marked PP1 or PP2 and ground wire to PP3, PP$, PP5 or PP6. That will be the same as if the power has been supplied through the micro USB. 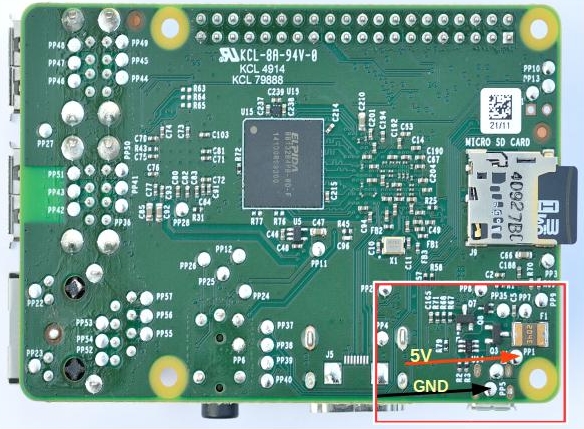 Easymouse 2 is powered via USB from RPI. Add a switch for 5V for RPI for your convenience. USB tuner requires external 12V, this will be switched on/off by a dedicated relay module, which I have laying around from “Arduino time”. The better way would be a switch based on mosfet transistor. The USB Tuner shell be switched off in case of no use/no streaming to save energy. #### Hands-on high level wiring diagram of all elements 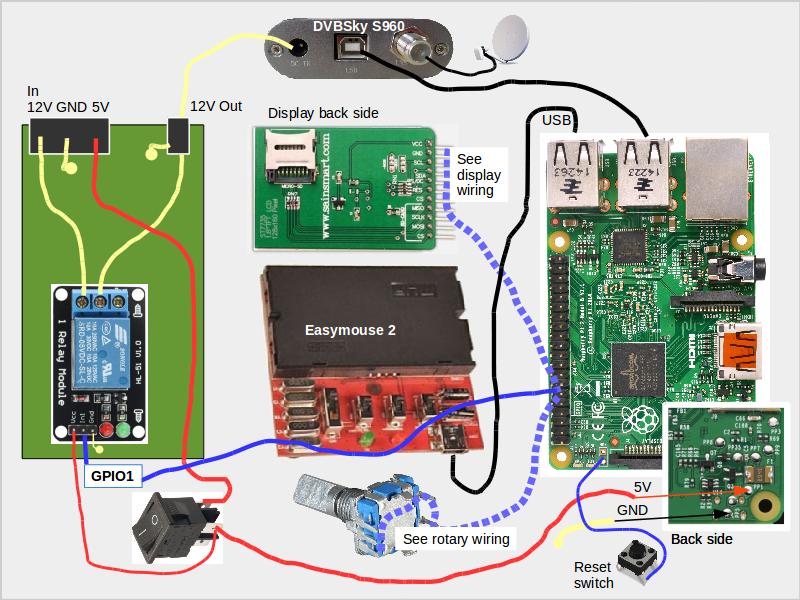 **Used GPIO for the rotary switch and the relay nodule** GPIO | Header PIN | Switch --- | :--: | --- GPIO 0 | 11 | Rotary switch pin **A** GPIO 1 | 12 | Relay input GPIO 2 | 13 | Rotary switch pin **B** GPIO 3 | 15 | Rotary push button **P1** GND | 9 | Ground for rotary switch **Used GPIO for the display** GPIO | Header PIN | Display --- | :--: | --- 3.3 VDC | 1 | VCC GND | 6 | GND GPIO 14 | 23 | SCL GPIO 12 | 19 | SDA GPIO 5 | 18 | RS/DC GPIO 6 | 22 | RES GPIO 10 | 24 | CS >**Note:** >For your reference I used as a housing an old D-Link Di-624 Wlan Router. Power socket is cut out from DVD Player board to get a nice stable 4 pin molex / amp connector. Just cut out the size you need. De-solder unwanted elements (I left some capacitors) tracked down the paths from the molex socket and solder 12V and 5V power cables. *** ## 2. Software: ### Do the standard raspian isntalation on a SD-Card Download and install on sd card raspbian (jessie), use one of the available [guides](https://www.raspberrypi.org/documentation/installation/installing-images/) Connect your RPI to your network, power-on and scan for new ip on your network to find newly booted rpi. Assuming your network segemnt is `192.168.0.0/24` you can find all ips ```sh nmap -sn 192.168.0.0/24 ssh to pi@detdected.ip ``` ... finish instaltion running `raspi-config` Enable SPI – will be needed by the display. After the first instllation always run ```sh sudo apt-get update sudo apt-get upgrade ``` Change default name of the server from raspberry to any thing you want by modifying the files `/etc/hostname` and `/etc/hosts` and run: ```sh sudo /etc/init.d/hostname.sh ``` Change dhcp to fixed ip (or do this on your router, servers should have fixed ip: in file `/etc/dhcpcd.conf`at the bottom add: ``` interface eth0 static ip_address=192.168.0.10/24 static routers=192.168.0.1 static domain_name_servers=192.168.0.1 interface wlan0 static ip_address=192.168.0.11/24 static routers=192.168.0.1 static domain_name_servers=192.168.0.1 ``` Make the network settings corresponding to your home network! [Install](https://www.raspberrypi.org/documentation/remote-access/ssh/passwordless.md) if desired a passwordless ssh (this accelerate the work) ### Customize your RPI software to use SainSmart 1.8" TFT LCD display Refer to the https://github.com/notro/fbtft/wiki#install for more details. Check the file `/boot/config.txt`if this entry is enabled (end add if neccessary) dtparam=spi=on Add to file `/etc/modules-load.d/fbtft.conf`two new lines: spi-bcm2835 fbtft_device Add to file `/etc/modprobe.d/fbtft.conf` options fbtft_device name=sainsmart18 rotate=270 Consider the rotate parameter according to your own hardware setup or think twice before you glue it. It is always good to see, on a headless device some booting or shutdown messages. As we have now a LCD head, let's enable it as a console device: To use the display as a console, add this to the end of the boot line in `/boot/cmdline.txt` fbcon=map:10 It can look like this: dwc_otg.lpm_enable=0 console=serial0,115200 console=tty1 root=/dev/mmcblk0p2 rootfstype=ext4 elevator=deadline fsck.repair=yes rootwait fbcon=map:10 Make the console font smaller sudo apt-get install kbd sudo dpkg-reconfigure console-setup Select from menu: >Encoding to use on the console: <UTF-8> >Character set to support: <Guess optimal character set> >Font for the console: Terminus (default is VGA) >Font size: 6x12 (framebuffer only) Switch off automatic console blanking, as we do not have a keyboard we won't be able to switch it on again. Change the settings in `/etc/kbd/config`: BLANK_TIME=0 and add to the `/etc/rc.local` setterm --blank 0 It shall be before the last 'exit 0` command and finally add to the file `/etc/modules` i2c-dev spi_bcm2708 fbtft fbtft_device name=sainsmart18 rotate=270 verbose=0 ### Prepare power pin for usb dvb tuner – at boot time we need “1” to enable modules loading More details here: https://www.raspberrypi.org/documentation/configuration/pin-configuration.md Extra 12V power for the USB tuner is provided via a relay. The relay is trogered by GPIO 1 (BCM GPIO 18). GPIO initialization at the boot time makes GPIO 1 low, this requires changing the default settings described in the blob file /boot/dt-blob.bin`. Get the compiler: sudo apt-get install device-tree-compiler Download the file `dt-blob.dts` for example from the above link, look at the bottom of the article or the better way is to create your own *.dts file out of your current hardware installation by calling on RPI in the local directory `~/dts`call: dtc -I dtb -O dts -o dt-blob.dts /boot/dt-blob.bin 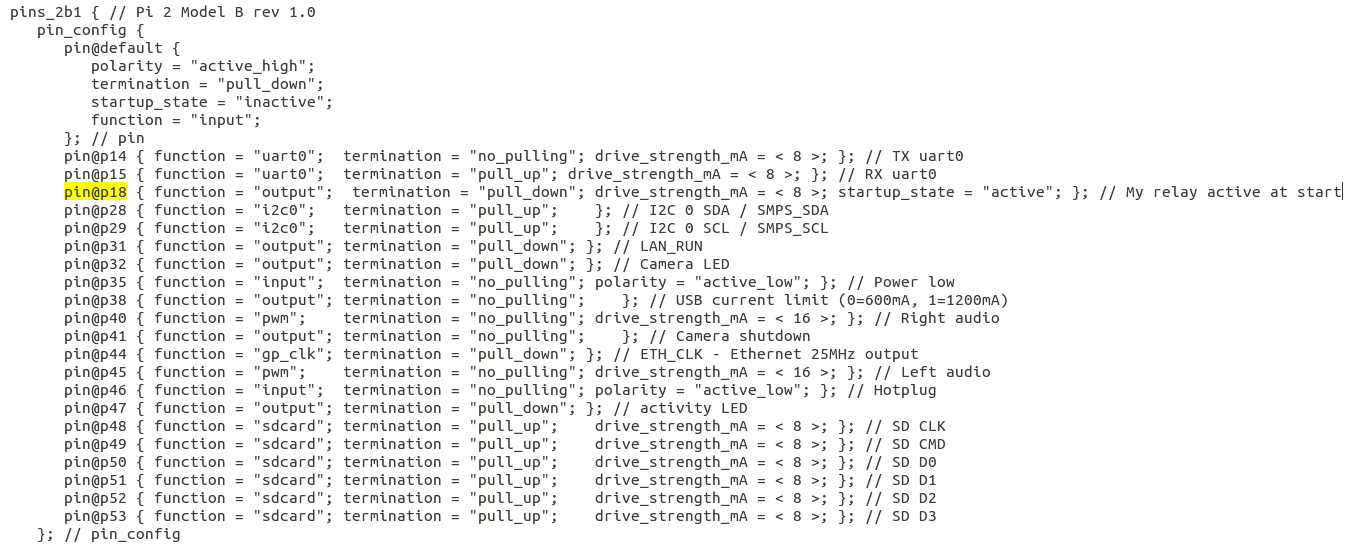 In the file `dt-blob.dts`depending on your hardware revision modify section of `pins_2b1 { // Pi 2 Model B rev 1.0` for the entry of `pin@p18 (GPIO 1) ` such as: pin@p18 { function = "output"; termination = "pull_down"; drive_strength_mA = < 8 >; startup_state = "active"; }; // My relay active at start Make sure that the `startup_state = "active"`parameter is set up. I added this also to the definition of `pins_2b2 { // Pi 2 Model B rev 1.1` Eventually compile ZZ compile the new blob file: sudo dtc -I dtb -O dts -o dt-blob.dts /boot/dt-blob.bin ### Install DVBSky S960 USB tuner Check the link https://www.linuxtv.org/wiki/index.php/DVBSKY_S960 for details. S960 is supported out of te box by RPI on Jessie, we need only to download firmware file from http://www.dvbsky.net/Support_linux.html. The [file](http://www.dvbsky.net/download/linux/dvbsky-firmware.tar.gz) Extract following files to a local folder dvb-fe-ds3103.fw dvb-demod-m88ds3103.fw dvb-demod-m88ds3103.fw and move all of them to `/lib/firmware/ ` ### Install tvheadend Compile or instal from repo – here how to with repo: https://tvheadend.org/projects/tvheadend/wiki/AptRepository sudo apt-get install apt-transport-https First install bintray's GPG key: sudo apt-key adv --keyserver hkp://keyserver.ubuntu.com:80 --recv-keys 379CE192D401AB61 echo "deb https://dl.bintray.com/tvheadend/deb jessie release" | sudo tee -a /etc/apt/sources.list >**Note** >This is for “jessie” Raspian version. In the tvheadend official repo there is only a “release” version no unstable or stable options. Install tvheadend sudo apt-get install tvheadend Disable tvheadend service at the boot time – we start it only if necessary via local menu or via web in order to save energy when not used sudo update-rc.d -f tvheadend remove Tvheadend configuration requires several steps – google for it. It aso takes time to scan all multiplexers – be patient. ### Install oscam server Download the oscam binary file from http://download.oscam.cc/index.php?direction=1&order=mod&directory=1.20_TRUNK/Raspberry Extract oscam binary file and copy it to `/usr/local/bin` and Check the permision: sudo chown root:root /usr/local/bin/oscam sudo chmod 755 /usr/local/bin/oscam Modify all necessary files according to your pay-tv provider. I'm not providing any help on this and I'd like to remind that watching pay-tv without required contract is illegal (at least in most of the countries). Eventually copy the files to `/usr/local/etc` You have to configure the oscam server, which is independent from pay-tv. For the Easymouse 2 USB Smart Card reader, which I used in my project following settings are fine: protocol = mouse device = /dev/ttyUSB0 detect = dc Jessie is ready to provide all USB libraries, just setup your Easymouse 2 USB Smart Card according to your card requirements plug and check if it is visible via lsusb. lsusb Bus 001 Device 005: ID 0403:6001 Future Technology Devices International, Ltd FT232 USB-Serial (UART) IC It apears as FT232 USB-Serial device. Next create oscam startup script in `/etc/init.d` folder using following file as an oscam startscript `oscam` available in this git repository Add this service to the default startup procedure (as this does not consume too much energy) sudo update-rc.d oscam defaults ### Install required python libraries >**Note** > Assumption you use the newest jessie raspian version. In order to run the two programs from - https://github.com/petervflocke/rotaryencoder_rpi - https://github.com/petervflocke/flasksse_rpi to controll the server platform install following libraries: - transitions, a lightweight, object-oriented finite state machine implementation in Python - psutil, library for retrieving information onrunning processes and system utilization - gevent, a coroutine -based networking library providing a high-level synchronous API on top of the libev event loop - flask, a micro web framework ```sh sudo apt-get install build-essential python-dev python-pip sudo pip install transitions sudo pip instal psutil sudo pip instal gevent sudo pip install flask ``` ### Install python software to manage services on RPI including graphic interface, rotary knob and web Create graphical menu with rotary knob: as the pi user run ```sh cd ~ git clone https://github.com/petervflocke/rotaryencoder_rpi menu chmod 755 menu/myshutdown.sh ``` Create web interface as the pi user run ```sh cd ~ git clone https://github.com/petervflocke/flasksse_rpi web chmod 755 web/myreboot.sh web/testdaemon.py ``` Start both programs after the boot, by modifying your /etc/rc.local` script ```sh sleep 3 gpio mode 1 output gpio write 1 0 python /home/pi/menu/main.py > /dev/null 2>&1& python /home/pi/web/sse.py > /dev/null 2>&1& ``` Complete [rc.local](https://github.com/petervflocke/rpitvheadend/blob/master/rc.local) file available in this repo for download >**Note** > gpio action – the tuner starts always with power on – it secures loading respective modules etc. If it is not used (no dvb streaming) it satys plug in into usb but the 12V power supply can be switched off to decrease energy consumption. It works fine with the DVB S960 USB Tuner Finaly starts two programs one for display and rotary knob and the other for web interface. I want to have both to be able quickly access system menu. Test the application by running: Local graphic interface: sudo python ~/menu/main.py Web based interface: sudo python ~/web/sse.py Or for more details: - [Go to local control via rotary and LCD](https://github.com/petervflocke/rotaryencoder_rpi) - [Go to web based RPI Server App](https://github.com/petervflocke/flasksse_rpi) Eventually restart and enjoy
