KO
|
EN
gitlite — search
Search
#python
#php
#python3
#javascript
#unity
#machine-learning
#go
#golang
#postgresql
#html
#arduino
#c
knative-pi
★ 32
Open GitHub ↗
Run Knative on Raspberry Pi in 5 minutes
Download README (.md)
Explore Similar Repositories
mlgw
:
This components integrates Bang & Olufsen Master Link Gateway and Beolink Gateway to Home Assistant, the open-source home automation platform.
panasonic_smart_app
:
Panasonic Smart App integration for Home Assistant.
bxd
:
📦 Object relational mapping for IndexedDB
react-flow-docs-v9
:
Archived documentation of React Flow version 9. Powered by Gatsby.
alugue-app
:
Interface App Alugue - Youtube Sujeito Programador
// repository documentation
Was this content helpful?
★ 0
(0 ratings)
Select Rating:
★
★
★
★
★
Submit Feedback
Recent Feedback
×
Download README
Do you want to download the
README.md
file for
knative-pi
?
Download (.md)
# Running Knative on Raspberry Pi Setup Knative on Raspberry Pi in 5 minutes ## Hardware - Get [Raspberry 4](https://www.raspberrypi.org/products/raspberry-pi-4-model-b/?resellerType=home), pick one that has 2GB or more of RAM. I would recommend getting the 8GB. - Accesories: - Micro SD Card - Raspberry Power Supply (USB-C) - Extras: - Fan, heat sinks, case ## Setup Operating System (OS) This instructions are based on [Ubuntu Post](https://ubuntu.com/tutorials/how-to-install-ubuntu-on-your-raspberry-pi#1-overview) - You will need a 64 bit OS, you can use Ubuntu or Raspberry OS. I will be using Ubuntu 20.10 64bit - Get an application to image the OS into the SD Card, you can use RaspBerry Imager or any other tool. Choose [MacOS](https://downloads.raspberrypi.org/imager/imager.dmg) or [Windows](https://downloads.raspberrypi.org/imager/imager.exe) 1. Scroll down and Select Ubuntu Server 20.10 64bit (RPi 3/4/400) (Do not select Desktop) 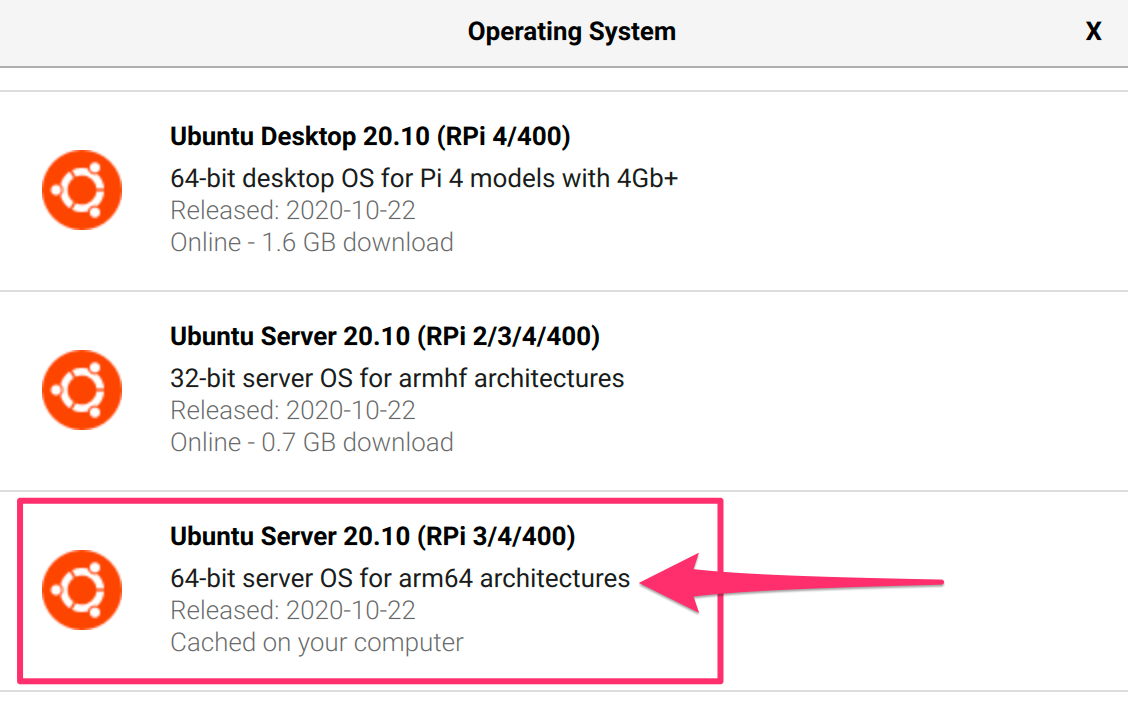 2. Select SD Card 3. WRITE 4. WAIT for ~10 minutes Configure some environment variables based on your operating system, you can use the template provided ```bash cp template.env .env ``` Enter the values based on your Operating system in to the `.env` file ``` BOOT_DRIVE=/Volumes/system-boot/ WIFI_SSID=SSID WIFI_PASSWORD=PASSWORD ``` Load the environment variables ```bash source .env ``` ### Enable cgroups for the kernel Enable cgroups for the kernel by appending to the `cmdline.txt` file - Append to the one line, do not add a new line, a backup copy `cmdline.txt.bak` is made. ```bash source .env sed -i .bak 's/$/ cgroup_memory=1 cgroup_enable=memory/' ${BOOT_DRIVE}/cmdline.txt cat ${BOOT_DRIVE}/cmdline.txt ``` ### Configure Network After the SD Card is imaged, remove the card and re-insert. The boot filesystem should be visible from example on MacOS under `/Volumes/system-boot/` Create a file `network-config` with the wifi info, replace the values for SSID and PASSWORD below ```bash source .env cp ${BOOT_DRIVE}/network-config ${BOOT_DRIVE}/network-config.bak cat <<EOF >${BOOT_DRIVE}/network-config version: 2 ethernets: eth0: match: driver: bcmgenet smsc95xx lan78xx set-name: eth0 dhcp4: true optional: true wifis: wlan0: dhcp4: true optional: true access-points: ${WIFI_SSID}: password: "${WIFI_PASSWORD}" EOF ``` ### Boot up Umount/Eject SD Card from your computer, insert into raspberry pi and power on the raspberry pi. You can discover the IP via your router, or plug a monitor and keyboard and use the command `ip a` to get the ip address. You can also use a network scan ```sh nmap -sn 192.168.7.0/24 ``` This would be something like `192.168.x.x` in my case is `192.168.7.101` Update the file `.env` ``` IP=192.168.7.101 echo IP=$IP >>.env ``` ### Setup ssh Login and change the default password `ubuntu` to something different ```bash source .env ssh ubuntu@$IP ``` Check if you have a local ssh, if not then create a new one with `ssh-keygen` ```bash ls ~/.ssh/id_rsa* ``` If you have more than one ssh key you can use `-i` to be sure it picks the correct one. ```bash source .env ssh-copy-id -i $HOME/.ssh/id_rsa ubuntu@$IP ``` Now you can ssh into the pi without a password ```bash source .env ssh ubuntu@$IP uname -m ``` It should print `aarch64` to indicate arm64 I recommend to change the hostname of the pi from the default `ubuntu` before you install kubernetes to something useful like `pi4` ```bash source .env NEW_HOSTNAME=pi4 ssh ubuntu@$IP "sudo hostnamectl set-hostname ${NEW_HOSTNAME}; sudo sed -i.bak s/localhost/${NEW_HOSTNAME}/g /etc/hosts" ``` ## Install Kubernetes - Install the [k3sup](https://github.com/alexellis/k3sup#download-k3sup-tldr) command line tool, check that you have latest version I'm using `0.9.7` ```bash k3sup version ``` - Run the following command to install k3s on the pi as a master node. ```bash source .env k3sup install \ --ip $IP \ --user ubuntu \ --merge \ --local-path $HOME/.kube/config \ --context knative-pi \ --k3s-channel latest \ --k3s-extra-args '--disable=traefik' ``` - The `--ip` specifies the IP Address to ssh in to the pi - The `--user` specifies the user to ssh as - The `--merge` specified to merge the kubeconfig of the new cluster into an existing kubeconfig file - The `--local-path` specifies which file to write the kubeconfig file, in our case specify an existing one to merge in the new config - The `--context` specifies the context for the cluster when you use `kubectl` or `kn` - The `--k3s-channel` specifies which version of kubernetes to install - The `--k3s-extra-args` with `--disable=traefik` is to avoid the installation of `traefik` as we are going to use `knative` networking - If you ever need to recover the kubeconfig from the cluster you can use the flag `--skip-install1` ```bash source .env k3sup install \ --ip $IP \ --user ubuntu \ --merge \ --local-path $HOME/.kube/config \ --context knative-pi \ --skip-install ``` ## Add worker nodes - To add worker nodes use the `join` command, `$AGENT_IP` is the ip of the next raspberry ip, and `$IP` is the IP of the first pi acting as master node. - Update `.env` file with AGENT_IP ```bash AGENT_IP=192.168.7.103 echo AGENT_IP=$AGENT_IP >>.env ``` ```bash source .env k3sup join \ --ip $AGENT_IP \ --server-ip $IP \ --user ubuntu \ --k3s-channel latest ``` - You con set a role for the worker node: ```bash NODE=pi-worker kubectl label node ${NODE} node-role.kubernetes.io/worker=true ``` ## Verify Kubernetes installed 1. switch your context using [kubectx](https://github.com/ahmetb/kubectx) ```bash kubectx knative-pi ``` 1. List the nodes ```bash kubectl get nodes -o wide ``` 3. The output should look like this ``` NAME STATUS ROLES AGE VERSION INTERNAL-IP EXTERNAL-IP OS-IMAGE KERNEL-VERSION CONTAINER-RUNTIME ubuntu Ready master 54m v1.19.3+k3s2 192.168.7.218 <none> Ubuntu 20.10 5.8.0-1006-raspi containerd://1.4.0-k3s1 ``` ## Install Knative Serving TLDR; `./01-knative-serving.sh` I will be using the pre-release build and [install instructions](https://knative.dev/development/install/any-kubernetes-cluster/) 1. Install Knative Serving ```bash kubectl apply -f https://storage.googleapis.com/knative-nightly/serving/latest/serving-crds.yaml kubectl wait --for=condition=Established --all crd kubectl apply -f https://storage.googleapis.com/knative-nightly/serving/latest/serving-core.yaml kubectl wait pod --timeout=-1s --for=condition=Ready -n knative-serving -l '!job-name' ``` 1. Install Contour `1.10` that uses arm enable envoy with `1.16` ```bash kubectl apply -f https://storage.googleapis.com/knative-nightly/net-contour/latest/contour.yaml kubectl wait --for=condition=Established --all crd kubectl wait pod --timeout=-1s --for=condition=Ready -n contour-external -l '!job-name' kubectl wait pod --timeout=-1s --for=condition=Ready -n contour-internal -l '!job-name' ``` 1. Install the Knative Network Controller: ```bash kubectl apply --filename https://storage.googleapis.com/knative-nightly/net-contour/latest/net-contour.yaml kubectl wait pod --timeout=-1s --for=condition=Ready -n knative-serving -l '!job-name' ``` 1. To configure Knative Serving to use previous installed Network Controller by default: ```bash kubectl patch configmap/config-network \ --namespace knative-serving \ --type merge \ --patch '{"data":{"ingress.class":"contour.ingress.networking.knative.dev"}}' ``` 1. Set the environment variable `EXTERNAL_IP` to External IP Address of the Worker Node ```bash EXTERNAL_IP="$(kubectl get svc envoy -n contour-external -o=jsonpath='{.status.loadBalancer.ingress[0].ip}')" echo EXTERNAL_IP==$EXTERNAL_IP ``` 1. Set the environment variable `KNATIVE_DOMAIN` as the DNS domain using `nip.io` ```bash KNATIVE_DOMAIN="$EXTERNAL_IP.nip.io" echo KNATIVE_DOMAIN=$KNATIVE_DOMAIN ``` Double check DNS is resolving ```bash dig $KNATIVE_DOMAIN ``` 1. Configure DNS for Knative Serving ```bash kubectl patch configmap -n knative-serving config-domain -p "{\"data\": {\"$KNATIVE_DOMAIN\": \"\"}}" ``` 1. Verify that Knative is Installed properly all pods should be in `Running` state and `contour-external` service configured. ```bash kubectl get pods -n knative-serving kubectl get pods,svc -n contour-external ``` ## Deploy Knative Application Deploy using Knative CLI [kn](https://github.com/knative/client): ```bash kn service create hello --port 8080 --image csantanapr/helloworld-go:latest ``` **Optional:** Deploy a Knative Service using a yaml manifest: ```bash cat <<EOF | kubectl apply -f - apiVersion: serving.knative.dev/v1 kind: Service metadata: name: hello spec: template: spec: containers: - image: csantanapr/helloworld-go:latest ports: - containerPort: 8080 env: - name: TARGET value: "Knative" EOF ``` Wait for Knative Service to be Ready ```bash kubectl wait ksvc hello --all --timeout=-1s --for=condition=Ready ``` Get the URL of the new Service ```bash SERVICE_URL=$(kubectl get ksvc hello -o jsonpath='{.status.url}') echo $SERVICE_URL ``` Test the App ```bash curl $SERVICE_URL ``` Output should be: ``` Hello World from Golang! ``` Check the knative pods that scaled from zero ``` kubectl get pod -l serving.knative.dev/service=hello ``` Output should be: ``` NAME READY STATUS RESTARTS AGE hello-00001-deployment-68bb96f946-wfzxc 2/2 Running 0 93s ``` Try the service `url` on your browser (command works on linux and macos) ```bash open $SERVICE_URL ``` You can watch the pods and see how they scale down to zero after http traffic stops to the url ``` kubectl get pod -l serving.knative.dev/service=hello -w ``` Output should look like this: ``` NAME READY STATUS hello-00001-deployment-68bb96f946-wfzxc 2/2 Running hello-00001-deployment-68bb96f946-wfzxc 2/2 Terminating hello-00001-deployment-68bb96f946-wfzxc 1/2 Terminating hello-00001-deployment-68bb96f946-wfzxc 0/2 Terminating ``` Try to access the url again, and you will see a new pod running again. ``` NAME READY STATUS hello-r4vz7-deployment-c5d4b88f7-rr8cd 0/2 Pending hello-r4vz7-deployment-c5d4b88f7-rr8cd 0/2 ContainerCreating hello-r4vz7-deployment-c5d4b88f7-rr8cd 1/2 Running hello-r4vz7-deployment-c5d4b88f7-rr8cd 2/2 Running ``` Some people call this **Serverless** 🎉 🌮 🔥 If you want to see how much CPU and Memory all the pods are consuming use `kubectl top` ``` kubectl top pods -A --sort-by=cpu NAMESPACE NAME CPU(cores) MEMORY(bytes) knative-serving webhook-c76796d6f-4rh2n 52m 13Mi knative-serving controller-7f6d88c75b-bmm5v 29m 24Mi knative-serving autoscaler-b57c65d47-w8rs6 21m 16Mi contour-external envoy-rqbd4 14m 25Mi kube-system coredns-66c464876b-nttx5 12m 8Mi contour-internal envoy-kvk8d 12m 25Mi knative-serving contour-ingress-controller-5fdd4b6f94-hrqth 8m 14Mi kube-system metrics-server-7b4f8b595-6zbrf 6m 13Mi contour-internal contour-6b84898d48-rtw9j 5m 19Mi knative-serving activator-5ff578d869-nxm4b 5m 17Mi contour-external contour-5fd57c546b-2lgsl 4m 19Mi kube-system local-path-provisioner-7ff9579c6-tph2s 4m 7Mi contour-external contour-5fd57c546b-qlxbm 3m 29Mi contour-internal contour-6b84898d48-r77lj 2m 16Mi contour-external svclb-envoy-wqwxm 0m 3Mi default hello-00001-deployment-6d8674c767-2zx86 0m 2Mi ``` And this is what htop shows  ## Build your containers with multi architectures I have two sample applications in `apps/` one for `go` and one for `nodejs` #### Build arm64 container image for go 1. Install `ko` version `v0.6.0`+ from https://github.com/google/ko 1. Setup your docker registry info, replace the value of `DOCKER_HUB_USER` ```bash export DOCKER_HUB_USER=csantanapr export KO_DOCKER_REPO="docker.io/${DOCKER_HUB_USER}" ``` 1. change directory to the root of the go app ```bash cd apps/helloworld-go ``` 1. Publish container image for all architecture types including `arm64` ```bash ko publish --platform=all -B . ``` 1. Deploy as Knative service ```bash kn service create helloworld-go --image ${KO_DOCKER_REPO}/helloworld-go ``` 1. Run the app ```bash curl $(kn service describe helloworld-go -o url) ``` ### Build arm64 container image for nodejs 1. Install Docker-Desktop with experimental enable follow instructions here https://www.docker.com/blog/multi-arch-images/ 1. Create a new builder if you don't have one already ```bash docker buildx create --name mybuilder ``` 1. Configure your docker registry ```bash export DOCKER_HUB_USER=csantanapr ``` 1. change directory to the root of the go app ```bash cd apps/helloworld-nodejs ``` 1. Build and Push the image ```bash docker buildx build \ -t ${DOCKER_HUB_USER}/helloworld-nodejs:latest \ --platform linux/amd64,linux/arm64 \ --push . ``` 1. Deploy as Knative service ```bash kn service create helloworld-nodejs --image docker.io/${DOCKER_HUB_USER}/helloworld-nodejs ``` 1. Run the app ```bash curl $(kn service describe helloworld-nodejs -o url) ``` ### Delete Cluster Uninstall kubernetes ``` ssh ubuntu@$IP sudo /usr/local/bin/k3s-uninstall.sh ``` If you have any issues with this instructions [open an new issue](https://github.com/csantanapr/knative-pi/issues/new) please 🙏🏻 ## Related Posts - https://blog.alexellis.io/test-drive-k3s-on-raspberry-pi/ - https://blog.alexellis.io/raspberry-pi-homelab-with-k3sup/ - https://itsmurugappan.medium.com/knative-on-raspberry-pi-1106984de5b8
