KO
|
EN
gitlite — search
Search
#typescript
#ai-agents
#ai
#dsh-plugin
#deepseek-harness
#open-source
#cli
#claude-code
#codex
#developer-tools
#react
#windows
robertalab-ev3dev
★ 18
Open GitHub ↗
roberta lab connector for ev3dev
Download README (.md)
Explore Similar Repositories
brickstrap
:
Tool for bootstrapping Debian and creating bootable image files for embedded systems
vscode-hello-python
:
Hello World for ev3dev + Visual Studio Code + Python
pyev3
:
A thin python wrapper library for ev3dev following the official API specification
template-project-gradle
:
A ready to use ev3dev-lang-java project to help users with the task to begin a new project with Gradle from Scratch
ev3dev_ruby
:
No description available.
// repository documentation
Was this content helpful?
★ 0
(0 ratings)
Select Rating:
★
★
★
★
★
Submit Feedback
Recent Feedback
×
Download README
Do you want to download the
README.md
file for
robertalab-ev3dev
?
Download (.md)
# intro # A connector to use a LEGO Mindstorms EV3 running the ev3dev firmware (http://www.ev3dev.org) from the Open Roberta lab (http://lab.open-roberta.org). This is now included by default with ev3dev images (Thanks @dlech). Step-by-step instruction to help you get ev3dev up and running can be found here (https://www.ev3dev.org/docs/getting-started/). Important note for Step 1 of the manual: You have to download the ev3dev operating system for your EV3 robot via the following link: [ev3dev - Github releases](https://github.com/ev3dev/ev3dev/releases/tag/ev3dev-jessie-2017-09-14). Select there the file ev3dev-jessie-ev3-generic-2017-09-14.zip. As soon as everything is installed, the connector is not enabled by default (to save memory), so you do have to enable it once: 1. Connect to the LEGO brick using SSH: (Read this for the [default password](http://www.ev3dev.org/docs/tutorials/connecting-to-ev3dev-with-ssh/)) ```bash ssh robot@ev3dev.local ``` 2. On the brick run: ```bash sudo systemctl unmask openrobertalab sudo systemctl start openrobertalab ``` After running the commands above, it will start automatically after a reboot. You can turn it back off by running: ```bash sudo systemctl stop openrobertalab.service sudo systemctl mask openrobertalab.service ``` If the ``openrobertalab`` package is installed and the service is running, the ``Open Roberta Lab`` menu item in brickman will allow you to connect to an Open Roberta server. This is how the menu will look like: 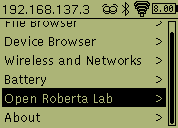. Once you selected the ``Open Roberta Lab`` menu item you'll get to this screen: 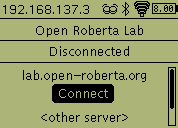. This offers to connect to the public server as the first item, or to a custom server as a 2nd item. The 2nd choice is mostly for developers or for using a local server. When clicking connect, the screen will show a pairing code: 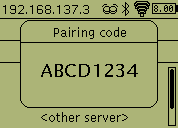. This code will have to be entered on the web-ui to establish the link. Once that has been done a beep-sequence on the EV3 confirms the link and this screen is shown: 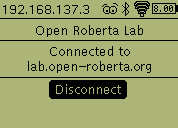. When a program contains an infinite loop, it can be ``killed`` by pressing the ``enter`` and ``down`` buttons on the ev3 simultaneously. If this is not enough to terminate the program, holding the ``back`` button for one second will kill it, but together with it the connector. The connector will restart automatically, but one needs to reconnect to the Open Roberta server again. # build status # [](https://travis-ci.org/OpenRoberta/robertalab-ev3dev/builds) [](https://codecov.io/gh/OpenRoberta/robertalab-ev3dev) # development # The package consist of two parts: 1. [roberta/lab.py](https://github.com/OpenRoberta/robertalab-ev3dev/blob/develop/roberta/lab.py): the connector to the open roberta lab * this is started as a systemd service at startup * it provides a dbus interface * the [brickman ui](https://github.com/ev3dev/brickman) uses dbus for the `Open Roberta` menu 2. [roberta/ev3.py](https://github.com/OpenRoberta/robertalab-ev3dev/blob/develop/roberta/ev3.py): a hardware abstraction library * provides the implementation for the NEPO blocks in the program The connector talks with two main components, the server and the local brickman UI: 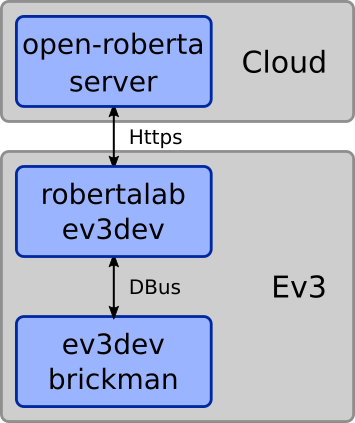. ## prerequisites ## python3-ev3dev python3-bluez python3-dbus python3-gi ## dist ## VERSION="1.3.2" python setup.py sdist Resulting file is under ./dist/openrobertalab-${VERSION}.tar.gz Now you can also build a debian package using ``debuild`` or ``debuild -us -us``. The new package will be in the parent folder. To build a release for the openroberta server run rm roberta/*~ zip -r roberta.zip roberta -x roberta/test*.py -x *__pycache__* ## upload to ev3 ## The easiest is to upload the debian package and install it. scp ../openrobertalab_1.3.2-1_all.deb maker@ev3dev.local: ssh -t maker@ev3dev.local "sudo dpkg --install openrobertalab_1.3.2-1_all.deb;" Alternatively after changing single files you can do: scp roberta/ev3.py robot@ev3dev.local: ssh -t robot@ev3dev.local "sudo mv ev3.py /usr/lib/python3/dist-packages/roberta/; sudo systemctl restart openrobertalab" Finally you can also upload through a local open roberta server (assuming your git checkout of the openroberta-lab is at the same parent dir): mkdir -p ../openroberta-lab/RobotEV3/updateResources/ cp roberta.zip ../openroberta-lab/RobotEV3/updateResources/ev3dev/ ## configuration ## The brickman ui will store configuration data under /etc/openroberta.conf. All configuration can be edited from the UI. If there is a need to manually change the configuration, it is advised to stop brickman. ## Testing ## ``python3 -m unittest discover roberta`` or ``nosetests``. The test require ``python3-httpretty``, but run without ``python3-ev3dev``. ## Logging ## The service writes status to the system journal. sudo journalctl -f -b0 -u openrobertalab
