KO
|
EN
gitlite — search
Search
#python
#go
#golang
#javascript
#api
#react
#docker
#typescript
#reactjs
#css
#java
#html
haxo-rs
★ 50
Open GitHub ↗
Software for the haxophone
Download README (.md)
Explore Similar Repositories
Security
:
Chapter 1 of the AWS Cookbook
zeebe-process-test
:
Testing project for Camunda Platform 8
crowdsec-docs
:
CrowdSec Documentation: Comprehensive guides, tutorials, and references for installing, configuring, and using CrowdSec, an open-source cybersecurity platform. Contributions welcome!
easymod
:
Modding for the modern age.
compose-photo-integration
:
Building a Simple Photo App with Jetpack Compose, CameraX, and Kotlin coroutines
// repository documentation
Was this content helpful?
★ 0
(0 ratings)
Select Rating:
★
★
★
★
★
Submit Feedback
Recent Feedback
×
Download README
Do you want to download the
README.md
file for
haxo-rs
?
Download (.md)
 ## Table of Contents <!-- toc --> - [What is haxo-rs?](#what-is-haxo-rs) - [Required System Configuration](#required-system-configuration) * [Hardware](#hardware) * [Overlay Filesystem](#overlay-filesystem) * [I2C](#i2c) * [Sound Card](#sound-card) - [Software Development Setup](#software-development-setup) * [Package dependencies](#package-dependencies) - [Running the code](#running-the-code) * [Logging](#logging) - [Testing](#testing) - [Running on boot](#running-on-boot) <!-- tocstop --> ## What is haxo-rs? haxo-rs is a the application that runs on a [haxophone](https://github.com/jcard0na/haxo-hw/) to convert key presses into music. The application is written in [Rust](https://www.rust-lang.org/). It compiles and runs on a Raspberry Pi. ## Required System Configuration ### Hardware The Raspberry Pi needs to have a Haxophone HAT attached to it. ### Overlay Filesystem For reliability, we recommend keeping the root file system as read-only on the SD card, and keep your software development limited to separate (writable) USB drive. This can be configured via `raspi-config`. ### I2C You need to enable I2C on your Raspberry Pi. The recommended and easiest way to do that with with `raspi-config`. ### Sound Card To use the audio codec on the Haxo HAT, you need to load the `max98357a` driver. You can do that by editing `/boot/firmware/config.txt` as shown below ``` # Enable audio (loads snd_bcm2835) # dtparam=audio=on dtoverlay=max98357a ``` ## Software Development Setup Software is developed on a headless (i.e. no display) Raspberry Pi. The development host runs VSCode and connects to the headless Pi over ssh. The diagram below shows the development setup we use on the Pi Zero. On the RP3 or 4 the setup is simpler as it has built-in USB and Ethernet. 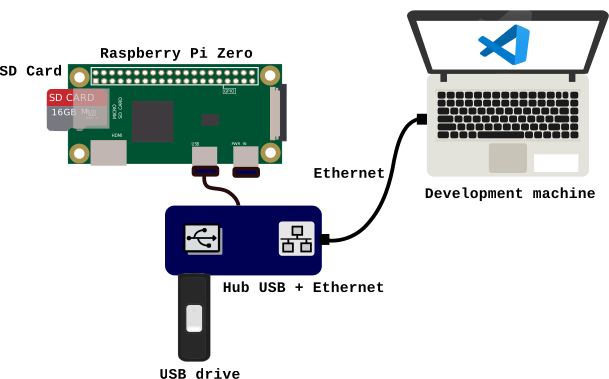 An alternative setup could be to go full native on the Raspberry Pi, running your IDE there. ### Package dependencies You will need to install fluidsynth and its development libraries ``` apt install libfluidsynth-dev fluidsynth ``` ## Running the code You can compile and run haxo-rs with `cargo`. ``` cd haxo-rs cargo run ``` ### Logging The application uses [`env_logger`](https://docs.rs/env_logger/0.9.0/env_logger/) to produce logs. You can enable debug logs as by setting the `RUST_LOG` environment variable, for instance: ``` RUST_LOG=debug cargo run ``` ## Testing You can run unit tests with `cargo test -- --test-threads=1`. The tests cannot run in parallel as they will collide accessing hardware resources (GPIO, I2C bus, etc.). The option `--test-threads=1` disables parallel execution of tests and forces them to run sequentially. ``` running 8 tests test keyscan::tests::all_keys ... ignored test keyscan::tests::init ... ok test keyscan::tests::read ... ok test notemap::tests::update ... ok test pressure::tests::init ... ok test pressure::tests::pressure_step ... ignored test pressure::tests::read ... ok test pressure::tests::read_io ... ignored test result: ok. 5 passed; 0 failed; 3 ignored; 0 measured; 0 filtered out; finished in 0.02s ``` Note that there are some ignored tests as well. These are disabled by default because they require user input to pass. But they are useful to test hardware (e.g. stuck keys, dead pressure sensor, etc.). To run, enable standard output as: ``` pi@raspberrypi-one:/media/usb/haxo-rs $ cargo test all_keys -- --nocapture --ignored Finished test [unoptimized + debuginfo] target(s) in 0.16s Running unittests (target/debug/deps/haxo001-c08e384db0cbfdd8) running 1 test Press all the keys at least once, in any order... 01/22: detected_keys: 400 keys: 400 01/22: detected_keys: 0 keys: 400 (...) 21/22: detected_keys: 0 keys: 27773777 22/22: detected_keys: 8 keys: 2777377f test keyscan::tests::all_keys ... ok test result: ok. 1 passed; 0 failed; 0 ignored; 0 measured; 6 filtered out; finished in 11.45s ``` ## Running on boot If you followed the advice to keep the sd card read-only, you will need to make it writable before making the changes below. Now copy the haxo binary somewhere in your sd card and invoke it from `/etc/rc.local`. ``` cp /media/usb/haxo-rs/target/debug/haxo001 /usr/local/bin echo /usr/local/bin/haxo001 >> /etc/rc.local ``` Now you can write-protect the SD card again.
